Table of Contents
Advertisement
Quick Links
User Manual
VISO15 –MSF (UK)
1. Features
‐
Easy to Read and Understand Time display
‐ Perpetual Calendar Up to Year 2099
‐ Days of the week & Month in 14 different languages
2. Unit Appearance
1 2 3
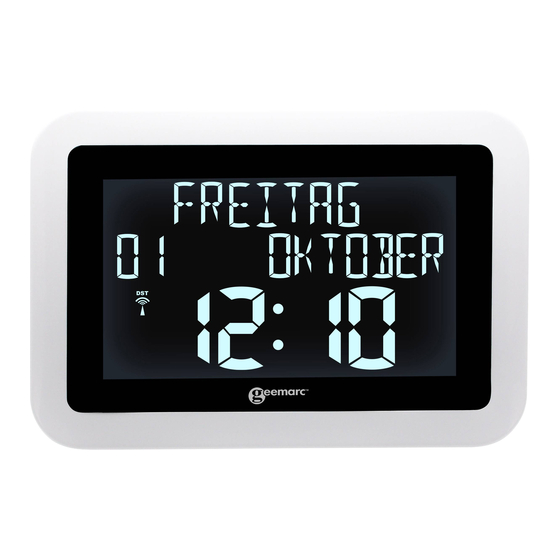
Part A‐LCD
A1: Day of the Week
A2: Radio Control Icon
A3: Time
A4: Period of the day
Part B‐Button
B1: "SET/
"Button
Day
+
B2: "▲"Button
Period of
B3: "▼"Button
the day
+
B4: Power adaptor
Time
3. Getting started:
Plug the power adaptor into the wall socket and into
the back of your clock in (B4)
Open the battery compartment (C3).
Insert 3 x AA size alkaline batteries observing polarity
["+" and "– "marks]. You should here a "click" sound, it
Day
indicates that you have placed the batteries correctly.
+
Replace the battery compartment cover.
Date
The batteries are only used in case of power failure.
+
Time
You can select the level of brightness of the backlight by
placing your hand on the backlight sensor (C1). There are
four levels (High, middle, low and OFF).
In NIGHT mode, the brightness is set on LOW and the
HI position can't be selected.
4. Setting
4.1 Automatic clock setting
Day
+
Date
+
Year
A5: AM/PM
A6: Date
A7: Month
A8: Year
Part C‐Structure
C1: backlight sensor
C2: Hanging Hole
C3: Battery Compartment
C4: Stand
When you connect your power adaptor or the Alkaline
batteries, your clock asks you to select your language.
You have the choice between the following 14 languages:
English, Français, Deutsch, Nederlands, Italiano, Espanol,
Portugues, Swenska, Norsk, Dansk, Suomi, Polski, Ceska
and Magyar.
Press the "▼" (B3) or "▲" (B2) button to choose your
language and then press the SET (B1) button
Press the "▼" (B3) or "▲" (B2) button to choose your
type of display and then press the SET (B1) button to
exit.
You can choose between four types of display (see pictures)
a) DP1: Day + Period of the day + Time
b) DP2: Day + Date + Time
c) DP3: Day + Date + Year
d) DP4: In this mode, you can select both (DP1, DP2 or
DP3) mode, the clock will then switch between the third.
By default, the switch will happen every 5 seconds but
you have the possibility to increase the time period
between two switches (up to 60 seconds).
After having set the language and the type of display,
the clock automatically starts to scan for the MSF time
signal. The Radio Control Icon "
appear on the screen.
Indicates that the clock is now
(A2) flashes
receiving the MSF signal
Indicates the signal has
(A2) stays on
successfully been received
Indicates the reception of the
(A2) disappears
signal has failed
The clock automatically synchronizes with the MSF radio
signal every day at 3.00 am to maintain accurate time
keeping. If synchronization with the MSF radio signal
fails, the "
" icon will disappear from the screen. The
clock will then reattempt to synchronize with the MSF
radio signal at 4.00 and 5.00 am.
You can make the clock scan for the radio signal by holding
the "▼" button (B3) for 3 seconds. Each attempts at
getting the signal takes several minutes. If the reception
fails, the scanning stops momentarily (the "
disappears) and then starts again on the next clock hour.
E.g. if reception failed at 8:20a.m. the clock will scan
again for the signal at 9:00a.m.
To stop the scanning for the MSF radio signal, hold
the "▼" button (B3) for 3 seconds.
" (A2) will then
" icon
Advertisement
Table of Contents

Related Manuals for Geemarc Viso 15


Summary of Contents for Geemarc Viso 15
- Page 1 4. Setting 4.1 Automatic clock setting Day When you connect your power adaptor or the Alkaline + batteries, your clock asks you to select your language. Date You have the choice between the following 14 languages: + English, Français, Deutsch, Nederlands, Italiano, Espanol, Year Portugues, Swenska, Norsk, Dansk, Suomi, Polski, Ceska and Magyar. Press the “▼” (B3) or “▲” (B2) button to choose your language and then press the SET (B1) button Press the “▼” (B3) or “▲” (B2) button to choose your type of display and then press the SET (B1) button to exit. You can choose between four types of display (see pictures) a) DP1: Day + Period of the day + Time b) DP2: Day + Date + Time c) DP3: Day + Date + Year User Manual d) DP4: In this mode, you can select both (DP1, DP2 or DP3) mode, the clock will then switch between the third. VISO15 –MSF (UK) ...
- Page 2 4.2 Manual clock Setting: 7. Guarantee (B3) or “▲” (B2) button to select the correct language 4.2.1: Setting of the period of the day From the moment your Geemarc product is purchased, then press the SET (B1) button to save. Note: Geemarc guarantee it for the period of two years. During Note: You have the choice between the following 14 languages: this time, all repairs or replacements (at our option) are ‐ All Setting modes will automatically exit after 15 seconds English, Français, Deutsch, Nederlands, Italiano, Espanol, if no adjustment is made. free of charge. Should you experience a problem then contact Portugues, Swenska, Norsk, Dansk, Suomi, Polski, Ceska our helpline or visit our website at www.geemarc.com. ...
Need help?
Do you have a question about the Viso 15 and is the answer not in the manual?
Questions and answers