Table of Contents
Advertisement
Advertisement
Table of Contents

Related Manuals for Nustep T6


Summary of Contents for Nustep T6
- Page 1 ® NuStep Recumbent Cross Trainer u ser m an u al...
-
Page 3: Table Of Contents
Contents Introduction ..................4 Safety Instructions ................5-6 Installation and Placement ..............7 AC Adapter Use ................... 8 T6 Feature Overview ................9 T6 StrideLock ................... 10 ® Making Adjustments ..............11-13 Correct Riding Position ..............13 Display Screens................14-15 Pause Function.................. -
Page 4: Introduction
As a customer-focused company, NuStep turned to our customers, including healthcare professionals, fitness experts and home users, for insight on what features to include in the product. The T6 is the end-result of this valuable feedback. -
Page 5: Safety Instructions
Safety Instructions CAUTION WARNING This is the safety alert CAUTION indicates a WARNING indicates a symbol. It is used to call potentially hazardous potentially hazardous attention to instructions situation, which if not situation, which, if not concerning personal avoided, may result avoided, could result in safety. - Page 6 Do not lift this product by yourself. Use this product only as directed The T6 is very heavy; it weighs 298 by your physician if you have any lbs (135 kg). type of heart disease, hypertension,...
-
Page 7: Installation And Placement
Unpacking and installation procedures for T6 To ensure safe and effective operation of shipments are documented in the applicable your NuStep, place on a flat, stable surface. T6 delivery installation guideline documents. Adjust rear leveler feet as required. The installation guideline documents are The minimum amount of required free space shipped with the products. -
Page 8: Ac Adapter Use
AC Adapter Use The T6 is powered by an AC adapter which is included with the equipment. The AC adapter may be plugged into either the front or the rear jack.* Plug the adapter into an appropriate power outlet. Route the AC adapter power cable in a manner that prevents tripping hazards and prevents damage to the adapter. -
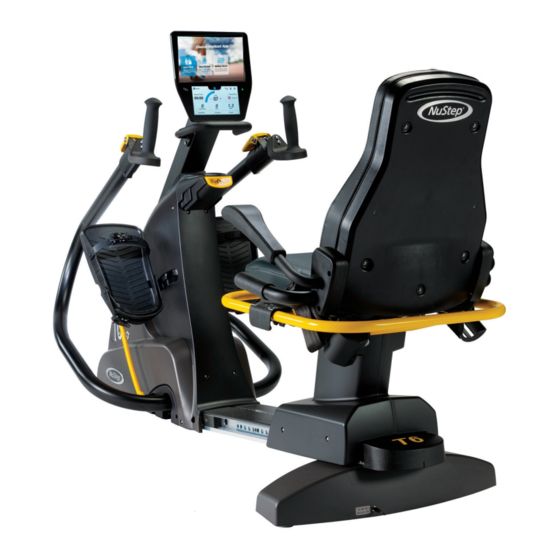
Page 9: T6 Feature Overview
T6 Feature Overview Display Console Seat Swivel Arm Adjustment Release Lever Release Lever Leveler Feet Seat Recline Release Lever Seat Adjustment Release Lever Dual-screen Display Console Grab Ring* Media Shelf *The grab ring is an optional add-on StrideLock ®... -
Page 10: T6 Stridelock
® The StrideLock feature allows users to lock the arm handles and foot pedals on the T6. When StrideLock is engaged, the handles and pedals do not move. This stabilizes the product and makes it easier for the user to: •... -
Page 11: Making Adjustments
Making Adjustments Adjust Seat Distance 1. Lift the front yellow lever to unlock. 2. Using feet, slide seat forward or backward to adjust distance. 3. Check that knee has a slight bend when leg is nearly fully extended. 4. Release lever to lock seat in place. Lift front lever to adjust seat distance. - Page 12 Making Adjustments Adjust Handle Length 1. Pull up on the yellow arm adjustment release lever to unlock arm handles. 2. Slide handle in or out to adjust length. 3. Adjust handles until elbow is slightly bent when arm is almost fully extended (for many people this may be the same number as their seat position).
-
Page 13: Correct Riding Position
Elbow has slight bend when After adjusting the arm handles and seat arm is nearly fully extended. position on the T6, there should be a slight bend in your knees and elbows at nearly full extension when exercising on your T6. -
Page 14: Display Screens
The T6 has a Home screen and Metric screen with touchscreen navigation: Home screen: Displays workout apps Quick Start, Pace Partner and NuStep Charts. Tap app icon to launch. Metric screen: Displays all workout metrics including time, speed (steps per minute), total distance, watts, calories, METs, resistance level and heartrate. - Page 15 Performance Chart Displays performance metrics - Pace (SPM), Watts, Load or METs over time. To toggle between charts, tap on desired metric tab. Metric screen Tap to open User Settings Tap to reset workout Tap to return to Tap to open or to apply changes Home screen Seat...
-
Page 16: Pause Function
The T6 has a 3-minute console shutdown. If a user stops stepping and does not resume stepping within three minutes, the console will reset. Before the console shuts down, the user has the option to extend the pause (e.g.,for interval training) for an additional 15 minutes. -
Page 17: System Settings
System Settings Use to adjust volume and screen brightness, change default settings, view diagnostics, change metric configuration, view regulatory and software information. Slide to adjust Slide to adjust Admin Use to change default settings (age, weight, gender). Changes made to the default settings are global. - Page 18 3. Go to the Metric screen. 4. Tap to open the Reset Workout screen. 5. Tap Reset to apply changes. Diagnostics The diagnostics screens display live and historical data for service technicians or those responsible for equipment maintenance. The Historical and Versioning screen requires a password to access.
- Page 19 User Configuration Users can create and save a profile with their own settings. To change: 1. Tap screen to open numeric keyboard. 2. Enter age, weight and select sex.
-
Page 20: User Settings
Users can export their profile data to a USB drive at any time. USB port To export: 1. Insert USB drive into the USB port on the back of the display console. 2. Tap on the Metric screen to open the User Settings screen. NOTE: Skip this step if the profile screen launches automatically. -
Page 21: Exporting Workout Summary
Exporting Workout Summary Users can export their workout summary to a USB drive. The summary is saved in a PDF format. NOTE: Before working out, insert USB drive into the USB port on the back of the console. At the end of a workout (when the user has stopped stepping) the Step to Unpause screen will open. -
Page 22: Preventive Maintenance
Preventive Maintenance Preventive Maintenance Intervals Although your T6 is designed to be maintenance free, we recommend a few tasks to increase the useful life of your equipment. Please follow the recommended preventive maintenance intervals shown below. These are estimated intervals and you may need to increase or decrease the frequency of preventive maintenance depending on your actual use. -
Page 23: Warranty And Serial Number Information
To view your warranty online, go to: NUSTEP.COM If you have any questions about your warranty, please contact Customer Service at: 800-322-4434 or support@nustep.com. For customers outside of the US and Canada, please contact your local NuStep distributor for warranty details. T6 Serial Number Information Location on the product: The serial number is located on the right side of the rear support cover. -
Page 24: Obtaining Customer Service And Parts
STEP 2 - Verify the problem. Inspect the cross trainer. Determine which part(s) may be required to correct the problem. Figures and parts lists are available on the NuStep web site at: nustep.com or by contacting Customer Service. STEP 3 - Contact NuStep Customer Service. -
Page 25: Technical Data
Technical Data USB A Port USB port is for flash drive use only. Some flash drives may not be compatible with the T6 USB port. Do not connect external devices to this port with USB cables. USB C Port Connection for service only. -
Page 26: Safety Notifications
The mode of operation Continuous Information regarding The NuStep T6 Recumbent potential electromagnetic or Cross Trainer uses other interference and advice electromagnetic and RF regarding avoidance energy only for its internal function. - Page 27 5º to 40ºC; ≤ 85% non-condensing humidity; 60 to 107 kPa. Indication that the When the T6 is plugged in and equipment is energized. not in use, the stand-by power indicator on the front of the console remains on.
-
Page 28: Emc Tables
Guidance and manufacturer’s declaration – electromagnetic emissions The NuStep model T6 is intended for use in the electromagnetic environment specified below. The customer or the user of the NuStep model T6 should assure that it is used in such an environment. - Page 29 Guidance and manufacturer’s declaration – electromagnetic immunity The NuStep model T6 is intended for use in the electromagnetic environment specified below. The customer or the user of the NuStep model T6 should assure that it is used in such an environment.
- Page 30 Guidance and manufacturer’s declaration – electromagnetic immunity The NuStep model T6 is intended for use in the electromagnetic environment specified below. The customer or the user of the NuStep model T6 should assure that it is used in such an environment.
- Page 31 The NuStep Recumbent Cross Trainer is intended for use in an electromagnetic environment in which radiated RF disturbances are controlled. The customer or the user of the NuStep T6 Recumbent Cross Trainer can help prevent electromagnetic interference by maintaining a minimum distance between portable and mobile RF communications equipment (transmitters) and the NuStep as recommended below, according to the maximum output power of the communications equipment.
-
Page 32: Us Fcc Compliance & Iec/En 55011 Compliance
Trademarks: The Bluetooth word mark and logos are registered trademarks owned by the ® Bluetooth SIG, Inc. and any use of such marks by NuStep, LLC is under license. Other trademarks and trade names are those of their respective owners. - Page 36 No part of this manual may be reproduced or transmitted in any form or by any means, electronic or mechanical, for any purpose without the express written permission of NuStep, LLC. © Copyright January 2020 by NuStep, LLC.
Need help?
Do you have a question about the T6 and is the answer not in the manual?
Questions and answers