Table of Contents
Advertisement
Advertisement
Table of Contents

Subscribe to Our Youtube Channel
Related Manuals for HMS-VILGO LIFTY 4


Summary of Contents for HMS-VILGO LIFTY 4
- Page 1 LIFTY 4 user guide Version 08/2013 200 Kg / 31.5 stones...
- Page 2 LIFTY 4 user guide Version 08/2013...
-
Page 3: Table Of Contents
Information is regularly updated in the latest instructions versions. This can not engage the responsibility of HMS-VILGO in any way. Warning : The pics on this leaflet are not under contract. Therefore, HMS-VILGO has the right to change the products inside anytime. TABLE OF CONTENTS 1. PREAMBLE ………………………………………………………………………... -
Page 4: Preamble
Use Lifty4 following the maintenance instructions (see Lifty4 maintenance paragraph). If you have any doubt about Lifty4 operating, please call HMS-VILGO After Sales Service for a diagnostic before using the hoist on a patient. HMS-VILGO will not be responsible for damage if these warnings are not followed. -
Page 5: General Description
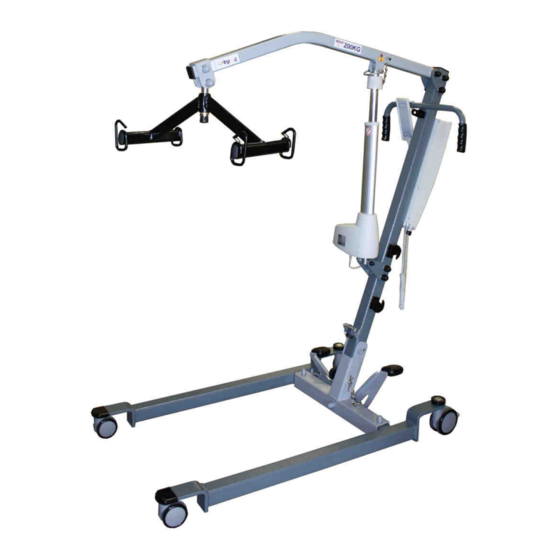
LIFTY 4 user guide Version 08/2013 2.2. GENERAL DESCRIPTION Support beam Driving handles Control box Electric actuator Pole Beam Pedals ∅ 3 in twin casters ∅ 4 in wheels with brake Side foot 2.3. TECHNICAL CARACTERISTICS Materials : steel Finish :... -
Page 6: Dimensional Characteristics
LIFTY 4 user guide Version 08/2013 2.4. DIMENSIONAL CHARACTERISTICS Dimensional characteristics of the base Maximum external length : 43.7 in Maximum internal length : 33.6 in Minimal internal width : 20.5 in Minimal external width : 25.6 in Maximum internal width : 35.4 in... -
Page 7: Labelling
There are 3 labels : One on the basis of the Lifty4, one on the electric actuator, and one on the control box. Standards : By this label, HMS-VILGO ensures that Lifty4 hoist is conformed to European directive 89/336 referring to electromagnetic compatibility and to European directive 93/42 referring to medical devices. -
Page 8: Lifty4 Assembling
LIFTY 4 user guide Version 08/2013 3. LIFTY4 ASSEMBLING 3.1. PACKAGE CONTENTS The following parts are in the package: 1 folded-up Lifty4 hoist : 1 box containing: Fixing screw Spanner 6 section 5 Control box (x1) CHC 6x80 (x2) (x1) -
Page 9: Recommended Checks
LIFTY 4 user guide Version 08/2013 Hoists are conformed to EN 10 535 standard which means that they can run 11 000 complete cycles under the conditions of uses they are designed for. Please, carefully consider how important it is to evenly check and maintain it in order to make sure that it is used under the standard specifications and under ours recommendations. - Page 10 LIFTY 4 user guide Version 08/2013 This table below, indicates if the replacement of actuator, axis and spare parts is necessary, in function of the number of runs a day. Oldness of the hoist (years) number of runs / a day...
-
Page 11: Maintenance Book
LIFTY 4 user guide Version 08/2013 HOIST REFERENCE: Serial number : Date of 1st use: DATE MAINTENANCE AND QUALITY CHECKING NAME & APPROVALS Number of cycles evaluated... -
Page 12: Spare Parts List
Ø 10 Lg 64+20 articulation pole/cross A001128 piece axle A001072 Ø 8 stop-nut A001061 actuator / pole Ø 8 washer connection pole / actuator Lifty 4 fixing plate A501244 Ø 12 stop nut A001080 HH 12x80 screw A501251 Ø 40-14.2-e2 brass ring A501404 Lifty4 Ø14-M12-Lg91axle... -
Page 13: Lifty4 Assembling
LIFTY 4 user guide Version 08/2013 3.2. LIFTY4 ASSEMBLING 1/ Unlock 2/ Take the axis out of the position and pick up the pole. 3-4 / Put the axle on position in locking it. 5/ Unlock the beam from the support beam and pick the support beam up. -
Page 14: Plugging
LIFTY 4 user guide Version 08/2013 3.3. PLUGGING 3.3.1 Plugging/blocking the actuator cable 1/ The 3 notches of this 2/ Put the cable plug in 3/ Grip the notches and turn ring show that the griping position and lean on it the ring from left to the right. -
Page 15: Lifty4 Use
A and B straps at the same hole level (same colour). Act the same way for C and D straps. Cautions : - This sling is designed for HMS-VILGO hoists only. - Always hang-up the 4 straps at the same level. -
Page 16: Safety
(approximately 12 hours). The Lifty 4 must be connected to a network which is in accordance with the NFC 15-100 and NFC 15-211 ( 230 V Electric plug + ground connection) for France and CEI 364 for other destinations. -
Page 17: Storage Instructions
LIFTY 4 user guide Version 08/2013 Warning, the loading of the batteries works only if the emergency button is out of power (put it on the position ‘on’ to load the batteries). Emergency stop Actuator connection LED green color when the... -
Page 18: Annual Maintenance
5.4 WARRANTY Lifty 4 hoist has a serial number. You will find it on the chassis and on each electronic item. To make a claim under warranty, you need to return the defective item with its serial number label to your retailer who will contact us. - Page 19 LIFTY 4 user guide Version 08/2013...
- Page 20 LIFTY 4 user guide Version 08/2013 Distributor stamp Site de Lille : Parc Eurasanté – 243 Rue Allendé Site de Bergerac : Rte de Sainte Alvère - Creysse BP 212 59120 LOOS LEZ LILLE 24102 BERGERAC Cedex Tél : +33 (0)3 20 84 81 50 – Fax : + 33 (0)3 20 59 58 08 Tel.
Need help?
Do you have a question about the LIFTY 4 and is the answer not in the manual?
Questions and answers