Advertisement
Quick Links
Advertisement

Subscribe to Our Youtube Channel
Related Manuals for Klarfit Tourek


Summary of Contents for Klarfit Tourek
- Page 1 Tourek 10030535 10030536...
- Page 2 Sehr geehrter Kunde, zunächst möchten wir Ihnen zum Erwerb Ihres Gerätes gratulieren. Bitte lesen Sie die folgenden Anschluss- und Anwendungshinweise sorgfältig durch und befolgen Sie die- se um möglichen technischen Schäden vorzubeugen. Warnung / Allgemeine Sicherheitshinweise • Setzen Sie dieses Gerät nicht dem Regen aus. Stellen Sie keine mit Flüssigkeiten gefüllten Gefäße auf dieses Gerät.
-
Page 3: General Safety Notice
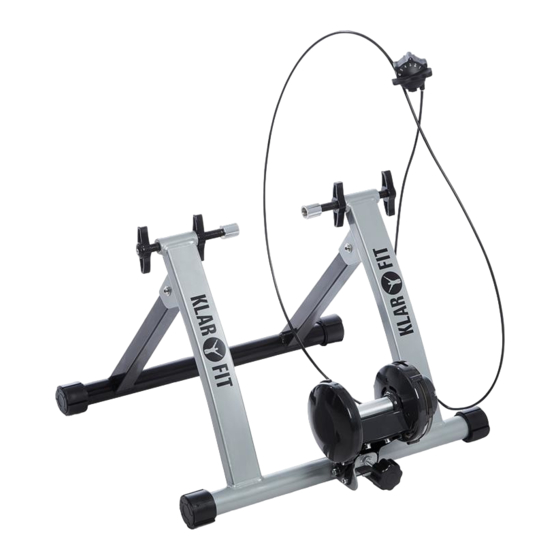
Dear Customer, Congratulations on purchasing this product. Please read and follow these instructions, in order to avoid damaging the item. We do not cover any damages that may arise from improper use of the item or the disregard of the safety instructions. General Safety Notice • Read all instructions before using. • Do not place on or near a hot gas or electric burner or in a heated oven. • To protect against a fire, electric shock or personal injury, do not immerse cord, electric plugs or de- vice in water or other liquids. • Do not expose the appliance to extreme temperatures. The appliance shall be used in moderate cli- mates. • Disconnect the appliance from the power source if it is not going to be used for a long time, if there is a thunderstorm or if it isn‘t working properly. - Page 4 Replace the quick-release skewer on the rear wheel of your bike with the skewer E included with the Step 2 Tourek. Bevor Sie Ihr Rad im TOUREK ein- spannen, drehen Sie die Klemmnabe D rechts und die Flügelmutter A ein wenig heraus, oder drehen Sie die Schritt 3 linke Mutter B heraus, um den Spalt für Ihr Rad zu erweitern.
- Page 5 Aufbau / Assembly Montieren Hinterachse Ihres Rads zwi- schen Kupplungen klemmen den Flügelschrauben A und C passend ein. Kontern Sie mit den Flügelmuttern B. Nicht Schritt 4 zu fest zudrehen! Install the bike‘s rear hub between the couplings and adjust the wing nuts A and C to lock onto the rear hub.
- Page 6 Abbau Removing your bike from the trainer Drehen Sie den Knauf F, um die Rolle vom Reifen Rotate the adjustable knob F to release the roller zu lösen. from the bicycle tire. Ziehen Sie den Hebel A oder lösen Sie die Flü- Pull the lever A up or rotate wing nut A and loo- gelmutter, um das Rad aus der Verankerung zu sen the wing nuts to draw your bike wheel out.
Need help?
Do you have a question about the Tourek and is the answer not in the manual?
Questions and answers