
Related Manuals for Alu Rehab Netti 4U Comfort CE PLUS


Summary of Contents for Alu Rehab Netti 4U Comfort CE PLUS
- Page 1 MOBILE FAMILY 4U FAMILY C O M F O R T user manual netti 4u comfort | ce Plus netti 4u comfort | ces Plus This product conforms to 93/42/EEC for medical products. my-netti.com...
-
Page 2: Table Of Contents
contents 1. introDuction 1.1 areas of use/indications for netti 4u ce Plus and ces Plus 1.2 contra indications 1.3 Quality and durability 1.4 environment and waste disposal 1.5 information for re-use 1.6 about this manual 1.7 Vital measures 2. QuicK reference 3. - Page 3 7.1 seat angle 7.2 Backrest angle 7.3 Keywords regarding tilt and recline 7.4 Decrease the possibility of sliding, shear and pressure sores 7.5 operating the tilt handle 7.6 operating the recline handle 8. maneuVring tHe WHeelcHair 8.1 general about driving and parking 8.2 Driving techniques - step up 8.3 Driving techniques - step down 8.4 Driving techniques - slope...
-
Page 4: Introduction
It is tested to DIN EN 12183:2014. The tests were carried out by TÜV SÜD Product Service GmbH in Germany. in alu rehab we believe that wheelchairs should be chosen based on a thorough assessment focusing on the needs of the user and demands from the environment. -
Page 5: Areas Of Use/Indications For Netti 4U Ce Plus And Ces Plus
Dynamic system which the greatest extent possible. offers a frame construction that follows the • That Alu Rehab’s products are movement pattern of the user. ignoring this ensured a long service life and a high advice could in unfavourable circumstances... -
Page 6: Information For Re-Use
4u ce Plus or ces Plus wheelchair, all products from alu rehab are please read this manual carefully before designed to give years of maintenance- starting to use the chair. -
Page 7: Vital Measures
1.7 VITAL MEASUrES a table with dimensions is found on netti 4u ce Plus and ces Plus are page 34. comfort wheelchairs designed for both outdoor and indoor use. netti 4u ce Plus and netti 4u ces Plus are identical chairs except for the shorter seat depth by netti 4u ces Plus. -
Page 8: Quick Reference
2. QuicK Drive carefully! reference be aware that friction against push rims can create a warm surface. the content of this page is a summary of the whole manual. it gives a brief Salt water can increase risk of introduction to the use and care of the corrosion. -
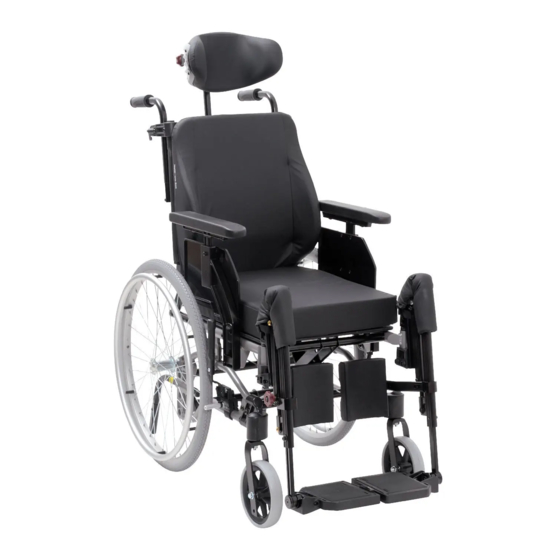
Page 9: Description
3.DescriPtion standard version* 1. Head support 2. angle and depth adjustment for head support. 3. Head support bracket 4. Push bow 5. release handle 6. main wheel 7. anti-tip 8. Brakes 9. front castors 10. front fork 11. foot plate 12. -
Page 10: Features Of Netti 4U Ce Plus And Ces Plus
4. features of netti 4u ce Plus / ces Plus stanDarD accessories SEAT bELTS • Hip belts (see chapter 5) • Pressure distributive cushion Uno SEAT • Tilt -5° to +20° • Adjustable depth of 75 mm • Pressure distributive cushions WHEELS WHEELS •... -
Page 11: Accessories
5. accessories The anytime updated complete Side support Correction accessory and spare part catalogue can meant for correction of be downloaded from our home page bad postures in the www.My-Netti.com order forms. upper trunk. frAME Pad for side support Anti-tip with tramp pedal Side support Stable meant for users with de-... - Page 12 Upholstery for HEAD SUPPorT calf support bracket support c large. reduces pressure. support a side support support B small support D pressure distribution Calf pad hinged support e side support adjustable The user doesn’t support f with cheek support have to lift the leg when mounting or Hygiene cover dismounting the...
-
Page 13: Assembly Of Hip-Belt
Infusion stand 5.1 ASSEMbLING of HIP bELT to be fixed to the horizontal chair back tube. • Pull the belt through the hole in the hip belt bracket. the spare part and accessory • Thread the belt back through the belt catalogue can be downloaded from clamp. -
Page 14: Assembly And Adjustment
6. assemBlY anD To check that the main wheel is properly attached to the hub, remove aDJustment the finger from the central knob and pull at the main wheel. for information about adapting the If the main wheel doesn’t lock, don’t wheelchair to the user, please see: use the wheelchair but contact my-netti.com Knowledge center. - Page 15 • Using 24” main wheels in the upper hole, the seat height is 465 mm from the floor When the seat height is changed to the seating plate. using 24” main ensure: wheels in the next lower position, the height will measure 500 mm to the that the front castors are positioned seating plate.
-
Page 16: Backrest
6.5 bACKrEST To check that the back rest is • to mount the gas spring, lift the push locked, grip the push bow and bow with one hand, and lead the gas press the back rest forward. spring locking head into the plastic If the back rest falls forward - bracket with the other. -
Page 17: Backrest Cushions
6.6 bACKrEST CUSHIoNS 6.7 SEAT DEPTH Backrest cushions are fixed and adjusted ADjUSTMENT onto the wheelchair using the Velcro. • If the seat depth can only be adjusted at the rear, loosen the locking bolt in the plastic bracket. • Find the required position for the locking head in the plastic bracket, and remove the plastic plug from this hole. -
Page 18: Seat Cushion
Adjusting the height of the anti-tip the cushion cover is washable and the anti-tip can be adjusted in two fixed reusable. follow the instruction positions. the short position is for 12” & 16” on the back of the cushion for main wheels and 24”... - Page 19 Adjusting the angle - Angle adjustable Mounting of leg support leg support • Mount the leg support by holding onto • The angle of the leg support can be the bar bending down towards the adjusted using the star wheel footplate.
- Page 20 While making the adjustment there must be no load on the foot plates. Adjusting the angle of the footplate • The foot plates angle can be adjusted. removing the leg support: • Untighten the screw (B) and adjust the • Pull the plastic lock on the foot plate foot plate to the required angle.
-
Page 21: Head Support
to adjust in depth, the calf pad is • Place the squared nut in the slot of the removed from the bracket by using an head support bracket as shown above. open-end spanner between the pad and • Place the head support in the head the bracket. -
Page 22: Arm Support
6.12 ArM SUPPorT Adjusting the head support in height: • Release the locking lever on the head support adapter (c). • Adjust the head support and fix it in required position. Adjusting the head support in angle: • Release the adjustment wheel at the rear of the horizontal bar (B). -
Page 23: Adjusting The Brakes
Adjusting the height of the arm support • To reposition the brake, loosen the two • Untighten the screw on the arm support screws on the inside of the brake clamp using a 6 mm allen key. • Raise or lower stem •... - Page 24 DrUM brAKE operating and applying the brake if the wheelchair is mounted with 12” or the wheelbase with drum brake is fitted 16” main wheels, these will be equipped with with hand operated hub brakes to allow drum brakes. 22” and 24” wheels can also regulation of speed on hills and whilst have drum brakes travelling along.
-
Page 25: Seat Angle/Tilt
Alu Rehab recommends the use of a going upright from a recline and tilted posi- hip belt to prevent falling out of the chair. -
Page 26: Operating The Tilt Handle
1:15 REPLA bACK This drawing is Alu Rehab A.S property and should not be copied or delivered to other firms or age Wherever you let the handle loose, the seat- ing unit will stay in this position. to bring Press the right handle and put pressure to... -
Page 27: Maneuvring The Wheelchair
8. manoeuVring 8.2 DrIVING TECHNIQUES - Step up- Companions, drive up a step forwards: 8.1 GENErAL TECHNIQUES • Check that the anti-tip is turned up. Manoeuvering and chair balance: • Angle the wheelchair backwards. the weight and balance of the chair •... -
Page 28: Driving Techniques - Slope
Companions, drive down a step 8.5 DrIVING TECHNIQUES backwards: - Up stairs - • Check that the anti tip is turned up. • Move the wheelchair backwards to the Always ask for assistance. step. Never use escalators, even if assisted •... -
Page 29: Driving Techniques - Down Stairs
With or without companion – forwards. 8.6 DrIVING TECHNIQUES before transfer: - Down stairs - • The wheelchair should be placed as close as possible to the destination of the Never use escalators, even if assisted transfer. by a companion. •... -
Page 30: Lifting The Wheelchair
9. transPort 8.8 LIfTING THE WHEELCHAIr netti 4u ce Plus and ces Plus tested and • The wheelchair should be approved to crash test iso 7176-19:2008. lifted in the frame, and push max user weight when use as a seat in a car bow only. -
Page 31: Folding For Transport
Never use the wheelchair as a seat in a car after it has been involved in an accident with impact. 9.2 foLDING for TrANSPorT When the wheelchair is unoccupied, fold it as described below. Put the wheelchair in the the angle of the straps trunk or back seat. -
Page 32: Travelling On Public Transport
Clean the wheelchair thouroughly after use. you can order original paint from Alu rehab to repair scratches and minor damages to the paint: Please contact your dealer to order. As a rule of thumb, use oil on movable parts and all bearings. -
Page 33: Cleaning And Washing Instructions
3. clean the frame using water and a rag. frequency Weekly monthly check defects/ 4. We recommend using soft soap. damages. e.g. breakage/missing parts 5. rinse the wheelchair well using clean water to remove all the soap. Washing of wheelchair oiling of bearings* 6. -
Page 34: Table Of Vital Measures
11. taBle Vital measures netti ce Plus / ces Plus netti 4u comfort ce Plus ce Plus ces Plus ces Plus specification min. overall length with leg 1160 mm/ 1050 mm / support / without leg support 960 mm 950 mm overall width 530 mm 680 mm... -
Page 35: Troubleshooting
12. trouBlesHooting Symptom reason/Action reference in manual The wheelchair • The main wheel hubs might be incorrectly mounted is going askew • One of the brakes might be too tight 6.13 • The user is sitting very askew in the chair •... -
Page 36: Tests & Warranty
13.2 GUArANTEE manual if claims are to be accepted. alu rehab is providing you with a 5-year guarantee on all frame components and on the cross-tube assembly. there is a 2-year guarantee on all other ce labelled components except batteries. -
Page 37: Netti Customized / Individual Adaptation
Plus requires the risk evaluation and adapted for the customer cannot keep the acceptance of the product responsibility ce mark given by alu rehab a.s norway. if and safety for use of the wheelchair from the adjustments are performed by other than... -
Page 38: Measures & Weight
14. measures & WeigHt seat seat depth** Back rest total transport Weight width* width width heigh *** 350 mm 375-450 mm 500 mm 530 mm 480 mm 27 kg Plus 400 mm 375-450 mm 500 mm 580 mm 530 mm 27,5 kg Plus 450 mm... - Page 39 Model: NettI 4U CE PLUS and CES PLUS my-netti.com Language: English Version: 2017-06...
- Page 40 JoY of life UM0101UK this product conforms to 93/42/eec for medical products. 2017-06 feel free to contact us: manufacturer: DistriButor: alu rehab as alu rehab aps Bedriftsvegen 23 Kløftehøj 8 4353 Klepp stasjon DK-8680 ry norWaY T: +45 87 88 73 00...
Need help?
Do you have a question about the Netti 4U Comfort CE PLUS and is the answer not in the manual?
Questions and answers