
Related Manuals for AVP Synthesizers ADS-7 mk2


Summary of Contents for AVP Synthesizers ADS-7 mk2
- Page 1 AVP Synthesizers ADS-7 mk2 Analog Drum Synthesizer with 16-track MIDI sequencer User Manual v1.0...
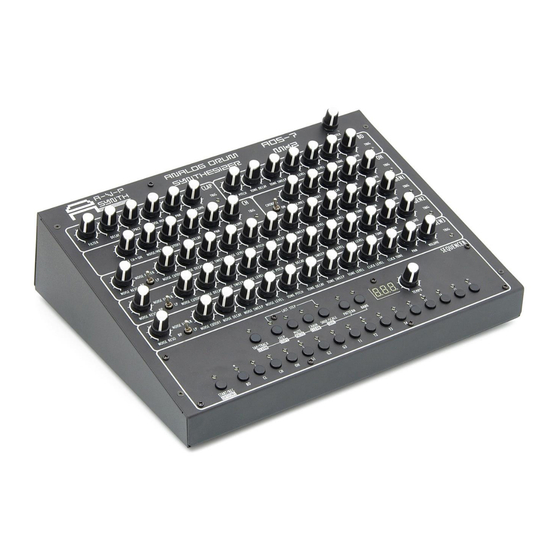
- Page 2 ADS-7 mk2 - is an analog drum synthesizer inspired by the drum machines/synthesizers of the 70s-80s with a built-in 16-track sequencer and MIDI control. It has a digit screen 65 controls, 4 switches and 24 buttons with which you can have a wide control over the sound parameters, sequencer and MIDI.
- Page 3 Controls Front panel Rear panel...
- Page 4 ① MASTER section Regulates the master volume level of the unit ② CLAP section TRIG - LED indicator VOLUME – volume control level PAN – panning control (L-R) NOISE MIX – mixing of the noise component with the CLAP SPACE – attack time control of the CLAP DECAY –...
- Page 5 Connect the power adapter, audio and MIDI cables to your ADS-7 mk2 rear connectors. Power supply (15 VAC): Connect the included power adapter to the POWER input of ADS-7 mk2; Audio outputs (6.3mm jacks): insert cables with 1/4 mono jacks into the MIX OUTS or individual outputs INDIVIDUAL OUTS jacks in order to connect the ADS-7 mk2 to a mixer or other audio equipment;...
- Page 6 Sequencer Software v1.02...
-
Page 7: Table Of Contents
Table of Contents TABLE OF CONTENTS ..............................6 SEQUENCER FEATURES..............................7 PRESENTATION................................7 ............................7 ECTIONS OF THE CONTROL PANEL START /REC ............................. 8 BUTTON BEHAVIOR TEMPO ............................ 8 ISPLAY AND POTENTIOMETER MENU SECTION, MAIN MODES............................ 9 TRACK . -
Page 8: Sequencer Features
Sequencer Features 16 tracks/16 drums. 16 hardware triggers (0-5V). 16 banks of 16 patterns each. Pattern chain with 16 positions and ‘Freeze’ function. 24 – 279 BPM range. 96ppqn internal clock, even in Slave MIDI SYNC by interpolation. ... -
Page 9: Start /Rec Button Behavior
START /REC button behavior. When your sequencer is not running Short press will start the sequencer in normal playing mode. Long press (>1s) will start the sequencer in record mode on release. When your sequencer is already running: ... -
Page 10: Menu Section, Main Modes
MENU section, main modes Those functions are the main features of your sequencer. Those modes work in combination with the KEY. Notes: Those operations can be done when the sequencer is running only. Of Course ;-) The TAP and TRACK modes. TAP and TRACK Selection modes. -
Page 11: The Step Mode
external MIDI device. Release the TAP /TRACK button to leave the TRACK Selection mode and go back to the last entered mode. The STEP mode. Pattern’s STEP toggle mode. This is your patterns composition Here, the sequencer will play a sound on each beat, in 4/4 scale. A short press on this button will enter in the STEP mode, here the 16 KEYs represents a pattern of the previously selected track (TAP /TRACK). -
Page 12: The Chain Mode
The CHAIN mode. Patterns CHAIN mode. This feature is part of the bank memory and recalled with it. Here, the length of the chain is 6 patterns, led 4 is blinking we are currently playing the position 4 which contains the pattern 12. A short press on this button will enter in the CHAIN mode, here the KEY section represents the amount of chained Patterns and the position in the chain. -
Page 13: The Last Step Mode
Holding this SHUF/SCALE button will enter in MUTE mode too, except that you will automatically leave this mode on release and go back to the last entered mode The LAST STEP mode. SHUF/SCALE + STEP button. This is the LAST STEP selection mode of the Pattern. This feature is part of a pattern, then saved and recalled with it. -
Page 14: The Bank Mode
The BANK mode. The BANK loading mode. Notes: Think about saving your bank before loading another one or you will lose your work! Here, bank 1, 2, 3, 4 are used and the bank 5 is the one selected and active in sequencer memory. -
Page 15: Track Sub Functions
TRACK sub functions Notes: COPY/PASTE/CLEAR functions are only accessible when: The sequencer is stopped. The sequencer is running but there’s only one pattern in the chain. The sequencer is running but the chain is frozen (Freeze feature). Notes: LEARN function and the OPTIONS are only accessible when: ... -
Page 16: The Track Paste
The TRACK PASTE. Once a track is selected for copy, you can PASTE this track to several others tracks. The track 2 is selected to copy, there’s no empty track. Hold the TAP /TRACK button then press the MUTE button, you will enter in the track PASTE selection mode. The TAP /TRACK, COPY and MUTE leds start to blink. -
Page 17: The Track Learn
The TRACK LEARN (Midi learn). This feature is a MIDI one and permits to assign a MIDI Note Event to a Track (Drum). The 1st MIDI channel is set by default. Here, the track 7 is learning and waiting for a valid MIDI note. Hold the TAP /TRACK button then hold a KEY during 3s. -
Page 18: The Options
The OPTIONS This mode gives the access to some configuration options. This is the list: MUTE ALL, Mute all events if enabled, else only steps(pattern) events. MIDI SYNC Input, 0: Auto (led 2 and 3 off), 1: Master (led 2 On), 2: Slave (led 3 on). ... -
Page 19: Pattern Sub Functions
To access those OPTIONS, Hold the TAP /TRACK button then hold the START button during 3s. When the TAP /TRACK and START leds are starting to blink you can release both button. You can leave this mode by pressing any other main MENU button. PATTERN sub functions Notes: Those operations can be done when the sequencer is running. -
Page 20: The Pattern Paste
The PATTERN PASTE. Once a pattern is selected for copy, you can PASTE this pattern to several others patterns. The pattern 2 is selected to copy, the patterns 1 and 2 are not empty Hold the PATTERN button then press the MUTE button, you will enter in the pattern PASTE selection mode. The PATTERN and MUTE leds start to blink. -
Page 21: Bank Sub Functions
BANK sub functions Notes: Those operations can be done only when the sequencer is stopped. The BANK CLEAR. The bank CLEAR. The bank 10 is the current bank in memory, the banks 1, 2, 3, 5, 7, 8 and 9 are not empty. Hold the BANK button then press the CHAIN button, you will enter in the bank CLEAR selection mode. -
Page 22: The Bank Save
The BANK SAVE. The bank SAVE. The bank 6 is the current bank in memory, the banks 1, 2, 3, 7 and 8 are not empty. Hold the BANK button then press the SHUF/SCALE button, you will enter in the pattern SAVE selection mode. The BANK and SHUF/SCALE leds will start to blink. - Page 23 Logo stickers. Warranty The standard warranty on ADS-7 mk2 is for one year from the date of purchase. 1. The warranty does not apply in the following cases: - Expiration of the guarantee (after one year from the date of purchase);...
- Page 24 AVP Synth www.avpsynth.com 2019...
Need help?
Do you have a question about the ADS-7 mk2 and is the answer not in the manual?
Questions and answers