Advertisement
Quick Links
Advertisement

Related Manuals for MedKlinn Home Asens+ Series


Summary of Contents for MedKlinn Home Asens+ Series
- Page 1 OPERATING MANUAL...
-
Page 2: Table Of Contents
CONTENTS SAFETY PRECAUTIONS ....................................DEVICE IDENTIFICATION ..................................GETTING STARTED ......................................OPERATION ........................................... SAFETY FEATURE ......................................MAINTENANCE & SERVICE .................................. TROUBLESHOOTING GUIDE .................................. SPECIFICATIONS ......................................14... -
Page 3: Safety Precautions
Warranty, and repair and servicing will be chargeable. 10. If the power cable is damaged, it must be sent to Medklinn Service Centre for repair. 11. Do not attempt to open the unit. The unit requires minimal maintenance, and no servicing or repairs are to be carried out by the User. - Page 4 NOTE - RADIO OR TV INTERFERENCE: If the unit should cause interference to radio or television reception, try to correct the interference by one or more of the following measures: Reorient or relocate the receiving antenna. • Increase the distance between the unit and radio/TV receiver. •...
-
Page 5: Device Identification
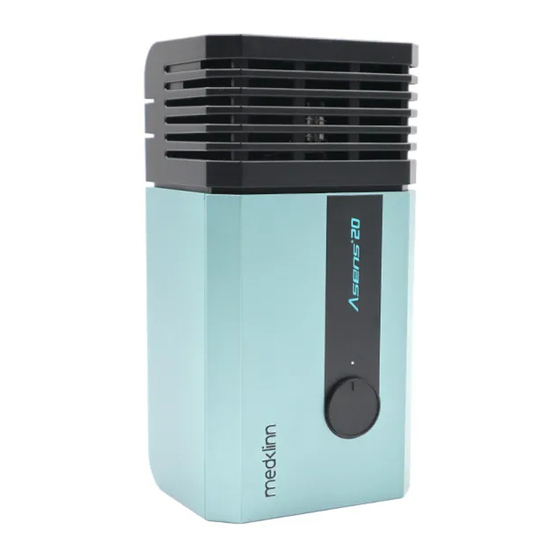
DEVICE IDENTIFICATION ASENS + 20 & 40 (Front View) Control button LED light indicator Removable front lid... - Page 6 DEVICE IDENTIFICATION ASENS + 20 & 40 (Back View) Power inlet Adaptor Plug into AC Outlet (AC 110V ~ 240V, 50/60Hz)
- Page 7 DEVICE IDENTIFICATION CERAFUSION™ CARTRIDGE Glass tube Outer electrode Metal contact points...
-
Page 8: Getting Started
GETTING STARTED Power inlet TO TURN THE UNIT ON: Plug in the power supply jack into the power inlet. Plug in the adaptor into 110V~240V AC power outlet. To AC Outlet (AC 110V ~ 240V, Power inlet 50/60Hz) Power supply jack Power supply jack... -
Page 9: Operation
OPERATION TO ADJUST TO HIGH: Turn the knob clockwise until it stops. TO ADJUST TO LOW: Turn the knob counter clockwise until it stops. Knob LED light indicator... -
Page 10: Safety Feature
SAFETY FEATURE When the front lid is closed, the unit will restore to its previous setting. CAUTION A safety feature is incorporated to prevent electrical shock. In the event the front lid is detached while the unit is still operating, the LED light will become unlit. -
Page 11: Maintenance & Service
MAINTENANCE & SERVICE CLEANING OF DEVICE CAUTION: SWITCH OFF AND UNPLUG THE UNIT BEFORE CLEANING Due to water evaporation and accumulation of fine dust or other pollutants, there may be some stains around the ventilation holes. CLEANING THE EXTERNAL PART OF DEVICE: Ventilation holes Wipe the device gently with a slightly damp cloth. - Page 12 MAINTENANCE & SERVICE CLEANING THE INTERNAL PART OF DEVICE: Front lid Front lid Step 1: Step 2: Push the latch outward slightly to open the front lid. Pull out the front lid.
- Page 13 MAINTENANCE & SERVICE CAUTION: THE CERAFUSION™ CARTRIDGE COULD BE HOT. BE CAREFUL WHEN REMOVING IT. Step 4: Clean the front lid and internal surfaces Step 3: Remove the Cerafusion™ Cartridge. with a slightly damp cloth.
- Page 14 MAINTENANCE & SERVICE REPLACING CERAFUSION™ CARTRIDGE (recommended every 12 months) CAUTION: 1. ENSURE THAT THE UNIT IS SWITCHED OFF BEFORE REPLACING CARTRIDGE TO AVOID ELECTRICAL SHOCK. 2. DO NOT HOLD THE GLASS TUBE WHEN HANDLING THE CARTRIDGE. 3. DO NOT TURN OR TWIST THE GLASS TUBE AS IT WILL DAMAGE OR CRACK THE GLASS. Cartridge Holder IMPORTANT NOTE: If the living space is more dusty or dirty, you...
-
Page 15: Troubleshooting Guide
I have switched on the unit, the LED lights are lit, but there is no “hissing” sound coming from the unit. First, check if the Cerafusion™ Cartridge is properly inserted into the cartridge holder. If there is still no “hissing” sound after cleaning, replace a new cartridge or contact Medklinn Service Centre to have the unit serviced. -
Page 16: Specifications
SPECIFICATIONS MODEL ASENS ASENS Input Voltage to adapter 110 ~ 240v AC, 50/60 Hz Output Current (max) from adapter 1.5 Amp @ 12 VDC Power Consumption < 5.5 watts Functions Low / Mid / High Dimensions (mm) 195(W) x 101(H) x 76(D) Operating Environment Temperature 5º...
Need help?
Do you have a question about the Home Asens+ Series and is the answer not in the manual?
Questions and answers