Advertisement
Quick Links
TOYOTA
Tundra
Procedure
1. Vehicle Preparation
a. Apply parking brake.
b. Open the trunk and hood of the vehicle.
c. Disconnect the negative (-) battery cable.
d. Prepare a protective surface to place all vehicle
components on.
2. Front Door Tweeter Installation
a. Remove Door Panels
1. Remove A Pillar by pulling straight and away
from door (Fig. 2-1). Disengage any clips that
remain in the door and return to the A Pillar
panel. (Fig. 2-2)
2. Carefully remove the factory tweeter from the
door panel by unlocking the three prongs one at a
time. (Fig. 2-3)
3. Install the OEM Audio Plus tweeter in the
same orientation as the factory tweeter by
aligning it with the locking tabs.
Issue B 02/16/18
JBL Enhancement
Fig. 2-1
Fig. 2-2
Fig. 2-3
Page | 1
Advertisement

Related Manuals for OEM Audio JBL Enhancement


Summary of Contents for OEM Audio JBL Enhancement
- Page 1 (Fig. 2-3) Fig. 2-3 3. Install the OEM Audio Plus tweeter in the same orientation as the factory tweeter by aligning it with the locking tabs. Issue B 02/16/18...
- Page 2 TOYOTA Tundra JBL Enhancement Procedure 4. Make sure Tweeter snaps into place. (Fig. 2-4) 5. Connect the tweeter connector and make sure it is secured with built-in locking tab. Fig. 2-4 6. Push the A Pillar back into position and apply presure until it snaps back into place.
- Page 3 TOYOTA Tundra JBL Enhancement Procedure 3. Disengage door locking tab. (Fig. 3-3) Fig. 3-3 4. Use a panel tool to remove the cover behind the interior door latch. (Fig. 3-4) Fig. 3-4 5. Remove #2 Phillips screw behind the door latch.
- Page 4 TOYOTA Tundra JBL Enhancement Procedure 7. Use a panel tool to remove the window door lock control panel. (Fig. 3-7) 8. Disconnect window control connectors from the panel. Fig. 3-7 9. Use gentle force to remove door panel. Start at the bottom, then the sides and finish at the top.
- Page 5 TOYOTA Tundra JBL Enhancement Procedure 13. Install the OEM Audio Plus tweeter in the same orientation as the factory tweeter by aligning it with the locking tabs. (Fig. 3-11) 14. Connect the tweeter connector and make Fig. 3-11 sure it is secured with built-in locking tab.
- Page 6 TOYOTA Tundra JBL Enhancement Procedure 4. Quick-Sync Wiring Harness (Preparation) a. Remove the front driver side threshold by pulling in an upward motion. (Fig. 4-1) Fig. 4-1 b. Remove the passenger side kick panel by unscrewing the black locking tab. (Fig. 4-2) c.
- Page 7 TOYOTA Tundra JBL Enhancement Procedure a. Remove the driver side lower seatbelt mounting bolt cover and bolt (14mm). (Fig. 8-1) Fig. 8-1 b. Remove the driver side rear threshold. (Fig. 8-2) Fig. 8-2 c. Loosen seatbelt trim weather-stripping by hand and remove carefully in an outward direction on both the front and rear driver side thresholds.
- Page 8 TOYOTA Tundra JBL Enhancement Procedure e. Check for white snaps that may not have came off with the panel. Re-insert to panel if applicable. f. Using a 17mm socket, remove the four (4) driver side 17mm rear seat bolts. Reposition rear driver side seat out of the way or remove from vehicle.
- Page 9 TOYOTA Tundra JBL Enhancement Procedure k. Disconnect the Factory sub connector and remove sub assembly from vehicle. (Fig. 8-9) Fig. 8-9 Using Needle Nose Plyers remover the factory male sub connector by compressing the white locking release found in the cavity of the factory sub enclosure.
- Page 10 When locking tab is disengaged, terminal will pull out with ease. Repeat these steps for both (2) wires. Insert the OEM Audio Plus terminals into the factory connector housing in the same orientation as the factory wiring. Red/Yellow = Positive andBlue/Black = Fig.
- Page 11 TOYOTA Tundra JBL Enhancement Procedure Using the factory ground located where the side/rear panel was previously installed, remove the 10mm ground bolt. (Fig. 5-2) Fig. 5-2 Install the harness ground together with the factory ground. Re-install the 10mm bolt. (Fig. 5-3) Run the ground wire with existing factory wire and factory sub connecotr.
- Page 12 TOYOTA Tundra JBL Enhancement Procedure 9. Power Wire Installation c. Route power wire to the driver side kick panel. Run neatly and out of the way. Use cable ties as necessary. (Fig. 9-3) Fig. 9-3 d. Under the hood locate the grommet for the main factory wiring harness on the driver side of the firewall directly under the two (2) heater hoses.
- Page 13 TOYOTA Tundra JBL Enhancement Procedure h. Secure any wire slack to existing factory wiring. Use cable ties as necessary. i. Install supplied high-temp corrugated split loom to cover the power wires and insulate against extreme temperature under the hood. (Fig. 9-7) Fig.
- Page 14 TOYOTA Tundra JBL Enhancement Procedure Re-install the 12mm bolt and tighten. (Fig. 9-11) Note: Do not install fuse at this time! Fig. 9-11 11. Subwoofer System (Installation Preparation) a. In the rear seat area, locate the three (3) sub mounting locations. Fig. 11-1,2,3) Fig.
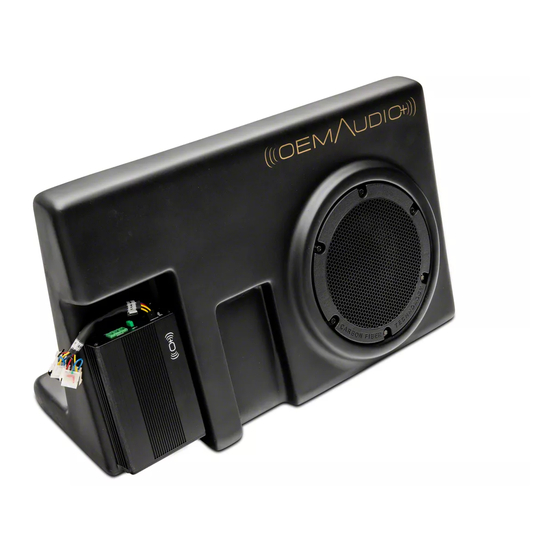
- Page 15 Position Subwoofer into it’s designated location. (Fig. 12-3) b. Connect the two (3) subwoofer connections to the OEM Audio Plus Subwoofer System. (Fig. 12-4,5) Fig. 12-3 Install Power/Ground Connection (Green 3-Pin) to top of Dedicated Sub Amplifier (mounted to enclosure).
- Page 16 TOYOTA Tundra JBL Enhancement Procedure Gain Control INPUT Install the Input Connector (Black 4-Pin) and Gain Cable Control Knob Cable (Clear RJ22 - Telephone-like Connector) to bottom of Dedicated Sub Amplifier. (Fig. 12-5) Fig. 12-5 c. Install the three (3) provided 10mm bolts into the subwoofer mounting arms.
- Page 17 Fig. 13-3 14. Fuse Installation Fig. 13-4 a. Insert the 30A fuse. (Fig. 14-1) 14. This concludes the OEM Audio Plus JBL ENHANCEMENT Installation for the TOYOTA TUNDRA CREWMAX. a. Start your engine. b. Turn on your radio. c. Enjoy! Fig.
Need help?
Do you have a question about the JBL Enhancement and is the answer not in the manual?
Questions and answers