
Related Manuals for Luminex LUMISPLIT Series


Summary of Contents for Luminex LUMISPLIT Series
- Page 1 Description: User Manual LumiSplit 2.10. REVISION: 20200820-REV 6.0.0 USER MANUAL LUMISPLIT PRODUCT FAMILY LumiSplit 2.10 THANKS FOR CHOOSING LUMINEX...
-
Page 3: Table Of Contents
CONTENTS INSTALLATION ..............4 THE NEW RDM EXPERIENCE ........... 9 Mounting the device / Rack mount ......4 Discovery ..................9 Power up the device ...............4 Identify a LumiSplit..............9 Description ..................5 Lock / Unlock the Front Panel ........10 LED Indicators ................6 Dark Mode .................. -
Page 4: Installation
1. INSTALLATION 1.1 Mounting the device RACK MOUNT In case you want to mount your LumiSplit 2.10 in a standard 19- inch rack, you need 4 rack screws (A) to mount the device. 1.2 Power up the device Power-up the device with a power cable with Neutrik powerCON TRUE1 connection (J) (please contact your local dealer if you don’t have a suitable power cable on hand). -
Page 5: Description
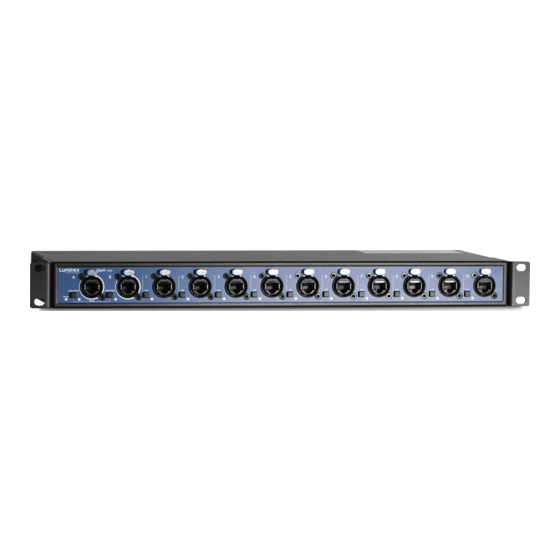
1 | INSTALLATION / 1.3 DESCRIPTION 1.3 Description 1.3.1 Front Panel (A) POWER LED: (D) OUTPUT BUTTON: Indicates the general status of the splitter. Output selector, enable / disable RDM filtering per output. (B) INPUT BUTTON: (E) OUTPUT LED: Enable / disable RDM filtering per input, mode selector. Indicates the output status and the selected mode. -
Page 6: Led Indicators
1 | INSTALLATION / 1.4 LED INDICATORS 1.4 LED indicators: The LED indicators of the LumiSplit show the following statuses: POWER LED COLOUR DESCRIPTION Power (General status Dimmed Dark Mode LED) Green Normal, unlocked (default) or upgrading White Identify Orange Locked Front Panel Port error Red blink... -
Page 7: Lumisplit Features And Mode Selection
2. LUMISPLIT FEATURES AND MODE SELECTION 2.3 Mode Selection After the device has been powered-up correctly, you can start changing the different operating modes and port features through the front panel or via RDM. To change the settings by using the The LumiSplit 2.10 has different operating modes. -
Page 8: Modes In Detail
2 LUMISPLIT FEATURES AND MODE SELECTION / 2.4 MODES IN DETAIL / 2.5 FRONT PANEL LOCK / 2.6 FACTORY RESET 2.4 Modes in detail 2.4.6 Regeneration Zone B (6) A: B: The LumiSplit will re-generate the incoming DMX signal on input B with some new parameters. -
Page 9: The New Rdm Experience
RDM connectivity. Once LumiNet Monitor is connected to a Luminex LumiNode or Ethernet-DMX converter with RDM enabled, the software will provide you with a comprehensive set of tools to monitor and configure your LumiSplit 2.10. -
Page 10: Lock / Unlock The Front Panel
3 | THE NEW RDM EXPERIENCE / 3.3 LOCK / UNLOCK THE FRONT PANEL / 3.4 DARK MODE / 3.5 MODE SELECTION 3.3 Lock / Unlock the Front Panel To lock the device, right click on one of the responders and select Lock state >... -
Page 11: Monitoring
3 | THE NEW RDM EXPERIENCE / 3.6 MONITORING / 3.7 ENDPOINT VIEW 3.6 Monitoring The RDM control panel enables you to monitor the status of all sensors To monitor the status of these sensors, right click on one of the re- embedded in the LumiSplit. - Page 12 3 | THE NEW RDM EXPERIENCE / 3.7 ENDPOINT VIEW 3.7.1 Zone assignation In the endpoint view, you can also modify the zone assignment output to one of these zones, click on the universe number of the per port (1 or 2). Input A is universe 1, input B is universe 2. To selected output, and change the number, according to your need.
-
Page 13: Custom
3 | THE NEW RDM EXPERIENCE / 3.8 CUSTOM 3.7.4 Regeneration When in regeneration mode, click on the timing field of the selected input(s) to assign the desired regenerating timing. Three different timings are available (Break Time, Framerate): Slow (200μs/25FPS) ƒ... -
Page 14: Snapshot
3 | THE NEW RDM EXPERIENCE / 3.9 SNAPSHOT / 3.10 DMX FAIL MODE / 3.11 DMX STARTUP MODE 3.9 Snapshot 3.10.1 Configure DMX Fail mode From firmware version 6 onwards the LumiSplit offers the option to To set the DMX Fail mode, use the following steps: record a DMX snapshot per input. -
Page 15: Messages
The LumiSplit 2.10 is the first splitter to be upgradable through RDM. configurable boundaries for setting the details of these modes. To upgrade the unit, you will need a Luminex LumiNode (firmware 1.1.0 or higher) or Ethernet-DMX converter (firmware 4.2.0 or higher), The following attributes can be adjusted: and LumiNet Monitor 2.1.6 or higher. -
Page 16: Technical Support
If you need to ask our team for more help or you need to return a de- tion. There is a knowledge base available online that gets updated on vice to Luminex for diagnostics or repair, you can also find the option a regular basis at: https://support.luminex.be... - Page 17 YOUR NETWORK SOLUTION FOR AUDIO, VIDEO AND LIGHTING EFFECTIVE, RELIABLE, ACCESSIBLE...
- Page 18 Slamstraat 13 | 3600 Genk | Belgium | T +32 11 812 189 | info@luminex.be | www.luminex.world...
Need help?
Do you have a question about the LUMISPLIT Series and is the answer not in the manual?
Questions and answers