Advertisement
Quick Links
Advertisement

Related Manuals for RPB GX4


Summary of Contents for RPB GX4
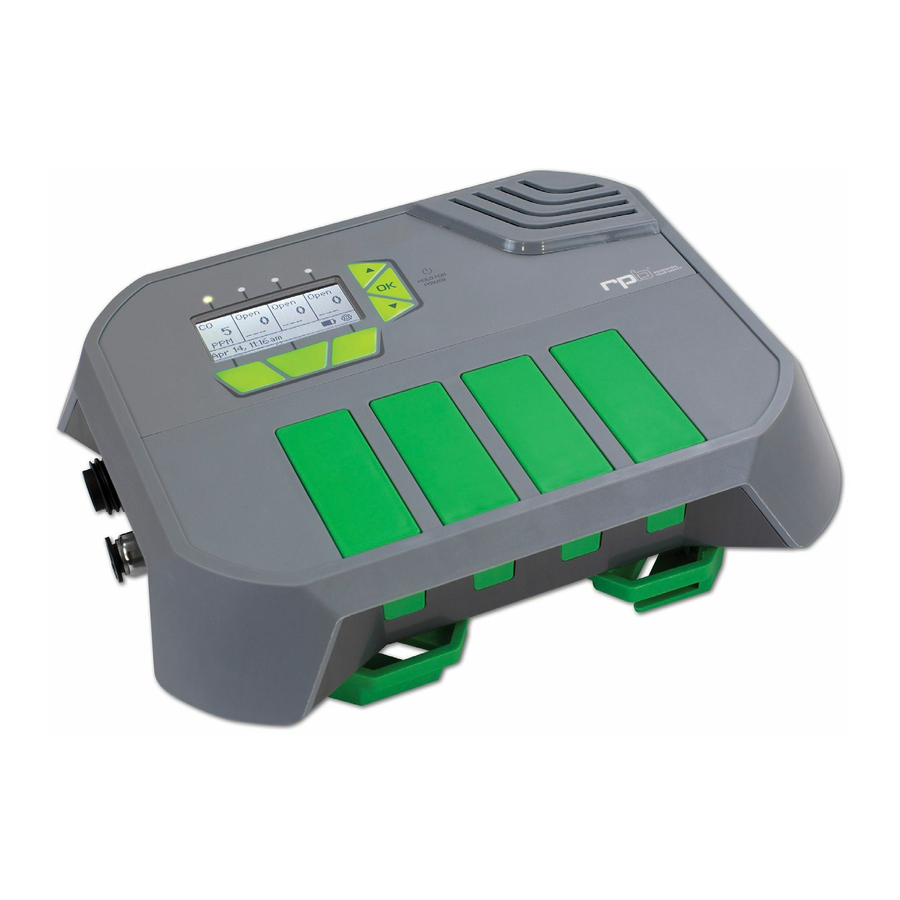
- Page 1 INSTRUCTION MANUAL...
-
Page 2: Table Of Contents
RPB® Safety Asia Pacific Headquarters 652 Halswell Junction Road, Hornby South 8042 New Zealand. T: +64-3-357-1761 F: +64-3-357-1763 E: sales.nz@rpbsafety.com rpbsafety.com RPB, Advancing Your Safety, Nova 3, Nova, Radex and Zytec are registered trademarks of RPB Safety LLC. For technical assistance contact our Customer Service Department Form #: 7.20.533... -
Page 3: Introduction
INTRODUCTION with Battery Clips (P/N: 08-431). The unit The RPB® GX4, model 08-400, tests the is designed to operate in temperature quality of compressed breathing air for ranges of 14° to 120F (-10 to +50C) Carbon Monoxide and other gases*. - Page 4 It DOES NOT remove any gasses from the air. listed in the parts and accessories. Do NOT remove any part of the GX4, Only gasses relating to the inserted especially the air inlet fitting or the cartridges can be detected. Ensure...
-
Page 5: Setup
SETUP BEFORE YOU USE YOUR Place the GX4 in a place that: GX4. The alarm can be heard Is protected from water and impact Unpack the unit from the shipping See mounting instructions on pg. 8. carton and remove the shrink wrap from the sensor cartridge. - Page 6 (CONTINUED) WIFI CONNECTION To unleash the full power of the GX4, it is recommended to connect it to the internet via the built-in wireless network transceiver. This connection allows easy firmware upgrades and the unit hosts a website available to devices on that network. Use the website to stream real-time gas levels, search through logs or print reports.
-
Page 7: Website
This allows the user to view information about the unit and change settings such as the network connection. This is your portal to access the full potential of the GX4. To access the website for your GX4 from your internet connected device: In Hotspot mode: Browse to http://192.168.1.3/... - Page 8 SETUP (CONTINUED) MOUNTING TO A RADEX® FILTRATION UNIT Figure 1.1 Position the monitor so that the green brackets on the back line up with the mounting bracket on the side of the RADEX® , turn clockwise until the monitor clicks into place. MOUNTING TO A WALL BRACKET Figure 1.2 Figure 1.3...
- Page 9 CONNECT THE AIR SUPPLY between 10-125psig. Figure 2.1 Figure 2.2 Connect the air supply hose to a Insert the 3/8” O.D. Air Supply Hose (P/N: Grade D air source regulated to between 08-428) into the push-lock fitting on the 7 to 80 PSI (50-550 kPa). Maximum air left side of the monitor.
- Page 10 AUX cable (08-434). outlet. The use of an external alarm is It is recommended to use a qualified recommended when the GX4 cannot electrician when wiring to ensure you be seen or heard by the operator. The do not damage the electrodes.
- Page 11 EXTERNAL WIRING DIAGRAM...
-
Page 12: Operation
Figure 5.1 Tip: you can store the AC Adaptor To turn the unit on, press and hold the between the tabs on top of the “OK” button until the “rpb” logo appears mounting bracket. on the screen. POWER OFF Figure 6.1 Press and hold the “OK”... - Page 13 OPERATION (CONTINUED) GAS DETECTION CARTRIDGES Figure 7.2 Figure 7.1 The gas detection sensors are supplied Insert the cartridge into any of the 4 in individual cartridges. Select the slots in the monitor. First locate the top cartridge for each gas you wish to end so the tabs line up, then push the detect at the correct alarm threshold for bottom until it clicks.
- Page 14 OPERATION (CONTINUED) Figure 7.5 Each monitor comes with 3 blank cartridges. These should be placed into slots that are not currently being used to protect the electrical contacts and air supply manifold. REMOVE CARTRIDGE Figure 8.1 Figure 8.2 To remove a cartridge, press the Lift the edge of the cartridge to remove corresponding release button and the it fully from the monitor.
- Page 15 Configure a WiFi connection or change Note: Logs are not erased during a advanced IP settings. factory reset. When connecting the GX4 to a network you may be prompted to enter the network name (SSID) and the wireless password. If you do not know these,...
-
Page 16: Sensor Check
Zero Air Bottle (08-460) containing 20.9% Oxygen in Nitrogen Control Air Bottle(s) specific to the gas of the cartridge(s) being checked Calibration Kit (08-450) to connect the bottles to the GX4 IMPORTANT: Alarms will be disabled. You must confirm the monitor is not in use. - Page 17 SENSOR CHECK (CONTINUED) SENOR CHECK OPERATION DO NOT REMOVE THE CARTRIDGES DURING A SENSOR CHECK. Disconnect air supply. Press the “Menu” button. Select “Sensors”. You will need: Zero Air: 08-460 Control Air (select depending on type of sensor being checked). Calibration Kit: 08-450 Ensure you are wearing proper P.P.E.
-
Page 18: Alarms
ALARMS BATTERY The alarm will sound in the following scenarios: Although the GX4 is designed to be Concentration of any gas being run on external power, it has a built in monitored exceeds the allowable Lithium Polymer battery. The battery... -
Page 19: Maintenance
MAINTENANCE MANIFOLD CHECK AND REPLACE Figure 10.1 Figure 10.2 In the back of the GX4, there is a To remove the manifold for inspection, manifold (to distribute the air to the press in the green clip so it can be... - Page 20 MAINTENANCE (CONTINUED) Figure 10.6 Figure 10.5 After removing the manifold, inspect To replace the manifold, insert the it from all sides to make sure all of the tapered end into the green ring of the holes are clear and that there is no oil push-lock fitting inside the back of or debris inside of the tube.
- Page 21 CLEANING INSTRUCTIONS Power/AUX Receptacles: Spray with The GX4 should be kept clean to insure optimal performance. Different parts of compressed air, clean the contacts the GX4 should be cleaned using these following the contact cleaning instructions: instructions. Sensor Cartridge Contacts: The Alarm Siren: Spray with compressed air.
-
Page 22: Parts And Accessories
PARTS AND ACCESSORIES... - Page 23 PARTS LIST Item Number Description Part Number GX4 Gas Monitor with mounting brackets 08-410 Mounting Brackets (Pair) 08-425 Wall Mounting Bracket 08-231 Carbon Monoxide Sensor (CO) 10ppm 08-420-01 Carbon Monoxide Sensor (CO) 5ppm 08-420-02 Hydrogen Sulfide Sensor (H S) 10PPM...
- Page 24 Looking for an advanced climate control device that can heat and cool your supplied air just by the slide of a lever? Look no further than the RPB® C40. From the searing heat of an Arizona summer to a severe Scandinavian winter the RPB®...
Need help?
Do you have a question about the GX4 and is the answer not in the manual?
Questions and answers