Table of Contents
Advertisement
Quick Links
Wind Support
Maintenance Instructions and
Directions for Use
Wind Support
Attention
Important guidelines for end users
Please read carefully and bear in mind before using!
These instructions must be kept by the end user
Last revised: July 2011
We reserve the right to make technical changes.
Item no.: 113197-0000
Advertisement
Table of Contents

Related Manuals for weinor Wind Support


Summary of Contents for weinor Wind Support
- Page 1 Wind Support Maintenance Instructions and Directions for Use Wind Support Attention Important guidelines for end users Please read carefully and bear in mind before using! These instructions must be kept by the end user Last revised: July 2011 We reserve the right to make technical changes.
-
Page 2: Table Of Contents
6.1 Locking the Wind Support (awning without rain or sun/wind sensor) ......6 6.2 Locking the Wind Support (awning with rain or sun/wind sensor)........ 8 6.3 Locking the Wind Support in its End Position at the Ball-Shaped Head ....... 9 6.4 Replacing the Ball-Shaped Heads .................. 10 ... -
Page 3: Important Notes / Safety Notes
Please read the operating instructions before using the wind support for the first time. For per- sonal safety, it is important that these instructions are complied with. All instructions must be kept by the customer and passed on to the new owner if ownership of the wind support passes to a third party. -
Page 4: Use In Ice And Snow
During wintery conditions and snowfalls, and when temperatures fluctuate around freezing point, you may find snow has settled and/or ice has formed on outer parts or inside the wind support which may result in the hand knob locking mechanism or the height-adjustable aluminium pipe freezing and you being unable to use these parts. -
Page 5: Description Of Construction And Function
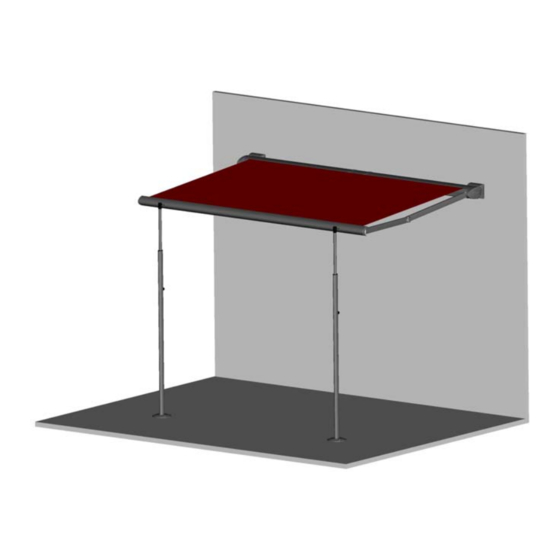
Connecting elements are fitted to the drop profile on the awning. These elements can be locked in the wind support if required. Since the wind supports are height- adjustable, they can be adjusted to the different clearance heights of the awning. The wind sup- ports are designed for a max. -
Page 6: Operation
Wind Support Operation The following notes detail how to operate the wind support using the Cassita as an example. Other weinor awnings are operated in the same way. Locking the Wind Support (awning without rain or sun/wind sensor) The following locking method is only possible on awnings that are not controlled by an automatic rain or sun/wind sensor. - Page 7 Wind Support Loosen the hand knob on the wind support (3.), and turn the rotating head approx. 90° (4.). Then re-tighten the hand knob (5.). We reserve the right to make technical changes.
-
Page 8: Locking The Wind Support (Awning With Rain Or Sun/Wind Sensor)
If the awning is controlled by a rain or sun/wind sensor, the locking mecha- nism on the wind support can only be locked in the following way. Never leave the awning unattended. Realign the wind support before opening the awning. -
Page 9: Locking The Wind Support In Its End Position At The Ball-Shaped Head
Wind Support Loosen the hand knob on the wind support (3.), and slide the rotating head upwards (approx. 20mm) until the awning is slightly tensioned against the drop profile (4.). Do not turn the rotat- ing head during this time. Then re-tighten the hand knob (5.). -
Page 10: Replacing The Ball-Shaped Heads
Wind Support Replacing the Ball-Shaped Heads If the wind support is inadvertently left in locked position, the ball-shaped heads will break off un- der heavy loads (e.g. in very strong winds) to avoid greater damage occurring to the wind support and awning. -
Page 11: Dismantling The Wind Support (E.g. During The Winter Season)
The following illustrations show how to dismantle a wind support attached to a base plate. Wind supports attached to a ground sleeve are dismantled in the same way. Loosen the four grub screws at the bottom end of the wind support (1.) and detach the entire wind support from the base plate (2.). -
Page 12: Adjusting The Wind Support
Adjusting the Wind Support Adjusting the Height of the Wind Support Adjust the height of the wind support so that the rotating head on the wind support is positioned at the same height as the ball-shaped heads on the awning's drop profile. -
Page 13: Adjusting The Inclination Of The Wind Support
- Gradient 3° maximum Loosen the four grub screws at the bottom end of the wind support (1.) Lift the cover plate (2.) and the wind support pole until you can see the side opening in the adjustment base (4.) or the screw in the adjustment base becomes accessible with an Allen key. -
Page 14: Carrying The Wind Supports When Fitted To A Moulded Base
Wind Support Loosen the fixing screw in the adjustment base (4.) Turn the screws under the adjustment base (turning in the direction in which the wind support can be tilted) to adjust the angle of the wind support (5.) Once the required angle is reached, re-tighten the screw located in the centre of the adjustment base (4.) and re-tighten the four grub screws at the bottom end of the wind support (1.) -
Page 15: Troubleshooting
Wind Support Troubleshooting Error Cause Remedy Wind supports are incorrectly posi- Check the position of the wind Ball-shaped heads on the tioned supports (especially wind sup- awning do not fully travel into ports with moulded base) the rotating head of the wind... -
Page 16: 10 Other Weinor Products
Wind Support Other weinor products Interested in learning more about weinor's range of products? Then please contact your local specialist retailer who will be happy to advise you on selecting the right sun protection unit. You can also visit us online at: www.weinor.com...
Need help?
Do you have a question about the Wind Support and is the answer not in the manual?
Questions and answers