Advertisement
Get To Know Your Switch
This chapter contains the following sections:
•
•
•
•
•
•
•
•
Introduction
Thank you for puchasing the Cisco CBS 350 Series Switches, which offers Cisco's most cost-effective
stackable managed switches. Simple to deploy and manage, the Cisco CBS 350 Series provide 24 or 48 ports
of 1G connectivity with 10G uplinks, or 12 to 48 ports of 10G connectivity, providing a solid foundation for
business applications. The advanced features make these switches the ideal choice for aggregation, access,
or server room switches, for any business looking for a reliable solution in an affordable price range.
Before You Begin
Before you begin installing your device, ensure that the following items are available:
• RJ-45 Ethernet cables for connecting network devices. A category 6a and higher cable is required for
• Tools for installing the hardware.
Introduction, on page 1
Rack Mounting Switch, on page 2
Wall Mounting a Switch, on page 2
Stacking the Switches, on page 5
Power over Ethernet Considerations, on page 6
Front Panel, on page 7
Configuring Switches, on page 9
Navigation, on page 11
10G ports; a category 5e and higher cable is required for all other ports.
• The rack-mount kit packed with the switch contains four rubber feet for desktop placement, and
two brackets and twelve screws for rackmounting.
• If the supplied screws are lost, use replacement screws in the following size:
• Diameter of the screw head: 6.9 mm
• Length of face of screw head to base of screw: 5.9 mm
• Shaft diameter: 3.94 mm
Get To Know Your Switch
1
Advertisement

Related Manuals for Cisco CBS 350 Series


Summary of Contents for Cisco CBS 350 Series
-
Page 1: Table Of Contents
Thank you for puchasing the Cisco CBS 350 Series Switches, which offers Cisco’s most cost-effective stackable managed switches. Simple to deploy and manage, the Cisco CBS 350 Series provide 24 or 48 ports of 1G connectivity with 10G uplinks, or 12 to 48 ports of 10G connectivity, providing a solid foundation for business applications. -
Page 2: Rack Mounting Switch
Get To Know Your Switch Rack Mounting Switch • A computer to manage the device either via the console port or via the web-based interface. for web based interface the computer needs to support one of the following browsers: • Microsoft Edge •... - Page 3 Get To Know Your Switch Wall Mount an 8 Port Switch Caution Read these instructions carefully before beginning installation. Failure to use the correct hardware or to follow the correct procedures could result in a hazardous situation to people and damage to the system. Caution Do not wall-mount the switch with its front panel facing up.
- Page 4 Get To Know Your Switch Wall Mount an 8 Port Switch Step 1 Locate the screw template. The template is used to align the mounting screw holes. Step 2 Position the screw template so that the edge that is marked as CABLE SIDE ENTRY faces toward the floor. Make sure that the switch is attached securely to wall studs or to a firmly attached plywoodmounting backboard.
-
Page 5: Stacking The Switches
The switch can only be stacked without Mesh topology. The switches in the same stack are connected together through their stack ports. Depending on the type of stack ports and the desired speed, you may need Cat6a Ethernet cables or Cisco approved modules or cables for the switches. Get To Know Your Switch... -
Page 6: Power Over Ethernet Considerations
Get To Know Your Switch Power over Ethernet Considerations Power over Ethernet Considerations Some switches support PoE while others do not. The switch models that support PoE have a P in their model number, such as: CBSxxx-xxP-xx. If your switch is one of the Power over Ethernet (PoE) models, consider the following power requirement. -
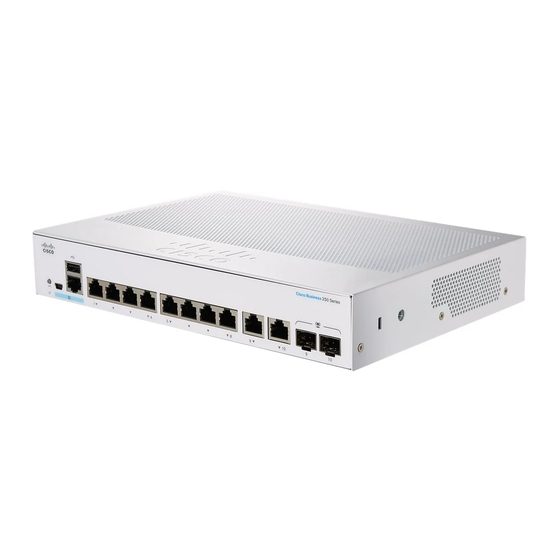
Page 7: Front Panel
The ports, LEDs, and Reset button are located on the front panel of the switch, as well as the following components: Cisco Business 250 Series Model Note Models may differ within the CBS 250 series and this is just a representation of a model within the series. - Page 8 Front Panel LEDs Note Models may differ within the CBS 350 series and this is just a representation of a model within the series. • Console port with RJ-45 and mini-USB connectors. The console connects a serial cable to a computer serial port so that it can be configured using a terminal emulation program.
-
Page 9: Configuring Switches
Using the console port requires advanced user skills. The following table shows the default settings used when configuring your switch for the first time. Parameter Default Value Username cisco Password cisco LAN IP 192.168.1.254 Configuring Your Switch Using the Web-based Interface To access the switch with a web-based interface, you must know the IP address that the switch is using. - Page 10 When the login page appears, choose the language that you prefer to use in the web-based interface and enter the username and password. The default username is cisco. The default password is cisco. Usernames and passwords are both case sensitive. Step 7 Click Log In.
-
Page 11: Navigation
Console access also provides additional interfaces for debug access which are not available via the web interface. These debug access interfaces are intended to be used by a Cisco Support Team personnel, in cases where it is required to debug device’s behavior. - Page 12 Get To Know Your Switch Basic or Advanced Display Mode corresponding feature tab in the navigation menu to display a menu of subcategories. Select a subcategory and repeat this process until you see the desired page, and then select the page to display it in the main window. Basic or Advanced Display Mode The product supports many features, and therefore the WEB GUI includes hundreds of configuration and display pages.
- Page 13 Get To Know Your Switch Management Buttons Button Name Description Click to reset changes made on the page. Clear Clear information on page. Click to clear filter to select information displayed. Clear Filter Clear All Interface Counters Click to clear the statistic counters for all interfaces. Clear Interface Counters Click to clear the statistic counters for the selected interface.
- Page 14 Running Configuration. Username Displays the name of the user logged on to the device. The default username is cisco. (The default password is cisco ). Host Name Displays the host name assigned in the System Settings page.
- Page 15 Get To Know Your Switch Application Header Application Link Name Description Click to display the device name and device version number. Click to display the online help. The SYSLOG Alert Status icon appears when a SYSLOG message, above the critical severity level, is logged.
- Page 16 Get To Know Your Switch Application Header Get To Know Your Switch...
Need help?
Do you have a question about the CBS 350 Series and is the answer not in the manual?
Questions and answers