Advertisement
Quick Links
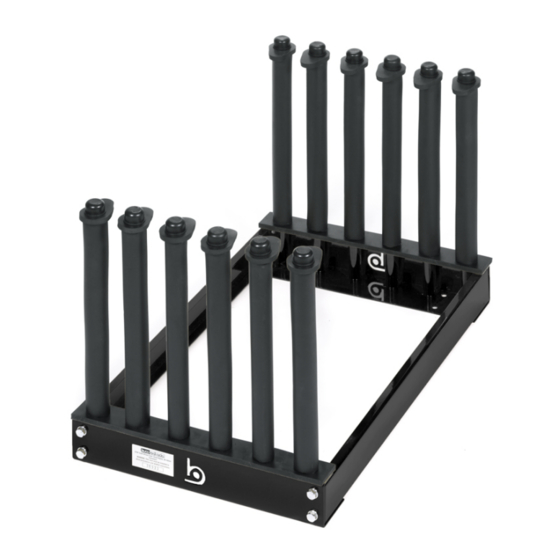
S-SERIES REDI RACK™
S-Series models and specifications:
S-05B
S-0918B (18" Mast Height): 9-Lite Capacity. Dimensions: 30" (L) x 30" (W) x 21" (H)
S-0924B
S-111524B
S-1418B (18" Mast Height): 14-Lite Capacity. Dimensions: 45" (L) x 30" (W) x 21" (H)
S-1424B
S-17x42B
S-19x48B
Technical Assembly Required
Save these instructions for future use
you have any questions
Page
of
Advertisement

Related Manuals for Burco RediRacks S Series

Summary of Contents for Burco RediRacks S Series
- Page 1 S-SERIES REDI RACK™ S-Series models and specifications: S-05B S-0918B (18” Mast Height): 9-Lite Capacity. Dimensions: 30” (L) x 30” (W) x 21” (H) S-0924B S-111524B S-1418B (18” Mast Height): 14-Lite Capacity. Dimensions: 45” (L) x 30” (W) x 21” (H) S-1424B S-17x42B S-19x48B...
- Page 2 Step 1: Place End Brackets................6 Step 2: Place 4 Fasteners................Step 3: Place last Side Rail............... Step 4: Place 4 Fasteners................Step 5: Tighten all Fasteners ..............Mounting Advisements...................9 Page 2 of 9 ©2015 Burco, Inc.
- Page 3 S-SERIES REDI RACK™ Tools Required for Installation (9/16” Box End Wrench) (Tape Measure) (Letter “X” Drill Bit) (Cordless Drill) Page ©2015 Burco, Inc.
- Page 4 (Slick Eddy™) (3/8-16 UNC x 3/4” Bolt) (3/8” Flat Washer) To prolong the life of (SE-46) (3/8-16 UNC x 1.75” Bolt) the rubber strip, the Slick Eddy should be Extra hardware included for use with used each time a S-111524B, S-17x42B, S-19x48B installations. windshield is reoved See page 9 illustration for placement of extra or placed into the...
- Page 5 Replacement Parts for Burco ® S-Series Redi Racks™ RTC-01 RFL-01 RCT-05 RBR-05 Burco’s patented fingerlock design i s exclusive and proprietary to Burco® For use with Burco ® Redi Racks ONLY REPLACEMENT PARTS FOR BURCO S-SERIES REDI RACKS™ All S-Series All S-Series masts Models with 15"...
- Page 6 S-SERIES REDI RACK™ NOTE: Make sure bottom bolt cutouts are facing downward x 3/4 Page ©2015 Burco, Inc.
- Page 7 Step 4: x 3/4 and a at washer into each of the four designated holes as shown below. Only tighten fasteners finger tight for now. Page ©2015 Burco, Inc.
- Page 8 30 lb.-ft. Once all eight of the bolts are tightened down, the Redi Rack is ready to be installed onto the mounting surface. DISCLAIMER: IN NO EVENT, REGARDLESS OF CAUSE, SHALL BURCO INC.® BE LIABLE FOR ANY INDIRECT, SPECIAL, INCIDENTAL, PUNITIVE OR CONSEQUENTIAL DAMAGES OF ANY KIND, WHETHER ARISING UNDER BREACH OF CONTRACT, TORT (INCLUDING NEGLIGENCE), STRICT LIABILITY OR OTHERWISE, EVEN IF ADVISED OF THE POSSIBILITY OF SUCH DAMAGES.
- Page 9 9/16" box end wrench. NOTE: For S-111524B, S-17x42B, and S-19x48B installation: Mount 3/8-16 bolts and washers in 2 additional places. Page ©2015 Burco, Inc.
Need help?
Do you have a question about the RediRacks S Series and is the answer not in the manual?
Questions and answers