Table of Contents
Advertisement
Available languages
Available languages
Quick Links
Advertisement
Table of Contents

Subscribe to Our Youtube Channel
Related Manuals for Axis T8415


Summary of Contents for Axis T8415
- Page 1 AXIS T8415 Wireless Installation Tool Installation Guide...
- Page 2 This equipment has been designed and tested to fulfill Liability applicable standards for: Every care has been taken in the preparation of this document. Please inform your local Axis office of any • Radio frequency emission when installed according to inaccuracies or omissions. Axis Communications AB cannot the instructions and used in its intended environment.
- Page 3 Class B limit of AS/NZS CISPR 22. The product shall be connected using a shielded network Por medio de la presente Axis Communications AB declara cable (STP) that is properly grounded. que el este producto cumple con los requisitos esenciales...
- Page 4 • find answers to resolved problems in the FAQ database. Search by product, category, or phrase • report problems to Axis support staff by logging in to your private support area • chat with Axis support staff •...
-
Page 5: Hazard Levels
AXIS T8415 Wireless Installation Tool Safety Information Read through this Installation Guide carefully before installing the product. Keep the Installation Guide for future reference. Hazard Levels DANGER Indicates a hazardous situation which, if not avoided, will result in death or serious injury. -
Page 6: Lead-Acid Battery
Axis or a third party. • Use only spare parts provided by or recommended by Axis. • Do not attempt to repair the product by yourself. Contact Axis support or your Axis reseller for service matters. Lead-Acid Battery The Axis product uses a Lead-Acid battery as the power supply. - Page 7 AXIS T8415 Wireless Installation Tool NO TICE TICE TICE Dispose of used batteries according to local regulations or the battery manufacturer's instructions.
-
Page 9: Package Contents
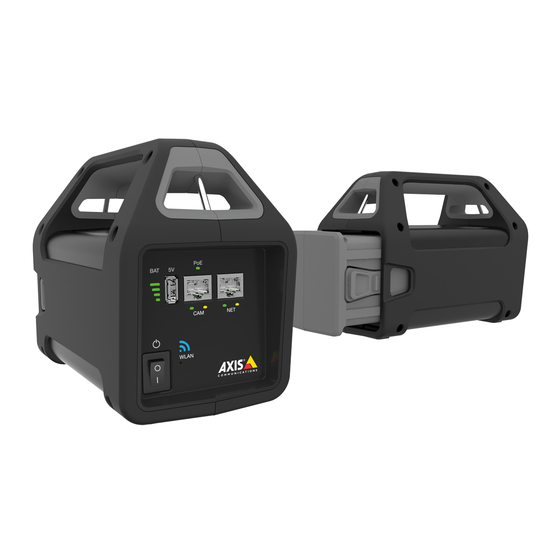
AXIS T8415 Wireless Installation Tool Installation Guide This Installation Guide provides instructions for AXIS T8415 Wireless Installation Tool . This installation tool support both the use of a laptop or an app for installation of cameras. For best performance and experience it is recommended to use the app. - Page 10 AXIS T8415 Wireless Installation Tool WLAN indicator Reset button Main Unit Battery Charger connector 10 Battery 11 Label (network settings) Charger Charger male connector Charger LED Power cord plug (EU) Power cord plug (US) Power cord plug (UK) Power cord plug (AU) Network Connector RJ45 Ethernet connector.
-
Page 11: Axis T8415 Web Interface
AXIS T8415 Wireless Installation Tool USB Connector AXIS T8415 is equipped with a USB connector (non-data). This connector can be used for charging any compatible handheld device (5V, 2.1A). Note • AXIS T8415 must be powered on when charging a handheld device. - Page 12 • Default SSID and password can be found on the label, located on the main unit. If changed in the web interface the label is no longer valid. • AXIS T8415 supports both 2.4GHz and 5GHz. • Channels might vary depending on country.
- Page 13 Interface Configuration: Set IP-address manually or get IP-address from a DHCP server. • Address: The IP-address for the unit. • Subnet mask: The subnet-mask for the unit. • Gateway: Default gateway for the unit. Maintenance Upgrade the firmware for AXIS T8415.
-
Page 14: Charge The Battery
AXIS T8415 Wireless Installation Tool Note The latest firmware can be found at www.axis.com Charge the Battery Attach the country specific power cord plug to the charger. See below image. Connect the battery charger to the battery (see below image) and to the power outlet. -
Page 15: Change The Battery
AXIS T8415 Wireless Installation Tool NO TICE TICE TICE • Due to the self-discharge characteristics of this type of battery, it is imperative that they be charged within 6 months of storage, otherwise permanent loss of capacity might occur as a result of sulfation. -
Page 16: Installation Preparations
Camera Installation - AXIS Wireless Installation Tool app 1. Connect the camera to the CAM port (PoE) on the main unit. 2. Verify that the PoE indicator is lit. 3. Connect to AXIS T8415 WiFi, see Connect to AXIS T8415 WiFi on page 16... - Page 17 AXIS T8415 Wireless Installation Tool 4. Start the app AXIS Wireless Installation Tool Note The start-up time for cameras varies for different products. It may take a few minutes before the camera is visible in the camera list in the app.
-
Page 18: Camera Installation - Laptop
Select 6 Snapshot to take a snapshot of the video image. Select 3 Settings to edit network settings for the product. Number 7 Wizard. This wizard starts the first time an Axis product is accessed or after a reset to factory default. -
Page 19: Troubleshooting
Make sure the camera do not have an IP-address in the range 10.252.252.X • Cannot login to AXIS T8415 web interface when using network cable and a PC. Make sure the network cable is connected to the correct port (NET). -
Page 20: Reset To Factory Default
To reset the product to the factory default settings: 1. Press and hold the Reset button for 10 seconds. 2. AXIS T8415 now re-starts with all values reset to factory default. Note See Hardware Overview on page 9 for location of the Reset button. -
Page 21: Niveaux De Risques
AXIS T8415 Wireless Installation Tool Informations sur la sécurité Lisez attentivement ce guide d'installation avant d'installer l'appareil. Conservez le guide d'installation pour toute référence ultérieure. Niveaux de risques DANGER Indique une situation dangereuse qui, si elle n'est pas évitée, entraînera le décès ou des blessures graves. - Page 22 AXIS T8415 Wireless Installation Tool Consignes de sécurité A A A VIS • Le produit Axis doit être utilisé conformément aux lois et règlementations locales en vigueur. • Conserver ce produit Axis dans un environnement sec et ventilé. • Ne pas exposer ce produit Axis aux chocs ou aux fortes pressions.
- Page 23 AXIS T8415 Wireless Installation Tool ATTENTION • Ne jamais jeter la batterie au feu, car cela pourrait provoquer une explosion ou une émanation de gaz toxique. • Ne pas tenter de démonter la batterie, car cela pourrait provoquer une fuite d’acide sulfurique susceptible d’entraîner des blessures.
-
Page 25: Contenu De L'emballage
Guide d’installation Ce Guide d’installation fournit des instructions pour l’installation de l’AXIS T8415 Wireless Installation Tool. Cet outil d’installation prend en charge l’utilisation d’un ordinateur portable ou d’une application pour l’installation de caméras. Pour obtenir des performances et une expérience optimisées, il est recommandé d’utiliser l’application. - Page 26 AXIS T8415 Wireless Installation Tool RJ45 non-PoE (NET) Commutateur Marche/Arrêt Voyant WLAN Touche Reset Unité principale Connecteur du chargeur de batterie 10 Batterie 11 Étiquette (paramètres réseau) Chargeur Connecteur mâle du chargeur Voyant du chargeur Fiche de cordon d’alimentation (UE) Fiche de cordon d’alimentation (US)
- Page 27 IP sur l’étiquette apposée sur l’unité centrale. Note • Les copies d’écran peuvent différer selon la version du micrologiciel. • Le moniteur AXIS T8415 est doté de deux adresses IP. L’une est réservée à la connexion Wi-Fi et l’autre à la connexion au réseau câblé. •...
- Page 28 Si ces informations ont été modifiées sur l’interface Web, les données de l’étiquette ne sont plus valables. • L’AXIS T8415 prend en charge les fréquences 2,4 GHz et 5 GHz. • Les canaux varient en fonction des pays. Network (Réseau) - - - Wired Network (Réseau câblé)
- Page 29 AXIS T8415 Wireless Installation Tool • External DHCP Server (Serveur DHCP externe) : détection d’un serveur DHCP externe. • Onboard DHCP Server (Serveur DHCP interne) : On (Activé) : serveur DHCP interne activé Off (Désactivé) : serveur DHCP interne désactivé...
-
Page 30: Mise En Charge De La Batterie
AXIS T8415 Wireless Installation Tool Cette page permet de mettre à jour le micrologiciel du moniteur AXIS T8415. Note La version la plus récente du micrologiciel se trouve sur le site Web www.axis.com Mise en charge de la batterie Fixez la fiche de cordon d’alimentation spécifique au pays au chargeur. Voir l’image ci-dessous. -
Page 31: Changement De La Batterie
AXIS T8415 Wireless Installation Tool A A A VIS • En raison des caractéristiques d’autodécharge de ce type de batterie, il est impératif que la batterie soit rechargée dans les 6 mois de stockage, sinon une perte de capacité pourrait survenir suite à un sulfatage. - Page 32 Préparatifs à l’installation Avec l’AXIS T8415 Wireless Installation Tool il est possible de réaliser des installations de caméras à l’aide d’un appareil portable ou d’un ordinateur portable. Il est recommandé d’utiliser un appareil portable et l’application AXIS Wireless Installation Tool pour obtenir les meilleures performances.
- Page 33 1. Connectez la caméra au port CAM (PoE) de l’unité principale. 2. Vérifiez que le témoin PoE est allumé. 3. Connectez-vous au Wi-Fi AXIS T8415, voir Connexion au Wi-Fi AXIS T8415 page 32 4. Démarrez l’application AXIS Wireless Installation Tool.
- Page 34 3. Connectez le portable au port NET (non PoE) de l’unité principale. 4. Accédez à l’interface Web et appuyez sur Camera List (Liste des caméras). Note Voir Interface Web AXIS T8415 pour savoir comment accéder à l’Interface Web AXIS T8415. 5. Sélectionnez la caméra en cliquant sur l’adresse IP.
-
Page 35: Dépannage
Assurez-vous que la caméra n’a pas une adresse IP comprise dans la plage 10.252.252.X • Impossible de se connecter à l’interface Web AXIS T8415 en utilisant un câble réseau et un ordinateur. Vérifiez que le câble réseau est branché sur le port qui convient (NET). -
Page 36: Réinitialisation Aux Paramètres D'usine Par Défaut
AXIS T8415 Wireless Installation Tool Sélectionnez un autre canal. La liste ci-dessous est applicable si vous essayez de découvrir une caméra autre que Axis avec le support Onvif. • La caméra est réglée sur une adresse IP dynamique, mais il n’y a pas de serveur DHCP sur le réseau. -
Page 37: Weitere Nachrichtenstufen
AXIS T8415 Wireless Installation Tool Sicherheitsinformation Lesen Sie das Installationshandbuch sorgfältig durch bevor sie das Produkt installieren. Bewahren Sie das Installationshandbuch für zukünftige Zwecke auf. Gefährdungsstufen GEFAHR Weist auf eine gefährliche Situation hin, welche, falls nicht verhindert, zu Tod oder schweren Verletzungen führt. - Page 38 Bestimmungen erfolgen. • Lagern Sie das Axis Produkt in einer trockenen und belüfteten Umgebung. • Achten Sie darauf, dass das Axis Produkt weder Stößen noch starkem Druck ausgesetzt ist. • Achten Sie darauf, dass das Axis Produkt keinen Vibrationen ausgesetzt ist.
- Page 39 AXIS T8415 Wireless Installation Tool VORSICHT • Entsorgen Sie die Batterie niemals in einem Feuer, da ansonsten die Gefahr einer Explosion besteht oder toxische Gase entstehen können. • Versuchen Sie nicht, die Batterie zu zerlegen, da Schwefelsäure austreten und dies Verletzungen verursachen kann.
-
Page 41: Übersicht Über Die Hardware
AXIS T8415 Wireless Installation Tool Installationsanleitung Diese Installationsanleitung enthält Anweisungen für das AXIS T8415 Wireless-Installations-Tool. Mit diesem Installationstool können Kameras mithilfe eines Laptops oder einer App installiert werden. Für eine optimale Leistung und Funktion wird die Verwendung der App empfohlen. - Page 42 AXIS T8415 Wireless Installation Tool Ein/Aus-Schalter WLAN-Anzeige Reset-Taste Haupteinheit Anschluss für Batterieladegerät 10 Batterie 11 Etikett (Netzwerkeinstellungen) Ladegerät Stecker des Ladegeräts Ladegerät-LED Netzkabelstecker (EU) Netzkabelstecker (USA) Netzkabelstecker (GB) Netzkabelstecker (AU) Netzwerkanschluss RJ-45-Ethernetanschluss. RJ-45-Ethernetanschluss mit Power over Ethernet Plus (PoE+). HINWEIS...
- Page 43 Beachten • Die Bildschirmfotos stimmen möglicherweise nicht mit den neuesten Firmware-Versionen überein. • AXIS T8415 verfügt über zwei IP-Adressen: Eine für die Verbindung über WiFi und eine für die Verbindung über ein verkabeltes Netzwerk. • Name: Name der Einheit, kann geändert werden.
- Page 44 • Standard-SSID und Kennwort befinden sich auf dem Etikett auf der Haupteinheit. Wenn Sie diese über die Weboberfläche ändern, verliert das Etikett seine Gültigkeit. • AXIS T8415 unterstützt sowohl 2,4 GHz als auch 5 GHz. • Die Kanäle unterscheiden sich je nach Land.
- Page 45 AXIS T8415 Wireless Installation Tool • External DHCP Server (Externer DHCP-Server): Erfassung eines externen DHCP-Servers. • Onboard DHCP Server (Integrierter DHCP-Server): On (An): Interner DHCP-Server ist aktiviert Off (Aus): Interner DHCP-Server ist deaktiviert • Ethernet Ports (Ethernet-Ports): Status der Ethernet-Ports:...
-
Page 46: Aufladen Der Batterie
AXIS T8415 Wireless Installation Tool Aktualisieren der Firmware für AXIS T8415. Beachten Die aktuelle Firmware finden Sie unter www.axis.com. Aufladen der Batterie Stecken Sie den landesspezifischen Netzstecker in das Ladegerät, wie unten dargestellt. Schließen Sie (wie unten dargestellt) das Batterieladegerät an die Batterie an und stecken Sie es in die Steckdose. -
Page 47: Austausch Der Batterie
AXIS T8415 Wireless Installation Tool HINWEIS HINWEIS HINWEIS • Wegen der Selbstentladungseigenschaften dieses Batterietyps muss die Batterie nach sechsmonatiger Lagerung unbedingt aufgeladen werden, ansonsten kann es aufgrund von Sulfatierung zu einem dauerhaften Kapazitätsverlust kommen. • Verwenden Sie ausschließlich das mitgelieferte Ladegerät. - Page 48 Aufladen der Batterie auf Seite 46 • Wenn Sie die App AXIS Wireless-Installations-Tool verwenden, stellen Sie sicher, dass diese vor dem Herstellen einer Verbindung zum AXIS T8415 WiFi-Netzwerk auf das Handgerät heruntergeladen wurde. • Das Gerät muss vor Anschluss der Kamera an die Haupteinheit eingeschaltet werden.
- Page 49 AXIS T8415 Wireless Installation Tool 2. Überprüfen Sie, ob die PoE-Statusanzeige leuchtet. 3. Stellen Sie eine Verbindung zum AXIS T8415 WiFi her, siehe Herstellen einer Verbindung zum AXIS T8415 WiFi auf Seite 48. 4. Starten Sie die App AXIS Wireless-Installations-Tool.
- Page 50 Wählen Sie 6 Schnappschuss, um einen Schnappschuss des Videobilds aufzunehmen. Wählen Sie 3 Einstellungen, um die Netzwerkeinstellungen für das Produkt zu bearbeiten. 7 Assistent. Dieser Assistent startet beim ersten Zugriff auf das Axis Produkt oder nach dem Zurücksetzen auf die werksseitigen Standardeinstellungen.
-
Page 51: Fehlerbehebung
CAM: Kameraanschluss NET: Laptopanschluss Stellen Sie sicher, dass die Kamera und das AXIS T8415 im gleichen IP-Adressbereich sind. Stellen Sie sicher, dass das AXIS T8415 als Standardgateway verwendet wird. Stellen Sie sicher, dass die Kamera nicht über eine IP-Adresse im Bereich 10.252.252.X verfügt. - Page 52 WLAN-Anzeige dauerhaft leuchtet. So wird das Produkt auf die werksseitigen Standardeinstellungen zurückgesetzt: 1. Halten Sie die Reset-Taste 10 Sekunden lang gedrückt. 2. Das AXIS T8415 wird neu gestartet und alle Werte werden auf die werksseitigen Standardeinstellungen zurückgesetzt. Beachten Unter Übersicht über die Hardware auf Seite 41 ist dargestellt, wo sich die Reset-Taste befindet.
-
Page 53: Livelli Di Pericolo
AXIS T8415 Wireless Installation Tool Informazioni di sicurezza Leggere con attenzione questa guida all'installazione prima di installare il dispositivo. Conservare questo documento per usi futuri. Livelli di pericolo PERICOLO Indica una situazione pericolosa che, se non evitata, provoca morte o lesioni gravi. - Page 54 VVISO VVISO • Il prodotto Axis deve essere utilizzato in conformità alle leggi e alle disposizioni locali. • Conservare il prodotto Axis in un ambiente asciutto e ventilato. • Evitare di esporre il prodotto Axis a urti o pressioni eccessive.
- Page 55 AXIS T8415 Wireless Installation Tool A A A VVISO VVISO VVISO Smaltire le batterie usate in base alle normative locali o alle istruzioni del produttore della batteria.
-
Page 57: Contenuto Della Confezione
Guida all'installazione La presente guida all'installazione fornisce le istruzioni per l'installazione di AXIS T8415 Wireless Installation Tool. Questo strumento di installazione supporta l'utilizzo di un computer portatile o di un'applicazione per l'installazione delle telecamere. Per ottimizzare le prestazioni e l'esperienza si consiglia di utilizzare l'applicazione. - Page 58 AXIS T8415 Wireless Installation Tool RJ45 non PoE (NET) Interruttore accensione/spegnimento Indicatore WLAN Pulsante di ripristino Unità principale Connettore del caricabatterie 10 Batteria 11 Etichetta (impostazioni di rete) Caricabatterie Connettore maschio del caricabatterie LED del caricabatterie Spina di alimentazione (EU)
- Page 59 Nota • Le schermate effettive potrebbero cambiare con i gli aggiornamenti del firmware. • AXIS T8415 ha due indirizzi IP. Uno per la connessione tramite WiFi e uno per la connessione tramite rete cablata. • Name (Nome): nome dell'unità, può essere modificato.
- Page 60 • Il SSID e la password predefiniti si trovano sull'etichetta dell'unità principale. Se vengono modificati nell'interfaccia Web, l'etichetta non è più valida. • AXIS T8415 supporta 2,4GHz e 5GHz. • I canali possono variare a seconda del paese. Network (Rete) - - - Wired Network (Rete cablata)
- Page 61 AXIS T8415 Wireless Installation Tool • External DHCP Server (Server DHCP esterno): rilevamento di un server DHCP esterno. • Onboard DHCP Server (Server DHCP su scheda): On (Acceso): server DHCP interno acceso Off (Spento): server DHCP interno spento • Ethernet Ports (Porte Ethernet): stato delle porte Ethernet.
-
Page 62: Caricare La Batteria
AXIS T8415 Wireless Installation Tool Aggiornare il firmware per AXIS T8415. Nota Il firmware più recente è disponibile all'indirizzo www.axis.com Caricare la batteria Collegare il cavo di alimentazione specifico del paese al caricabatterie. Vedere l'illustrazione seguente. Collegare il caricabatteria alla batteria (vedere l'immagine seguente) e alla presa di corrente. - Page 63 AXIS T8415 Wireless Installation Tool A A A VVISO VVISO VVISO • A causa delle caratteristiche di scaricamento automatico di questo tipo di batteria, è imperativo che la batteria venga carica entro 6 mesi dall'immagazzinamento, altrimenti può verificarsi una perdita permanente della capacità a causa della solfatazione.
-
Page 64: Preparazione All'installazione
Preparazione all'installazione Con AXIS T8415 Wireless Installation Tool è possibile eseguire l'installazione della telecamera con un computer o un dispositivo portatile. Per ottimizzare le prestazioni si consiglia di utilizzare un dispositivo portatile e l'applicazione AXIS Wireless Installation Tool. - Page 65 AXIS T8415 Wireless Installation Tool 2. Verificare che l'indicatore PoE sia acceso. 3. Eseguire la connessione a AXIS T8415 WiFi, vedere Eseguire la connessione alla rete WiFi di AXIS T8415 alla pagina 64 4. Avviare l'applicazione AXIS Wireless Installation Tool Nota Il tempo di avvio della telecamera varia a seconda del dispositivo.
- Page 66 Selezionare 3 Settings (Impostazioni) per modificare le impostazioni di rete del dispositivo. Numero 7 Wizard (Procedura guidata). La procedura guidata viene avviata la prima volta che si accede a un dispositivo Axis o dopo la reimpostazione delle impostazioni predefinite di fabbrica. Nota Le informazioni sulle impostazioni della procedura guidata sono disponibili nella Guida per l'utente del dispositivo all'indirizzo www.axis.com...
-
Page 67: Risoluzione Dei Problemi
Assicurarsi che la telecamera non abbia un indirizzo IP compreso nell'intervallo 10.252.252.X • Impossibile accedere all'interfaccia Web di AXIS T8415 quando si utilizza un cavo di rete e un PC. Assicurarsi che il cavo di rete sia collegato alla porta corretta (NET). -
Page 68: Informazioni Sulla Garanzia
AXIS T8415 Wireless Installation Tool Assicurarsi che la rete wireless sia impostata su 5GHz Selezionare un canale differente. Il seguente elenco si applica quando si tenta di individuare una telecamera non Axis con il supporto Onvif. • La telecamera è impostata sull'indirizzo IP dinamico ma non è presente un server DHCP nella rete. -
Page 69: Niveles De Peligro
AXIS T8415 Wireless Installation Tool Información de seguridad Lea esta Guía de instalación con atención antes de instalar el producto. Guarde la Guía de instalación para poder consultarla en otro momento. Niveles de peligro PELIGRO Indica una situación peligrosa que, si no se evita, provocará lesiones graves o la muerte. - Page 70 VISO VISO • El producto de Axis debe utilizarse de acuerdo con la legislación y la normativa locales. • Almacene el producto de Axis en un entorno seco y ventilado. • Evite la exposición del producto de Axis a choques o a una fuerte presión.
- Page 71 AXIS T8415 Wireless Installation Tool A A A VISO VISO VISO Deseche las baterías usadas en conformidad con la normativa local o las instrucciones del fabricante.
-
Page 73: Contenido Del Paquete
AXIS T8415 Wireless Installation Tool Guía de instalación Esta guía de instalación incluye instrucciones para instalar la AXIS T8415 Wireless Installation Tool. La herramienta de instalación se puede usar tanto en portátiles como a través de una aplicación para la instalación de cámaras. Para conseguir un rendimiento y una experiencia óptimos, se recomienda utilizar la aplicación. - Page 74 AXIS T8415 Wireless Installation Tool RJ45 no PoE (NET) Interruptor de encendido/apagado Indicador WLAN Botón de restablecimiento Unidad principal Conector del cargador de la batería 10 Batería 11 Etiqueta (configuración de la red) Cargador Conector macho del cargador LED del cargador Enchufe del cable de alimentación (UE)
- Page 75 Interfaz web de AXIS T8415 En la interfaz web de AXIS T8415 es posible editar la configuración de la red y actualizar el firmware. Para acceder a la interfaz web, escriba la dirección IP de las unidades en un navegador. La dirección IP se encuentra en la etiqueta de la unidad principal.
- Page 76 • El SSID y la contraseña predeterminados se encuentran en la etiqueta de la unidad principal. Si se cambian en la interfaz web, la etiqueta dejará de ser válida. • La AXIS T8415 admite 2,4 GHz y 5 GHz. • Los canales pueden variar según el país.
- Page 77 AXIS T8415 Wireless Installation Tool • External DHCP Server (Servidor DHCP externo): detección de un servidor DHCP externo. • Onboard DHCP Server (Servidor DHCP integrado): On (Encendido): el servidor DHCP interno está encendido. Off (Apagado): el servidor DHCP interno está apagado.
-
Page 78: Carga De La Batería
AXIS T8415 Wireless Installation Tool Actualice el firmware de AXIS T8415. Nota El firmware más reciente se encuentra en www.axis.com Carga de la batería Conecte el enchufe del cable de alimentación específico del país al cargador. Vea la siguiente imagen. -
Page 79: Cambio De La Batería
AXIS T8415 Wireless Installation Tool Comportamiento Rojo Batería cargando Verde Batería totalmente cargada Nota El LED del cargador se encuentra en la parte delantera del cargador. Vea Información general del hardware en la página 73 A A A VISO VISO VISO •... - Page 80 Preparativos para la instalación Con la AXIS T8415 Wireless Installation Tool, puede instalar cámaras con un portátil o un dispositivo manual. Es recomendable utilizar un dispositivo manual y la aplicación AXIS Wireless Installation Tool para conseguir un rendimiento óptimo.
- Page 81 1. Conecte la cámara al puerto CAM (PoE) de la unidad principal. 2. Compruebe que el indicador PoE esté encendido. 3. Conecte la opción wifi de AXIS T8415. Vea Conexión a wifi de AXIS T8415 en la página 80 4. Inicie la aplicación AXIS Wireless Installation Tool.
- Page 82 3. Conecte el portátil al puerto NET (no PoE) de la unidad principal. 4. Vaya a la interfaz web y pulse Lista de cámaras. Nota Vea Interfaz web de AXIS T8415 para obtener información sobre cómo acceder a la interfaz web de AXIS T8415.
-
Page 83: Solución De Problemas
Asegúrese de que la dirección IP de la cámara no se encuentre en el rango 10.252.252.X • No se puede iniciar sesión en la interfaz web de AXIS T8415 si se utiliza un cable de red y un ordenador. Asegúrese de que el cable de red esté conectado al puerto correcto (NET). -
Page 84: Restablecimiento De Los Valores Predeterminados De Fábrica
Asegúrese de que la red inalámbrica esté establecida en 5GHz. Seleccione un canal diferente. La siguiente lista se aplica si se intente detectar una cámara de otro fabricante distinto de Axis compatible con Onvif. • La cámara está establecida en una dirección IP dinámica, pero no hay ningún servidor DHCP en la red. -
Page 85: Información De Garantía
AXIS T8415 Wireless Installation Tool Información de garantía Para obtener más detalles sobre la garantía del producto de Axis y la información relacionada con ella, consulte www.axis.com/warranty/... - Page 87 AXIS T8415 Wireless Installation Tool 安 安 安 全 全 全 情 情 情 報 報 報 本製品を設置する前に、このインストールガイドをよくお読みください。 インス トールガイドは、後で参照できるように保管しておいてください。 危 危 危 険 険 険 レ レ レ ベ ベ ベ ル ル ル 危 危 危 険 険 険...
- Page 88 AXIS T8415 Wireless Installation Tool 安 安 安 全 全 全 手 手 手 順 順 順 注 注 注 記 記 記 • 本製品は、お使いになる地域の法律や規制に準拠して使用してください。 • 本製品は乾燥した換気のよい環境に保管してください。 • 本製品に衝撃または強い圧力を加えないでください。 • 本製品に振動を加えないでください。 • 本製品を設置する際には、適切な工具のみを使用してください。 電動工具を 使用して過剰な力をかけると、製品が損傷することがあります。 • 化学薬品、腐食剤、噴霧式クリーナーは使用しないでください。 • 清掃には、きれいな水に浸した清潔な布を使用してください。 • 製品の技術仕様に準拠したアクセサリーのみを使用してください。 これらの...
- Page 89 AXIS T8415 Wireless Installation Tool 注 注 注 記 記 記 使用済みバッテリーは、地域の規制またはバッテリーメーカーの指示に 従って廃棄してください。...
- Page 91 AXIS T8415 Wireless Installation Tool イ イ イ ン ン ン ス ス ス ト ト ト ー ー ー ル ル ル ガ ガ ガ イ イ イ ド ド ド このインストールガイドでは、AXIS T8415 Wireless Installatin Toolをインストールす る手順について説明します。 このインストールツールでは、ノートPCおよびカメラ のインストール用アプリの使用に対応しています。 最高のパフォーマンスと経験を...
- Page 92 AXIS T8415 Wireless Installation Tool RJ45 PoE非対応 NET(ネットワーク側) オン/オフスイッチ WLANインジケーター リセットボタン メインユニット バッテリーチャージャーコネクタ 10 バッテリー 11 ラベル (ネットワーク設定) チャージャー チャージャー (オスコネクタ) チャージャーLED 電源コードプラグ (EU) 電源コードプラグ (日本/米国) 電源コードプラグ (英国) 電源コードプラグ (オーストラリア) ネ ネ ネ ッ ッ ッ ト ト ト ワ ワ ワ ー ー ー ク ク ク コ コ コ ネ ネ ネ ク ク ク タ タ タ...
- Page 93 AXIS T8415 Wireless Installation Tool USB コ コ コ ネ ネ ネ ク ク ク タ タ タ AXIS T8415にはUSBコネクタ (データ転送不可) が搭載されています。 このコネクタを 使用して、互換性のある携帯型デバイス (5 V、2.1 A) を充電することができます。 注意 • 携帯型デバイスを充電する場合は、AXIS T8415の電源をオンにする必要が あります。 • 携帯型デバイスの充電はユニットのバッテリーに影響します。 バッテリー の残量が非常に低いレベルに到達すると、携帯型デバイスを充電しなくな 91ページの、ハードウェアの概要 ります。バッテリーの状態については、 バッテリーインジケーターを参照してください。 充電を継続するには、新...
- Page 94 AXIS T8415 Wireless Installation Tool Address (アドレス): ユニットのIPアドレスです。 • Subnet mask (サブネットマスク): ユニットのサブネットマスクです。 • Gateway (ゲートウェイ): ユニットのデフォルトゲートウェイです。 • SSID: ワイヤレスネットワークの名前は変更することができます。 • WPA password (WPAパスワード): ワイヤレスネットワークのパスワードは • 変更することができます。 Mode (モード): ワイヤレスネットワークの周波数モードを設定します。 • 2.4 GHzか5 GHzのどちらかを選択します。注: 5GHzは屋内専用です。屋外 で使用する場合は2.4GHzを選択してください。 チャンネルは国によって異なる場合があります。 5GHzは屋内のみでお使い • ください。屋外で作業する場合は2.4GHzのみお使いいただけます。...
- Page 95 AXIS T8415 Wireless Installation Tool External DHCP Server (外部DHCPサーバー): 外部DHCPサーバーの検出状 • 況です。 Onboard DHCP Server (オンボードDHCPサーバー): • ‑ On (オン): 内部DHCPサーバーをオンにします ‑ Off (オフ): 内部DHCPサーバーをオフにします Ethernet Ports (イーサネットポート): イーサネットポートのステータス • を表示します。 ‑ Connected (接続): カメラ/ノートPCがイーサネットポートに接続 されています ‑ Unconnected (未接続): カメラ/ノートPCがイーサネットポート...
- Page 96 AXIS T8415 Wireless Installation Tool AXIS T8415のファームウェアをアップグレードします。 注意 www.axis.com 最新のファームウェアは で入手できます バ バ バ ッ ッ ッ テ テ テ リ リ リ ー ー ー を を を 充 充 充 電 電 電 す す す る る る...
- Page 97 AXIS T8415 Wireless Installation Tool 挙 挙 挙 動 動 動 赤 バッテリー充電中 緑 バッテリー充電完了 注意 91ページの、ハード チャージャーLEDは、チャージャーの正面にあります ( ウェアの概要 を参照) 注 注 注 記 記 記 • このタイプのバッテリーは自己放電特性を有しているため、6か月以内に充 電を行う必要があります。そのようにしないと、硫酸化により電池容量が永 続的に失われる可能性があります。 • 付属のチャージャーのみを使用してください。 注 注 注 意 意 意 密閉容器内でのバッテリーの充電または放電は絶対に行わないでください。...
- Page 98 イ イ イ ン ン ン ス ス ス ト ト ト ー ー ー ル ル ル の の の 準 準 準 備 備 備 AXIS T8415 Wireless Installatin Toolを使用すれば、携帯型デバイスやノートPCでカメ ラをインストールすることができます。 最高のパフォーマンス得るために、携帯型 デバイスとAXIS Wireless Installatin Toolアプリを使用することをお勧めします。 96ページ 使用前にバッテリーが完全に充電されていることを確認します。 • の、バッテリーを充電する を参照してください AXIS Wireless Installatin Toolアプリを使用する場合は、AXIS T8415 WiFiネッ • トワークに接続する前にアプリを携帯型デバイスにダウンロードするよ うにしてください。 カメラをメインユニットに接続する前に、電源がオンになっていること • を確認します。 注意 AXIS Wireless Installatin Toolは、App StoreまたはGoogle Playからダウンロード...
- Page 99 を確認します。 注意 デフォルトのSSIDおよびパスワードは、メインユニットのラベルに印刷 されています。 カ カ カ メ メ メ ラ ラ ラ の の の 設 設 設 置 置 置 ‑ ‑ ‑ AXIS AXIS Wireless Wireless Installatin Installatin T T T ool ool ア ア ア プ プ プ リ リ リ...
- Page 100 ビデオ画像のスナップショットを撮るには、6 6 6 ス ス ス ナ ナ ナ ッ ッ ッ プ プ プ シ シ シ ョ ョ ョ ッ ッ ッ ト ト ト を選択します。 製品のネットワーク設定を編集するには、3 3 3 設 設 設 定 定 定 を選択します。 7 7 7 番目はウ ウ ウ ィ ィ ィ ザ ザ ザ ー ー ー ド ド ド です。 このウィザードは、初めてAxis製品にアクセスしたとき、 または工場出荷時の設定へのリセットを行った後に開始します。...
- Page 101 ネ ネ ネ ッ ッ ッ ト ト ト ワ ワ ワ ー ー ー ク ク ク ケ ケ ケ ー ー ー ブ ブ ブ ル ル ル と と と PC PC を を を 使 使 使 用 用 用 す す す る る る と と と 、 、 、 AXIS...
- Page 102 AXIS T8415 Wireless Installation Tool CAM: CAM: CAM: カメラに接続 NET : : : ノートPCに接続 ‑ カメラとAXIS T8415のIPアドレスが同じ範囲になっていることを 確認します。 ‑ AXIS T8415がデフォルトゲートウェイとして使用されているこ とを確認します。 ‑ カメラのIPアドレスが10.252.252.Xの範囲になっていないことを 確認します。 ア ア ア プ プ プ リ リ リ を を を 使 使 使 用 用 用 す す す る る る と と と 、 、 、 画 画 画 像 像 像 の の の フ フ フ レ レ レ ー ー ー ム ム ム / / / 秒 秒 秒 が が が 低 低 低 下 下 下 し し し ま ま ま す す す 。 。 。...
- Page 103 AXIS T8415 Wireless Installation Tool 保 保 保 証 証 証 情 情 情 報 報 報 www.axis.com/warranty/ Axisの製品保証と関連情報については、 をご覧ください...
- Page 104 Installation Guide Ver. M1.2 AXIS T8415 Wireless Installation Tool Date: August 2015 © Axis Communications AB, 2015 Part No. 60165...
Need help?
Do you have a question about the T8415 and is the answer not in the manual?
Questions and answers