Table of Contents
Advertisement
Quick Links
HANDY DRILL BIT SHARPENER
INSTRUCTION LEAFLET
KOBe PROFeSSIONAL TOOLS have been specifically designed to help you work
SAFeLY and eFFICIeNTLY. Your care and good judgment are the best protection against
injury, but always ensure that the appropriate safety equipment is worn.
All possible hazards cannot be covered here, but the most relevant ones have
been highlighted.
This product must only be used for the purposes specified in this
instruction manual and used in the manner described. It is not intended for
industrial/work use or conditions. Please read and follow these instructions
carefully before using and keep this document for later use.
GeNeRAL OPeRATING HAZARDS
l ALWAYS store the tool in a dry, secure place away from children.
l ALWAYS check for damaged or loose parts and fittings.
l ALWAYS use recommended attachments or parts.
l ALWAYS wear suitable eye protection at all times.
l NeveR touch, allow hair, rags, clothing near the rotating wheels and drill chuck.
l DO NOT leave the chuck key in the drill.
l ALWAYS ensure the power drill cable is placed safely away from any hazards.
l DO NOT continue using the drill sharpener if sharpening guides/rests become
damaged, the wheels are chipped/damaged or of any other signs of abnormality occur
you must stop using at once, remove from service and repair before using again.
l ALWAYS use the correct KOBE replacement wheels to avoid possible injury.
CAUTION!
Our products are very carefully inspected. Nevertheless as a safety
precaution after setting up the drill sharpener stand away from the wheels,
turn on the drill for 30 seconds to double check the wheels for safety.
l NeveR operate the tool when tired or under the influence of alcohol /prescription or
non-prescription drugs.
l NeveR operate if any parts are missing or damaged.
l NeveR leave the tool running whilst unattended.
l NeveR modify the tool or accessories and only use it for the task for which it has
been designed.
l NeveR force or apply excessive pressure on the tool.
l NeveR touch moving or active parts of the tool or accessories.
l NeveR work in a combustible atmosphere.
l NeveR allow children to use or play with the tool.
WARNING: Do not leave the drill plugged in whilst tool is not in use or
whilst setting up. Do not use the hammer or reverse setting. Do not leave
the drill running for more than five minutes at any one time.
Fig. 2
Slide
back
Approx. 125mm
(5inches) from edge
of bench
OPeRATION - SHARPeNING HSS TWIST DRILL BITS
Fig. 4
Turret Holder
Fig. 5
Flip 'Setter' down
Table: HSS drill bit shape; 118° tip angle
Tip clearance
Incorrect
Incorrect
Correct
insufficient
excessive
Drill point
Incorrect
Correct
Unequal edges
Remedy
Sharpen slightly more
on shorter side
ORDER CODE:
KBE-280-8520K
SAFeTY INSTRUCTIONS
General set up:
1. To securely fix the sharpener to a
flat surface use the screws provided
fix the locating foot about 125mm
(5 inches) from the front edge of the
bench or suitable board (see Fig.2).
2. Before securing the sharpener onto
the locating foot, fit the sharpener
spindle into the drill chuck ensuring
it is centered in the jaws and that
the chuck does not touch the chuck
guard. Tighten the chuck.
3. Now place the sharpener along with
the drill attached, over the locating
foot and slide it back to lock it into
position, placing the drill with the
handle forward so that there is no
strain on the foot.
Power drill:
Ensure that the mains wall socket is
within easy reach. During use, lock the
drill 'on' using the trigger catch. Run
the drill at maximum speed but no more
than 3000rpm, maximim power 850 watt.
1. Set up the carriage for 'HSS drill
sharpening' see above.
2. Place the turret holder into the
'HSS' slots on the carriage
pushing the support legs until they
click into position (see Fig. 4).
3. Flip the drill setter down so it
touches the grinding wheel then
hold it lightly and slide the carriage
to the left until it clicks and locks
into position with the drill setter
(see Fig. 5).
4. Select the correct size collet for
your drill bit then see 'Changing
the collet' section above if a
change of collet is needed.
5. Tilt the turret holder onto the right,
resting it on the upright part of the
carriage.
6. Insert the drill bit into the turret
and turn the nut until the bit is a
loose fit and centred in the collet
(for 13mm drill bits insert by
disassembling the turret).
7. Insert the turret (without the drill
bit in it) into the turret holder,
slotting either rib on the side of the
turret into the 'SeT/MAS' on the
turret holder and push down fully
(see Fig. 6).
8. Now insert the drill bit into the
turret (see Fig. 6) and push down
Remedy
firmly so it comes into contact with
Repeat
the drill setter and the grinding
sharpening
wheel. Then twist the drill bit
operation,
ensuring
anti-clockwise until it lifts slightly
correct
and then it will drop down into
alignment.
position.
9. Press the drill bit towards the
grinding wheel and then turn it
clockwise until you feel it stop.
Hold the drill bit in this position
with one hand and tighten the nut
with the other.
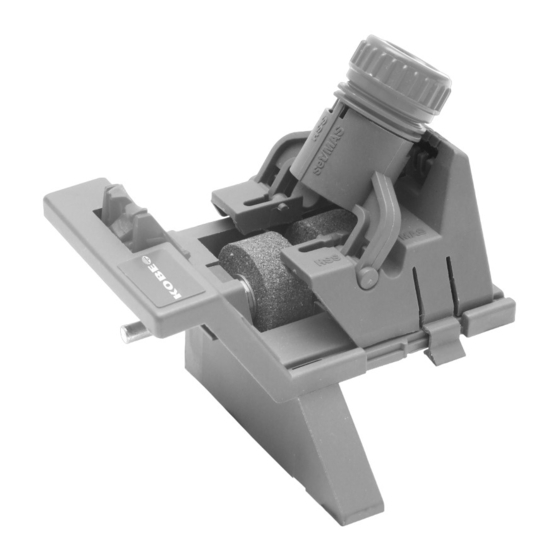
Fig. 1
Carriage
Aluminium oxide
grinding wheel (grey)
HSS drill setter
Chuck
guard
Spindle
Locating foot
l ALWAYS comply with Health & Safety regulations.
l ALWAYS ensure that all long hair, loose clothing & jewellery, etc., are secured or
removed.
l ALWAYS wear suitable eye protection at all times.
l DO NOT use without the locating foot.
l ALWAYS plug the drill into the mains power supply which is protected by an MCB or
earth leakage circuit breaker, if this is not possible plug into an adaptor-type RCD and
then plug the adaptor into the mains power supply.
l DO NOT have the drill plugged in when not in use. Only plug in when wanting to use
the drill sharpener.
Drill life:
l Drill bits should be regularly sharpened and not allowed to become blunt especially
on masonry drill bits as the carbide tip wears much quicker when blunt.
Grinding wheel life:
l The grinding wheels should not be allowed to wear down to below 8mm from the grey
spacer (the plastic part between them) because the smaller diameter of the wheel
cannot produce the correct geometry and therefore it needs to be replaced before
continuing the sharpening of the drill bits.
NOTe: Always use the correct KOBE replacement wheels to avoid possible injury.
These are available from your local KOBE stockist.
Grinding wheel surface:
l If the grinding wheel becomes unevenly worn, their surface can be restored by, for
example, an old masonry drill and simply running it from side to side across the wheel
while its rotating until the surface of the wheel is square again.
After use care:
l To prevent the collet from developing a permanent 'set' unscrew the nut after use.
l Remove all abrasive dust.
SeT UP
General sharpening:
Use the grinding bed on it's own. See 'General grinding and sharpening' in the
'Operation' section.
HSS drill sharpening:
Hook the carriage under the rear rail and place the other side of the carriage over the
front rail and lightly press down until you hear a click (see Fig.4).
Slide the carriage to the right until it reaches the stop.
See 'Sharpening HSS Twist Drill Bits' in the 'Operation' section.
Masonry drill sharpening:
Starting with the carriage at the right-hand edge of the grinding bed (see Fig.9),
repeat the procedure for the 'HSS
drill sharpening' above then
See 'Sharpening masonry drill
bits' in the 'Operation' section.
Wood bit sharpening:
See overleaf.
Changing the collet:
Select the correct size collet for
your drill bit. The collet that comes already in
the turret is the tighter of the two and is for 3mm
to 7mm diameter drill bits. The other collet is for
the 8mm to 13mm drill bits. When changing
between the two collets unscrew the nut,
remove the collect ring and insert the correct
collet. Replace the collet ring with the lugs
downwards and replace the nut.
10. Remove the turret from the holder
and check that the drill bit's cutting
edges are parallel with the turret
nose index marks (see Fig. 7).
NOTe: If the drill bit position is not
correct, remove and repeat the
aligment procedure. Do not simply
turn it by hand.
11. Once the alignment is correct slide
the cariage to the right and flip the
setter up.
12. Replace the turret and drill bit in
the holder so either of the ribs
slots down into the wide slot
marked 'HSS' with the drill bit fully
over the left-hand grey grinding
wheel. Switch on the drill.
13. Now press the red cam on the
turret up against the upright part of
the carriage and slowly and evenly
rotate the turret from one end of
the slot to the other about 10
times or until you hear that the
grinding has stopped
(see Fig. 8).
14. Finally remove the drill bit from the
turret and compare it to the table
on the left and if necessary make
the adjustments following the
table.
NOTe: Broken drill bits can be ground
to approximate shape (see table) on
the silicon carbide (green) wheel, then
follow the instructions above. Whilst
sharpening to avoid uneven wear in
the grinding wheels slowly move the
carriage across the whole width of the
wheel with your left hand whilst
rotating the turret with your right.
If the grinding wheel is not flat it will
not grind the correct tip geometry,
see 'Grinding wheel surface' in the
'maintenance' section above.
COMPONeNTS
Catch
Silicon carbide
grinding wheel
(green)
Grinding bed
Wood bit guide
WORKPLACe HAZARDS
PeRSONAL PROTeCTION
SPeCIFIC OPeRATING HAZARDS
MAINTeNANCe
Stop
Fig. 6
Fig. 7
Fig. 8
Nut
Collet
Ring
2 collets:
3-7mm dia.
8-13mm dia.
Turret
Turret
holder
Fig. 3
Rear
Rail
Catch
Front rail
Rib
Align cutting
edges of
tip with
index
marks
slowly &
evenly
rotate
Advertisement
Table of Contents

Subscribe to Our Youtube Channel
Related Manuals for KOBE KBE-280-8520K


Summary of Contents for KOBE KBE-280-8520K
- Page 1 ALWAYS use the correct KOBE replacement wheels to avoid possible injury. Grinding wheel life:...
- Page 2 OPeRATION - SHARPeNING MASONRY DRILL BITS 1. Set up the carriage for ‘Masonry drill sharpening’ see ‘Set Up’ overleaf. Masonry drill bits: The drill bit sharpener accurately sharpens Tip geometry; 132° tip angle all 3 main types of masonry drill bits: 2.
Need help?
Do you have a question about the KBE-280-8520K and is the answer not in the manual?
Questions and answers