
Subscribe to Our Youtube Channel
Related Manuals for doble Vanguard Instruments WRM-10P S2


Summary of Contents for doble Vanguard Instruments WRM-10P S2
- Page 1 WRM-10P S2 TRANSFORMER WINDING RESISTANCE METER USER’S MANUAL 1520 S Hellman Avenue, Ontario, CA 91761 TEL: 909.923.9390 | FAX: 909.923.9391 October, 2017 Revision 1.0 www.vanguard-instruments.com...
- Page 2 WRM-10P S2 USER’S MANUAL REV 1.0 SAFETY SUMMARY FOLLOW EXACT OPERATING PROCEDURES Any deviation from the procedures described in this operator’s manual may create one or more safety hazards, damage the WRM-10P S2, or cause errors in the test results. Vanguard Instruments assumes no liability for unsafe or improper use of the WRM-10P S2.
-
Page 3: Table Of Contents
REV 1.0 WRM-10P S2 USER’S MANUAL TABLE OF CONTENTS CONVENTIONS USED IN THIS DOCUMENT ..................1 INTRODUCTION ........................2 General Description and Features ................... 2 WRM-10P S2 Technical Specifications ................4 WRM-10P S2 Controls and Indicators ................5 PRE-TEST SETUP ........................6 Operating Voltages ...................... - Page 4 WRM-10P S2 USER’S MANUAL REV 1.0 LIST OF FIGURES Figure 1. WRM-10P S2 Controls and Indicators ................5 Figure 2. Typical WRM Connections Diagram #1 ................8 Figure 3. Typical WRM Connections Diagram #2 ................8 Figure 4. Typical WRM Connections Diagram #3 ................9 Figure 5.
-
Page 5: Conventions Used In This Document
REV 1.0 WRM-10P S2 USER’S MANUAL CONVENTIONS USED IN THIS DOCUMENT This document uses the following conventions: The WRM-10P S2 is referred to as WRM for short. • A key, switch, or knob on the WRM-10P S2 is indicated as •... -
Page 6: Introduction
WRM-10P S2 USER’S MANUAL REV 1.0 INTRODUCTION General Description and Features The WRM-10P S2 is Vanguard's second generation lightweight winding resistance meter, designed to accurately measure the winding resistance of highly inductive power transformers. The unit’s dual resistance-reading input channels can measure two winding resistances simultaneously, and four-wire (Kelvin) connections provide high accuracy and require no lead compensation. - Page 7 REV 1.0 WRM-10P S2 USER’S MANUAL Internal Test Record Storage The WRM-10P S2 can store 100 test records (up to 64 readings per test record) in Flash EEPROM. Test records can be retrieved and printed on the built-in thermal printer or can be transferred to a PC via the USB PC or USB Flash drive interfaces.
-
Page 8: Wrm-10P S2 Technical Specifications
WRM-10P S2 USER’S MANUAL REV 1.0 WRM-10P S2 Technical Specifications Table 1. WRM-10P S2 Technical Specifications TYPE Portable transformer winding resistance meter Dimensions: 17.5”W x 11.75”H x 12.5” D (44.5 cm x 29.8 cm x 31.8 cm) PHYSICAL SPECIFICATIONS Weight: 27 lbs (12.2 kg) INPUT POWER –... -
Page 9: Wrm-10P S2 Controls And Indicators
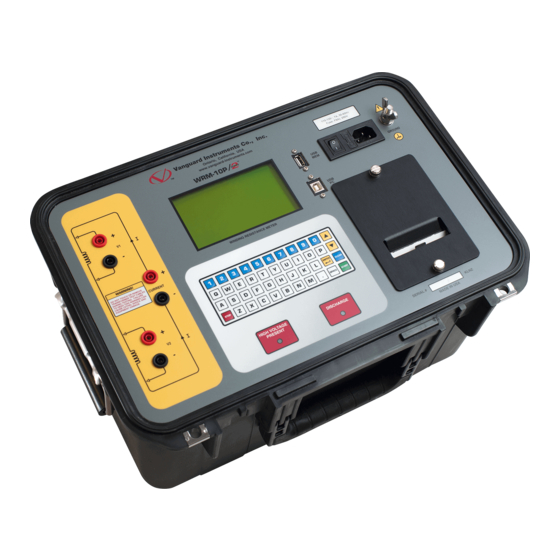
REV 1.0 WRM-10P S2 USER’S MANUAL WRM-10P S2 Controls and Indicators The WRM-10P S2's controls and indicators are shown in Figure 1. The purpose of the controls and indicators may seem obvious, but users should become familiar with them before using the WRM. -
Page 10: Pre-Test Setup
WRM-10P S2 USER’S MANUAL REV 1.0 PRE-TEST SETUP Operating Voltages The WRM’s operating voltage is preset at the factory and is selectable between 100-120 Vac, 50/60 Hz or 200-240 Vac, 50/60 Hz. LCD Screen Contrast Control To increase the LCD screen contrast, press and hold the key for two seconds. -
Page 11: Replacing The Thermal Printer Paper
REV 1.0 WRM-10P S2 USER’S MANUAL Replacing the Thermal Printer Paper The roll of thermal paper is housed inside a dispenser underneath the printer cover. To replace the paper, follow the steps below: • Unscrew the two large printer cover screws and remove the printer cover. •... -
Page 12: Operating Procedures
WRM-10P S2 USER’S MANUAL REV 1.0 OPERATING PROCEDURES WRM Cable Connections Typical WRM connection diagrams are shown in Figure 2, Figure 3, Figure 4, and Figure 5. • Do not touch or disconnect any test lead that is connected to a transformer terminal while high current is being conducted during a test. -
Page 13: Figure 4. Typical Wrm Connections Diagram #3
REV 1.0 WRM-10P S2 USER’S MANUAL Figure 4. Typical WRM Connections Diagram #3 The above figure illustrates the simultaneous testing of both the high and low windings on a single-phase transformer. When measuring two channels, the above cable connection is recommended since it will speed up the testing process. NOTE Figure 5. -
Page 14: General Procedures
WRM-10P S2 USER’S MANUAL REV 1.0 General Procedures The main steps for using the WRM are outlined below: a. Ground the WRM to the substation ground. Always connect the WRM to the substation ground before connecting any test lead to any transformer bushing. Failure to follow this procedure may damage the WRM. -
Page 15: Entering Test Record Header Information
REV 1.0 WRM-10P S2 USER’S MANUAL Entering Test Record Header Information You can enter the test record header information before performing tests. The record header includes identifying information such as the company, station, circuit, model number, etc. Once the header information has been entered, it will apply to all subsequent test records. To enter the header information: a. - Page 16 WRM-10P S2 USER’S MANUAL REV 1.0 d. The following screen will be displayed: STATION: ↑↓ TO POSITION "ENTER" TO ACCEPT Type the station name using the keypad and press the key. [ENTER] e. The following screen will be displayed: CIRCUIT: ...
- Page 17 REV 1.0 WRM-10P S2 USER’S MANUAL h. The following screen will be displayed: SERIAL NUMBER: ↑↓ TO POSITION "ENTER" TO ACCEPT Type the transformer serial number using the keypad and press the key. [ENTER] i. The following screen will be displayed: KVA: ...
-
Page 18: Setting The Clock
WRM-10P S2 USER’S MANUAL REV 1.0 Setting the Clock Follow the steps below to set the WRM-10P S2's internal clock: a. Start from the "START-UP" menu: 08/30/17 1.RUN TEST 08:51:56 2.TEST RECORDS 3.DIAGNOSTICS 4.SETUP Press the key (SETUP). -
Page 19: Toggling The Calibration Notification Feature
REV 1.0 WRM-10P S2 USER’S MANUAL Toggling the Calibration Notification Feature The WRM-10P S2 offers a convenient feature that can print the unit's calibration due date at the bottom of the test reports printed on the unit's thermal printer. Follow the steps below to toggle this feature: a. -
Page 20: Performing A Resistance Test
WRM-10P S2 USER’S MANUAL REV 1.0 Performing a Resistance Test a. Start from the “START-UP” menu: 08/30/17 1.RUN TEST 08:51:56 2.TEST RECORDS 3.DIAGNOSTICS 4.SETUP Press the key (RUN TEST). b. The following screen will be displayed: 1.V1 &... - Page 21 REV 1.0 WRM-10P S2 USER’S MANUAL d. The following screen will be displayed: CONVERT READINGS TO STANDARD TEMP? 1. YES 2. NO 1. YES Press the key (YES) if you wish to convert readings to standard temperature. The following screen will be displayed: WINDING MATERIAL 1.COPPER,...
- Page 22 WRM-10P S2 USER’S MANUAL REV 1.0 e. The following screen will be displayed: D.U.T. TEMP: 25.0 °C 77.0 °F ↑↓ to Adjust Temp, "ENTER" to Accept Use the keys to adjust the D.U.T. (Device Under Test) temperature by [] [] 0.5°C increments.
- Page 23 REV 1.0 WRM-10P S2 USER’S MANUAL h. The following screen will be displayed: -V1 ONLY TEST- "START" TO RUN TEST "STOP" TO ABORT Press the key to run the test. [START] i. The following screen will be displayed momentarily: CALIBRATING PLEASE WAIT...
- Page 24 WRM-10P S2 USER’S MANUAL REV 1.0 j. The WRM determines when the resistance reading is stable and displays the resistance value on the LCD screen as shown below: TEST IN PROGRESS 06 9.972 Amps Ω R1 = 1.000 m The WRM will continue the test and update the resistance values on the LCD screen.
- Page 25 REV 1.0 WRM-10P S2 USER’S MANUAL k. The following screen will be displayed: SAVE LAST READING? 1. YES 2. NO Press the key (YES) to save the last reading that was taken, or press the key (NO) to discard the last reading.
-
Page 26: Figure 6. Typical V1 Test Report Printout
WRM-10P S2 USER’S MANUAL REV 1.0 o. The following screen will be displayed: SAVE THIS RECORD? 1. YES 2. NO Press the key (YES) to save the test record. p. The following screen will be displayed: SHOT NUMBER 002 HAS BEEN SAVED! ... -
Page 27: Figure 7. Typical V1 And V2 Test Report Printout
REV 1.0 WRM-10P S2 USER’S MANUAL Measured Resistance Equivalent Resistance at Reference Temperature Figure 7. Typical V1 and V2 Test Report Printout... -
Page 28: Figure 8. Typical V1 And V2 Test Report Printout With Multiple Readings
WRM-10P S2 USER’S MANUAL REV 1.0 Figure 8. Typical V1 and V2 Test Report Printout with Multiple Readings... -
Page 29: Performing A Load Tap Changer / Voltage Regulator Resistance Test
REV 1.0 WRM-10P S2 USER’S MANUAL Performing a Load Tap Changer / Voltage Regulator Resistance Test The Load Tap Changer/Voltage Regulator Resistance Test can be used to conveniently measure the resistance at each tap position. Once the number of taps has been entered, the WRM will request the user to set the tap position, starting with the lower taps, then to neutral, and then to the raise taps. - Page 30 WRM-10P S2 USER’S MANUAL REV 1.0 d. The following screen will be displayed ENTER # OF RAISE TAPS, NOT COUNTING NEUTRAL (1-23): Type the number of "RAISE" taps (not counting neutral) the LTC or Voltage Regulator has using the keypad, and then press the key.
- Page 31 REV 1.0 WRM-10P S2 USER’S MANUAL g. The following screen will be displayed: CONVERT READINGS TO STANDARD TEMP? 1. YES 2. NO 1. YES Press the key (YES) if you wish to convert readings to standard temperature. The following screen will be displayed: WINDING MATERIAL 1.COPPER,...
- Page 32 WRM-10P S2 USER’S MANUAL REV 1.0 h. The following screen will be displayed: D.U.T. TEMP: 25.0 °C 77.0 °F ↑↓ to Adjust Temp, "ENTER" to Accept Use the keys to adjust the D.U.T. (Device Under Test) temperature. [] [] Press the key to confirm the D.U.T.
- Page 33 REV 1.0 WRM-10P S2 USER’S MANUAL k. The following screen will be displayed: SET TAP TO 3 LOWER "START" TO RUN TEST "STOP" TO ABORT Set the LTC or Voltage Regulator tap position as indicated on the LTC screen and press key.
- Page 34 WRM-10P S2 USER’S MANUAL REV 1.0 n. The following screen will be displayed: SET TAP TO 2 LOWER ("START" TO CONTINUE) ** XFMR ENERGIZED! ** Set the LTC or Voltage Regulator tap position to the position indicated on the LCD screen and press the key.
-
Page 35: Figure 9. Typical Ltc/Voltage Regulator Test Report Printout
REV 1.0 WRM-10P S2 USER’S MANUAL Figure 9. Typical LTC/Voltage Regulator Test Report Printout... -
Page 36: Performing A Special Resistance Test
WRM-10P S2 USER’S MANUAL REV 1.0 Performing a Special Resistance Test The Special Resistance Test is used to conduct a resistance test for a pre-defined period ranging from 1 to 45 minutes. The resistance data is recorded at pre-defined intervals (from 10 seconds to 1 minute). - Page 37 REV 1.0 WRM-10P S2 USER’S MANUAL d. The following screen will be displayed: ENTER SPECIAL TEST TIME IN MINUTES (1-20): Enter the total special test time in minutes (from 1 to 20 minutes) using the keypad and press the key. For this example, we will press the key (for 1 minute) and [ENTER] then press the...
- Page 38 WRM-10P S2 USER’S MANUAL REV 1.0 230.0 °C ↑↓ to Adjust Temp, "ENTER" to Accept You can increase the Tk value by 0.5°C increments by pressing the key. [] You can decrease the Tk value by 0.5°C increments by pressing the key.
- Page 39 REV 1.0 WRM-10P S2 USER’S MANUAL h. The following warning screen will be displayed: **********WARNING********** DANGEROUS FLASH-OVER WILL OCCUR IF CABLES ARE DISCONNECTED! *************************** This warning is a reminder that the next sequence of test steps will run current through the test load and that caution should be exercised.
- Page 40 WRM-10P S2 USER’S MANUAL REV 1.0 k. Next, the current will be ramped up, and the following screen will be displayed: PRESS "ENTER" 00:02 To START LOGGING... 9.867 Amps XFMR ENERGIZED! Press the key to start logging the test data. [ENTER] l.
- Page 41 REV 1.0 WRM-10P S2 USER’S MANUAL n. The following screen will be displayed when the total test time has elapsed: TEST RESULTS 9.906 Amps Ω R1 = 1.001 m Ω R2 = 1.001 m XFMR ENERGIZED! Press any key to continue. o.
-
Page 42: Figure 10. Typical Special Test Report Printout (1 Minute @ 10 Second Intervals)
WRM-10P S2 USER’S MANUAL REV 1.0 Figure 10. Typical Special Test Report Printout (1 minute @ 10 second intervals) -
Page 43: Performing A Transient Test
REV 1.0 WRM-10P S2 USER’S MANUAL Performing a Transient Test The transient test verifies that a regulating switch in a Voltage Regulator or Load Tap Changer changes contacts through its selection range without a break in the circuit. This is an important test because in actual use, any break in current in a regulating tap switch generates large reactive voltage spikes that are hazardous and exceeds the switch’s voltage ratings, thus causing irreparable damage. - Page 44 WRM-10P S2 USER’S MANUAL REV 1.0 c. The following screen will be displayed: TRANSIENT FILTER INTERVAL: 5 mSecs THRESHOLD: 1. CONTINUE 2. EDIT SETTINGS • The interval value is the interval at which the WRM-10P S2 takes current measurements (1 - 20 mSecs).
- Page 45 REV 1.0 WRM-10P S2 USER’S MANUAL d. The following warning screen will be displayed: **********WARNING********** DANGEROUS FLASH-OVER WILL OCCUR IF CABLES ARE DISCONNECTED! *************************** Press any key to continue. e. The following screen will be displayed: TRANSIENT TEST "START"...
- Page 46 WRM-10P S2 USER’S MANUAL REV 1.0 The following screen will be displayed if no transient is detected: NO TRANSIENT DETECTED! The following screen will be displayed if a switch break is detected: TRANSIENT DETECTED Press any key to continue. h. The following screen will be displayed: PRINT TEST RESULTS? 1.
-
Page 47: Figure 11. Typical Transient Test Report
REV 1.0 WRM-10P S2 USER’S MANUAL Figure 11. Typical Transient Test Report... -
Page 48: Performing A Diagnostic Test
WRM-10P S2 USER’S MANUAL REV 1.0 3.10 Performing a Diagnostic Test In diagnostic mode, the WRM can run a resistance test and then display the sense voltages and test current on the screen. This feature can be used to verify the WRM’s voltage and current readings against an external meter. - Page 49 REV 1.0 WRM-10P S2 USER’S MANUAL Once the readings have stabilized, they will be displayed on the screen as shown below: - USER DIAG TEST - 10.068 Amps 10.1 mV 10.1 mV ** XFMR ENERGIZED! ** Press the key to end the test and return to the “START-UP” menu. [STOP]...
-
Page 50: Working With Test Records
WRM-10P S2 USER’S MANUAL REV 1.0 3.11 Working with Test Records 3.11.1. Restoring a Test Record from the Unit's Internal Flash EEPROM Follow the steps below to restore a test record from the WRM's internal Flash EEPROM to the unit's working memory so that it can be reviewed or printed: a. - Page 51 REV 1.0 WRM-10P S2 USER’S MANUAL c. The following screen will be displayed: RESTORE RECORD 1.ENTER REC NUMBER 2.SCROLL TO SELECT If you have a USB Flash drive inserted in the WRM’s “USB MEM” port, the following screen will be displayed instead of the above screen: NOTE 1.INTERNAL STORAGE 2.THUMB DRIVE...
- Page 52 WRM-10P S2 USER’S MANUAL REV 1.0 2. SCROLL TO SELECT Press the key (SCROLL TO SELECT) if you would like to scroll through a directory of the stored test records. The following screen will be displayed: SHOT DIRECTORY "UP" TO SCROLL FWD "DOWN"...
- Page 53 REV 1.0 WRM-10P S2 USER’S MANUAL Press the key to view the first or last reading in the test record, [] [] respectively. The results will be displayed as shown below: TEST NUMBER: 01 Ω = 1.000 m Ω R1s = 1.192 m Ω...
-
Page 54: Restoring A Test Record From A Usb Flash Drive
WRM-10P S2 USER’S MANUAL REV 1.0 3.11.2. Restoring a Test Record From a USB Flash Drive Follow the steps below to restore a test record from a USB Flash drive to the WRM's working memory: a. Make sure the USB Flash drive containing the test records is inserted in the WRM's "USB MEM"... - Page 55 REV 1.0 WRM-10P S2 USER’S MANUAL If you do not know the record number, you can first print a test record directory following the instructions in section 3.11.8. NOTE e. The following screen will be displayed: REC_001 RESTORED! PRINT RECORD? 1.YES 2.NO 1.
-
Page 56: Viewing A Test Record
WRM-10P S2 USER’S MANUAL REV 1.0 3.11.3. Viewing a Test Record The WRM-10P S2's temporary working memory always contains the test results from either the last test that was performed or the last test that was restored from either the unit's internal memory or from a USB Flash drive. - Page 57 REV 1.0 WRM-10P S2 USER’S MANUAL Press the key to view the first or last reading in the test record, respectively. [] [] The results will be displayed as shown below: TEST NUMBER: 01 Ω = 1.000 m Ω R1s = 1.192 m Ω...
-
Page 58: Printing A Test Record
WRM-10P S2 USER’S MANUAL REV 1.0 3.11.4. Printing a Test Record Once you perform a test or restore a test record from the unit's internal memory or USB Flash drive, you will be presented the option to print the test record. If you do not print the test record immediately after performing a test or restoring a test record, you can do so later by following the steps below: a. -
Page 59: Saving A Test Record From The Working Memory
REV 1.0 WRM-10P S2 USER’S MANUAL 3.11.5. Saving a Test Record From the Working Memory Whenever a test is performed or a test record is restored from the unit's internal memory or from a USB Flash drive, the test data is stored in the unit's working memory. The test record in the WRM's working memory can be saved to the unit's internal memory or to a USB Flash drive by following the steps below: a. - Page 60 WRM-10P S2 USER’S MANUAL REV 1.0 c. The following screen will be displayed: 1.SAVE INTERNALLY 2.SAVE TO THUMB DRIVE 1. SAVE INTERNALLY Press the key (SAVE INTERNALLY) to save the test record from the unit's working memory to the unit's internal memory. The following screen will be displayed: SHOT NUMBER 003 HAS BEEN SAVED!
-
Page 61: Copying Test Records To A Usb Flash Drive
REV 1.0 WRM-10P S2 USER’S MANUAL 3.11.6. Copying Test Records to a USB Flash Drive Follow the steps below to copy one or all test records from the unit's internal memory to a connected USB Flash drive: a. Make sure a USB Flash drive is connected to the unit's "USB MEM" port, and then start from the "START-UP"... - Page 62 WRM-10P S2 USER’S MANUAL REV 1.0 Type the record number that you would like to copy to the USB Flash drive and then press the key. The test record will be copied to the USB Flash [ENTER] drive, and the following confirmation screen will be displayed: REC_004 SAVED TO THUMB DRIVE.
-
Page 63: Printing A Directory Of Test Records Stored In The Wrm's Internal Memory
REV 1.0 WRM-10P S2 USER’S MANUAL 3.11.7. Printing a Directory of Test Records Stored in the WRM's Internal Memory Follow the steps below to print a directory of all the test records stored in the WRM's internal memory: a. Start from the "START-UP" menu: 1.RUN TEST 2.TEST RECORDS 3.DIAGNOSTICS... - Page 64 WRM-10P S2 USER’S MANUAL REV 1.0 PRINT DIRECTORY 1. FULL DIRECTORY 2. SHORT DIRECTORY Continue with the steps below: 1. FULL DIRECTORY Press the key (FULL DIRECTORY) to print a full directory of all the test records stored in the WRM's internal memory. The directory listing will be printed on the thermal printer, and you will be returned to the "START-UP"...
-
Page 65: Figure 12. Typical Internal Test Record Directory Printout
REV 1.0 WRM-10P S2 USER’S MANUAL Figure 12. Typical Internal Test Record Directory Printout... -
Page 66: Printing A Directory Of Test Records Stored In A Usb Flash Drive
WRM-10P S2 USER’S MANUAL REV 1.0 3.11.8. Printing a Directory of Test Records Stored in a USB Flash Drive Follow the steps below to print a directory of all the test records stored in a connected USB Flash drive: a. Insert the USB Flash drive containing the test records in the WRM's "USB MEM" port, and then start from the "START-UP"... -
Page 67: Figure 13. Typical Usb Flash Drive Test Record Directory Printout
REV 1.0 WRM-10P S2 USER’S MANUAL Figure 13. Typical USB Flash Drive Test Record Directory Printout... -
Page 68: Erasing Test Records From The Unit's Internal Memory
WRM-10P S2 USER’S MANUAL REV 1.0 3.11.9. Erasing Test Records From the Unit's Internal Memory Follow the steps below to erase an individual test record or all test records from the WRM's internal memory: a. Start from the “START-UP” menu: 1.RUN TEST 2.TEST RECORDS 3.DIAGNOSTICS... - Page 69 REV 1.0 WRM-10P S2 USER’S MANUAL ERASE RECORD 1.ERASE SINGLE RECORD 2.ERASE ALL RECORDS Continue with the steps below: 1. ERASE SINGLE RECORD Press the key (ERASE SINGLE RECORD) if you would like to erase a single test record. The following screen will be displayed: ERASE RECORD NUMBER: Type the record number to be erased and press the...
- Page 70 WRM-10P S2 USER’S MANUAL REV 1.0 ERASE ALL RECORDS? Are you SURE? "ENTER" TO CONTINUE You can press the key to cancel the process. Any test [STOP] records that are erased CANNOT be recovered! NOTE Press the key to continue with the erasure process. All test records [ENTER] will be deleted from the unit's internal memory, and the following screen will be displayed:...
-
Page 71: Erasing Test Records From A Connected Usb Flash Drive
REV 1.0 WRM-10P S2 USER’S MANUAL 3.11.10. Erasing Test Records From a Connected USB Flash Drive Follow the steps below to erase an individual test record or all test records from a connected USB Flash drive: a. Insert the USB Flash drive containing the test records in the WRM's "USB MEM" port, and then start from the "START-UP"... - Page 72 WRM-10P S2 USER’S MANUAL REV 1.0 d. The following screen will be displayed: ERASE RECORD 1.ERASE SINGLE RECORD 2.ERASE ALL RECORDS 1. ERASE SINGLE RECORD Press the key (ERASE SINGLE RECORD) if you would like to erase a single test record from the USB Flash drive.
- Page 73 REV 1.0 WRM-10P S2 USER’S MANUAL ERASE ALL RECORDS? Are you SURE? "ENTER" TO CONTINUE You can press the key to cancel the process. Any test [STOP] records that are erased CANNOT be recovered! NOTE Press the [ENTER] key to continue with the erasure process. All test records will be deleted from the connected USB Flash drive, and the following screen will be displayed: ALL SHOTS ERASED...
-
Page 74: Wrm-10P S2 Special Features
WRM-10P S2 USER’S MANUAL REV 1.0 WRM-10P S2 SPECIAL FEATURES Bypassing the Resistance Reading Delay When the WRM first applies the test voltage to the transformers winding, the current is increased slowly until the transformer’s winding reaches saturation. During this period, the resistance value varies substantially and the readings may appear unstable to the operator. -
Page 75: Converting Resistance Measurements
REV 1.0 WRM-10P S2 USER’S MANUAL Converting Resistance Measurements The WRM can convert the resistance reading of the device under test at its present temperature to the equivalent resistance value at a different temperature. The conversion is accomplished by the following formula: ����... -
Page 76: Troubleshooting Guide
WRM-10P S2 USER’S MANUAL REV 1.0 Troubleshooting Guide PROBLEM DESCRIPTION Probable Cause Suggested Solution No current displayed on Opened current cable connection. • Check current cable connection. • the LCD screen when Opened transformer windings. • • Perform a quick test using a shunt performing a test. - Page 77 1520 S. Hellman Ave • Ontario, CA 91761 • USA Phone: 909-923-9390 • Fax: 909-923-9391 www.vanguard-instruments.com Copyright 2017 by Vanguard Instruments, a Doble Company WRM-10P S2 User’s Manual • Revision 1.0 • October 5, 2017 • TA...
Need help?
Do you have a question about the Vanguard Instruments WRM-10P S2 and is the answer not in the manual?
Questions and answers