Table of Contents
Advertisement
Advertisement
Table of Contents

Subscribe to Our Youtube Channel
Related Manuals for Toro LawnMaster 53603


Summary of Contents for Toro LawnMaster 53603
- Page 1 Model 53603 Owner’s Manual Español - P. 19 Français - P. 39...
-
Page 2: Table Of Contents
Table of Contents I. Introduction ......1 Sample Watering Plan ......1 II. -
Page 3: Introduction
I. Introduction: What is a Watering Cycle? Each watering cycle opens and closes all the valves assigned to a program, in sequence, starting with the lowest valve number. For example, in the sample watering plan shown, program A has three start times which initiate three watering cycles. All four valves in the program water in sequence, three times each day, once at 7:00am, once at 5:00pm, and once at 11:00pm. -
Page 4: Installation
II. Installation Selecting an Installation Site Install the timer with the display at eye level. If you will be using a pump, the timer must be mounted at least 15 feet (4.5m) away from your pump start relay and pump. Do not plug the timer into any power circuit serving a refrigerator, a pump, an air conditioner, a garage door opener, a washer or dryer, or other high-powered equipment. -
Page 5: Connecting A Pump Start Relay
Note: Please use only single strand, color-coded irrigation wire for your installation. 1. Connect the wire from valve #1 to the terminal slot marked 1, connect the wire from valve #2 to the terminal slot #2 and so on until all valves are connected. 2. -
Page 6: Dial Programming
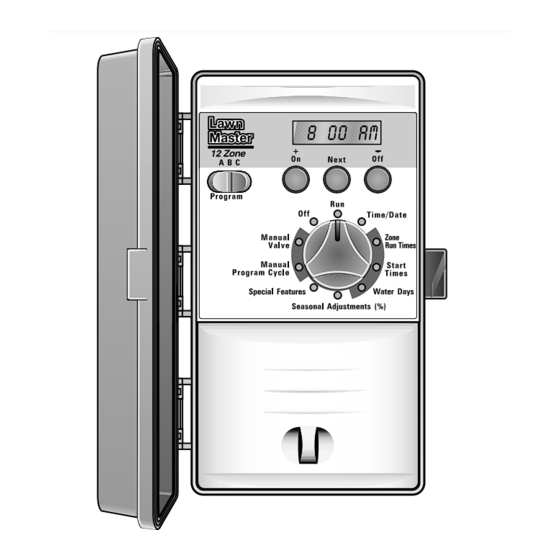
III. Dial Programming Use the dial to set all elements of your program or to simply review and update existing information. Setting Time and Date 1. Set the dial to the Time/Date position. 2. Time: The hour will flash. Use the + and – buttons to change the hour shown on the display. -
Page 7: Setting Valve Run Time
Setting Valve Run Times Follow the steps below to program how long each valve will water. 1. Set the dial to the Zone Run Time position. 2. Select program A, B, or C. 3. The display will indicate the valve number and then the run time for that valve. 4. -
Page 8: Selecting Program Start Times
1. To select your master valve option ON, set the dial to Zone Run Time. 2. Press the Next button until Master is displayed (after the last valve). 3. Press the + button to turn the master valve ON. 4. Press the – button to turn the master valve OFF. Selecting Program Start Times This sets the time of the day you wish to water. -
Page 9: Canceling A Program Start Time
Canceling a Program Start Time 1. With the dial set to the START TIME position, use the + and – buttons to set the start time to OFF, (which is between 11:59 p.m. and 12:00 a.m.). 2. If a program has all three start times turned off, then that program is Off. (All other program details are retained). - Page 10 Selecting Odd or Even Days This option will water only odd days or even days of the month. 3. Press the + button to select or the – button to cancel Odd Days. 4. Press the Next button to go to Even Days. 5.
-
Page 11: Run/Off Positions
Set the dial to the Run position to enable automatic watering of all programmed schedules. Use this dial position to turn off watering, such as when it is raining or you don’t want watering. As long as the dial is in the Off position, watering programs will not be activated automatically. -
Page 12: Manual Operation
IV. Manual Operation Manual Program Cycle Use this feature to manually start your normal program cycle at any time. Each valve’s run time will be operated for the program selected. For example, this can be used to start a program an extra time on a particularly hot day. 1. -
Page 13: Manual Valve
Manual Valve Use this feature to start one or more valves, watering sequentially, for a selected period of time. 1. Set the dial to the Manual Valve position. 2. Valve 1 will show on the display. You may use + and – buttons to select the amount of time for valve 1 to water or you may skip to the next valve by pressing the Next button. -
Page 14: Other Dial Functions
V. Other Dial Functions Seasonal Adjustment(%) Use this dial position for simple seasonal adjustment of all your valve’s watering durations. When weather conditions return to normal this adjustment can be returned to normal (100%). A setting of less than 100% results in less watering. A setting of more than 100% results in more watering. -
Page 15: Program Review
Special Features This position has three functions. In this position, you may Erase all programmed information, Review all Programmed information, or activate a Rain Sensor. Program Review You can review the contents of programs A, B, and C by setting the dial to the Special Features position. -
Page 16: Sensor Override
Sensor Override Rain switches or moisture sensors are often used in automatic irrigation systems to prevent automatic watering during rainy or wet conditions. This timer provides convenient sensor hook-up terminals and a sensor override or bypass option. The override option (OFF) lets you bypass the sensor for testing. -
Page 17: Special Protection
VI. Special Protection Lawn Master has been designed to ensure operation of the timer in the event of unexpected electrical disturbances, power loss or valve failure. Memory Protection Your programs are stored in a unique electronic device called “Non-Volatile Memory.” This protects your programs from being lost when electrical power is interrupted for up to 10 years, even without having a battery connected. -
Page 18: Troubleshooting
VII. Troubleshooting Problem Correction 1. All valves do not turn on 1. Verify program. Use Special Features Review option. automatically 2. Check valve common wire for proper hook-up. 3. Check for shorted valve, refer to Special Protection Section V, “Electronic Fuse”. 4. -
Page 19: Warranty Information
Neither The Toro Company nor Toro Warranty Company is liable for failure of products not manufactured by it even though such products may be sold or used in conjunction with Toro products. -
Page 20: Fcc Information
Electromagnetic Compatibility This equipment has been tested and found to comply with the limits for a Class B digital device, pursuant to Part 15 of the FCC Rules. These limits are designed to provide reasonable protection against harmful interference in a residential installation. This equipment generates, uses and can radiate radio frequency energy and, if not installed and used in accordance with the instructions, may cause harmful interference to radio communications.
Need help?
Do you have a question about the LawnMaster 53603 and is the answer not in the manual?
Questions and answers
After I have programmed the amount to water, the valve to water, and the days to water I check it with Special Features and I get an incomplete because there are no watering days specified. I turned the days I wanted to water to the ON position….not sure why it’s not working.
The Toro LawnMaster 53603 may show an incomplete status for watering days even after setting them to the ON position due to a few possible reasons:
1. The dial is not set to the Run position, which is required to enable automatic watering.
2. A short circuit at one of the valves may have occurred, causing that specific valve to be shut off automatically.
3. The RAIN SENSOR may be active, preventing watering.
4. The Seasonal Adjustment may be set to 00%, disabling watering.
5. The transformer may not be plugged in, so the timer has no power.
These conditions can prevent the system from executing the programmed watering days correctly.
This answer is automatically generated