Advertisement
Quick Links
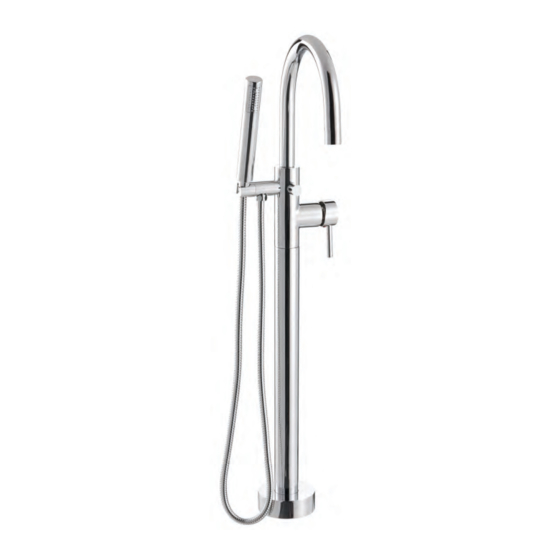
Bathtub freestanding faucet
Robinet autoportant pour baignoire
Owner Manual and Installation Guide
Manuel du propriétaire et guide d'installation
This manual is a graphic reference for installation purposes. Some graphic elements and components may differ.
Ce manuel est une référence graphique pour l'installation. Certains éléments graphiques et composantes peuvent différer.
94051012
04MR2014
Advertisement

Related Manuals for A&E SALACIA


Summary of Contents for A&E SALACIA
- Page 1 Bathtub freestanding faucet Robinet autoportant pour baignoire Owner Manual and Installation Guide Manuel du propriétaire et guide d’installation This manual is a graphic reference for installation purposes. Some graphic elements and components may differ. Ce manuel est une référence graphique pour l’installation. Certains éléments graphiques et composantes peuvent différer. 94051012 04MR2014...
- Page 2 INFORMATION / INFORMATION Before you begin carefully read all instructions. Avant de débuter les travaux, lire attentive- ment les instructions de montage. Consult local building codes to ensure that ins- tallation complies with standards in your area. Consulter le code du bâtiment de votre région, afin que l'installation respecte les normes en Inspect unit carefully to ensure there is no da- vigueur.
- Page 3 TOOLS AND MATERIAL REQUIRED / OUTILS ET MATÉRIAUX REQUIS METRIC METRIQUE METRIC METRIQUE Drillbits / Forets Allen Key Set / Clés Allen Wrenches / Clés Utility Knife / Couteau à lame rétractable Screwdriver / Tournevis Lead Pencil / Crayon à mine de plomb Basin Wrench / Clé...
-
Page 4: Parts List / Liste Des Pièces
PARTS LIST / LISTE DES PIÈCES ITEM DESCRIPTION Qté/Qty Faucet body / Corps du robinet Flexible hose / Tuyau flexible Handheld shower / Douchette à main Faucet base / Base du robinet #12x1¾" Hex. socket head screw (M6x45) / #12x1¾" Vis à tête cylind. à 6 pans creux (M6x45) #10x⅜"... - Page 5 EXPLODED VIEW / VUE EXPLOSÉE 1.35 1.36 1.10 1.11 1.12 1.37 1.38 1.28 1.13 1.30 1.14 1.33 1.15 1.16 1.17 1.18 1.19 1.27 1.20 1.29 1.31 1.32 1.25 1.34 1.26 1.21 1.22 1.39 1.23 1.24 1.40 1.25 1.26 1.48 1.43 1.49 1.44 1.45...
- Page 6 PLUMBING ALIGNMENT ALIGNEMENT DE LA PLOMBERIE Isometric view Vue isométrique Face view Vue de face COLD FROID CHAUD Water supply lines must be perpendicular with the spout. Les raccords d'eau se doivent d'être perpendiculaires avec l'orientation du bec verseur. Page 6...
- Page 7 CONCRETE SUBFLOOR INSTALLATION INSTALLATION SUR SOUS-PLANCHER DE BÉTON Hole dimension Dimension du trou : 4" 102mm Finished floor Plancher fini ¾" min. 3" min. 19mm min. 76mm min. Concrete subfloor Sous-plancher de béton Concrete subfloor installation: Cont. with section A at page 9. Installation sur sous-plancher de béton: Suite de la section A à...
- Page 8 WOOD FLOOR INSTALLATION INSTALLATION SUR PLANCHER DE BOIS Hole dimension Dimension du trou : 2" 51mm Subfloor Plancher brut ⅝" min. - 1⅛" max. 16mm min. - 29mm max. Wood floor installation: Cont. with section B at page 14. Installation sur sous-plancher de béton: Suite de la section B à la page 14. Page 8...
- Page 9 CONCRETE SUBFLOOR INSTALLATION INSTALLATION SUR SOUS-PLANCHER DE BÉTON Concrete screws not included Vis à béton non incluses Page 9...
- Page 10 CONCRETE SUBFLOOR INSTALLATION INSTALLATION SUR SOUS-PLANCHER DE BÉTON CHAUD COLD FROID Open water supply and maintain pressure for a few minutes to make sure there is no leak. Close down water supply afterward and proceed to next step. Ouvrir l'apport d'eau et maintenir la pression pendant quelques minutes afin de vous assurer qu'il n'y a aucune fuite.
- Page 11 CONCRETE SUBFLOOR INSTALLATION INSTALLATION SUR SOUS-PLANCHER DE BÉTON Page 11...
- Page 12 CONCRETE SUBFLOOR INSTALLATION INSTALLATION SUR SOUS-PLANCHER DE BÉTON Page 12...
- Page 13 CONCRETE SUBFLOOR INSTALLATION INSTALLATION SUR SOUS-PLANCHER DE BÉTON Page 13...
- Page 14 WOOD FLOOR INSTALLATION INSTALLATION SUR PLANCHER DE BOIS Vous n'aurez pas besoin de cette pièce You will not need this part Page 14...
- Page 15 WOOD FLOOR INSTALLATION INSTALLATION SUR PLANCHER DE BOIS Page 15...
- Page 16 WOOD FLOOR INSTALLATION / WOOD FLOOR INSTALLATION INSTALLATION SUR PLANCHER DE BOIS INSTALLATION SUR PLANCHER DE BOIS Page 16...
- Page 17 WOOD FLOOR INSTALLATION / WOOD FLOOR INSTALLATION INSTALLATION SUR PLANCHER DE BOIS INSTALLATION SUR PLANCHER DE BOIS Page 17...
- Page 18 WOOD FLOOR INSTALLATION INSTALLATION SUR PLANCHER DE BOIS Rubber gasket Rondelle de caoutchouc Page 18...
- Page 19 WOOD FLOOR INSTALLATION INSTALLATION SUR PLANCHER DE BOIS View from underneath the floor Vue sous le plancher Page 19...
- Page 20 WOOD FLOOR INSTALLATION INSTALLATION SUR PLANCHER DE BOIS Open water supply and maintain pressure for a few minutes to make sure there is no leak. Close down water supply afterward and proceed to next step. Ouvrir l'apport d'eau et maintenir la pression pendant quelques minutes afin de vous assurer qu'il n'y a aucune fuite.
- Page 21 WOOD FLOOR INSTALLATION INSTALLATION SUR PLANCHER DE BOIS Page 21...
- Page 22 WOOD FLOOR INSTALLATION INSTALLATION SUR PLANCHER DE BOIS Page 22...
- Page 23 WOOD FLOOR INSTALLATION INSTALLATION SUR PLANCHER DE BOIS Page 23...
-
Page 24: Warranty / Garantie
WARRANTY / GARANTIE A&E Shower and Baths inc. (hereafter ‘‘ A&E ‘‘) offers the A&E Shower & Bath inc. (˝A&E˝) offre la garantie limi- following express limited warranty on each of its pro- tée suivante sur ses produits. Cette garantie s’applique ducts.
Need help?
Do you have a question about the SALACIA and is the answer not in the manual?
Questions and answers