Advertisement
Quick Links
CompX eLock Instructions
Thank you for purchasing the CompX eLock. The information contained in these instructions is intended to serve
as a guide so as to allow the eLock to be quickly and easily put into service. CompX's Network eLock (if equipped)
can be configured to work in conjunction with existing 802.11g or Ethernet networks, making it the 1st and only
product to provide networked access control and temperature monitoring in one device.
For complete set up and installation instructions for networked and stand-alone eLocks, please see the "Help"
section in CompX's LockView v4 software.
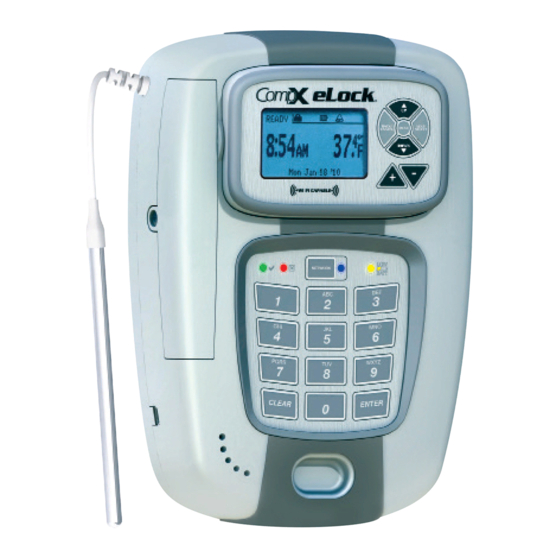
1. 3-position LCD adjustment
2. Dot matrix LCD
3. Wi-Fi antenna cover (if equipped)
4. Red LED & Green LED
5. Network button (blue LED)
6. Alpha-numeric keypad
7. USB port (USB A to mini B cable)
8. "CLEAR" button
9. Beeper location
10. "UP" button
11. "BACK/CANCEL" button
12. "MENU" button
13. "NEXT/SELECT" button
14. "DOWN" button
15. - button
16. + button
17. "LO BATT" indicator
18. Battery pack (6 AA) (BATTERIES
NOT INCLUDED)
19. AC adapter plug-in (2.5 mm)
(ADAPTER NOT INCLUDED)
20. Ethernet connector (if equipped)
(ETHERNET CABLE NOT
INCLUDED)
21. Magstripe reader location (if
equipped)
22. "ENTER" button
23. HID PROX or HID iCLASS reader
location (if equipped)
24. Door switch connector (SWITCH
NOT INCLUDED)
25. Dual eLatch connector (if
equipped) (LATCH NOT
INCLUDED)
26. RTD probe for temperature
monitoring (if equipped)
1
Advertisement

Related Manuals for COMPX eLock


Summary of Contents for COMPX eLock
- Page 1 Thank you for purchasing the CompX eLock. The information contained in these instructions is intended to serve as a guide so as to allow the eLock to be quickly and easily put into service. CompX’s Network eLock (if equipped) can be configured to work in conjunction with existing 802.11g or Ethernet networks, making it the 1st and only product to provide networked access control and temperature monitoring in one device.
-
Page 2: Unit Features
1 -- eLock mounting plate read/write communication w 1 -- strike (8” for standard or 14” for ultra low) w Each eLock can hold any combination of up to 3,000 w 1 -- strike plate cover Supervisors and Users w 8 -- #8 x 3/8”... - Page 3 Install 6 AA alkaline batteries. (not included) 2. Press “ENTER”. 1. The first time the eLock is powered up, FACTORY will be displayed in the upper left hand corner of the LCD. CARD CREDENTIAL If the eLock is equipped with a card 2.
- Page 4 1 -- Automatic Method **Once the Lock Name has been chosen in LockView, it can 1) With the eLock in SETUP mode, connect the eLock via the not be changed. Please be sure the name that is chosen is USB cable to the computer on which LockView is installed.
- Page 5 User or Supervisor that has 3. Press “ENTER” again. HOLD OPEN will flash; LOCK IS HELD access rights to the eLock can place it in passage mode. OPEN will appear in the upper left hand corner of the LCD.
- Page 6 TEMPERATURE THAT HAS BEEN RECORDED SINCE THE LAST PROGRAMMED RANGE IN ORDER SEE THIS FEATURE TIME THE eLock WAS RESET. THIS WILL NOT RESET THE UPPER AND LOWER LIMITS FOR ALARMING. Mute can be used to silence a triggered alarm for 10 minutes.
-
Page 7: Manual Programming Guide
(OBSERVED TEMPERATURES IS THE HIGHEST AND LOWEST TEMPERATURE sound an alert. THAT HAS BEEN RECORDED SINCE THE LAST TIME THE eLock WAS RESET. THIS WILL NOT RESET THE UPPER AND LOWER LIMITS FOR ALARMING. IF THE ALARM TEMPERATURE LIMITS NEED TO BE CHANGED, SEE When is “ON”... - Page 8 LOG INTERVALS RESET ALARM (THE eLock RECORDS IN MEMORY TEMPERATURE DATA THAT CAN BE (THE ALARM MUST BE TRIGGERED AND THE RECORDED TEMPERATURE RETRIEVED USING LOCKVIEW. USING LOG INTERVALS, THE FREQUENCY MUST HAVE RETURNED TO THE ACCEPTABLE PROGRAMMED RANGE IN OF TEMPERATURE RECORDS FOR “IN RANGE”...
- Page 9 Manual Programming Guide continued 9. CREDENTIAL NAME ENTRY will appear. Press 2 - 9 for A - Z; 7. Press “NEXT/SELECT” to display NAME, SLOT NUMBER, LAST press 1 for , + or ; press 0 for “space”; press and hold ACCESS ATTEMPT.
-
Page 10: Display Formats
Network Test (if equipped) again and press “NEXT/SELECT. ” NEW PIN SET will appear. Using NETWORK TEST the strength and quality of the eLock connection to the network is displayed. The IP and MAC Display Formats addresses are also shown here. - Page 11 (twice/day). The time of day was 10 a.m. when the eLock was initialized. Therefore, the eLock update time is 10 a.m. and 10 p.m. The desired update time is 6 a.m. and 6 p.m. Using the RESET NET SCHED. feature, the above steps should...
- Page 12 There are two main parts of this installation: installing the strike and installing Install the strike the eLock assembly. The strike and the eLock assembly can be mounted either with foam tape or by drilling holes and using screws. It is important to note that...
- Page 13 ® Drilling Installation The CompX eLock can be mounted to the front of the refrigerator by using the provided foam tape or by drilling holes and using screws a. Cut a 3” piece of double- (provided).
- Page 14 There are two main parts of this installation: installing the strike and installing the Install the strike eLock assembly. The strike and the eLock assembly can be mounted either with foam tape or by drilling holes and using screws. It is important to note that mounting the...
- Page 15 ® Drilling Installation The CompX eLock can be mounted to the front of the refrigerator by using the provided foam tape or by drilling holes and using screws a. Cut a 3” piece of double-sided foam tape and attach it to the (provided).
- Page 16 LockView is a Registered Trademark of CompX International. Windows is a trademark of the Microsoft Corporation. Specifications may vary based on user application. Copyright 2010 © CompX Security Products / 847.752.2500 / compx.com / 715 Center St., Grayslake, IL 60030...
Need help?
Do you have a question about the eLock and is the answer not in the manual?
Questions and answers