Advertisement
Quick Links
Page 1 of 20
ESP32 Environment Sensor Shield Hookup
Guide
Introduction
The ESP32 Environment Sensor Shield provides sensors and hookups for
monitoring environmental conditions. This tutorial will show you how to
connect your sensor suite to the Internet and post weather data online.
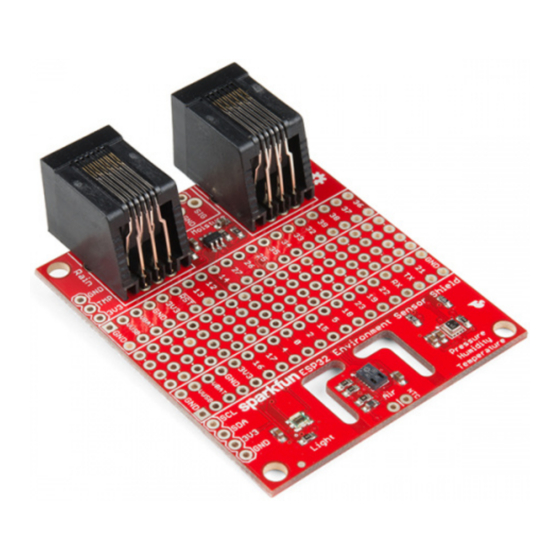
SparkFun ESP32 Thing Environment Sensor
Shield
DEV-1415 3
Required Materials
You'll need the ESP32 Thing board to interface with this shield. Other
microcontroller boards will work, but since the shield is designed to stack on
the ESP32 Thing, interfacing with them will be difficult.
You'll also need some means of connecting the two boards together. While
it's possible to solder them together using snappable male header pins, it
makes good sense to use female headers on one of the boards board so
the boards can be separated again later if needed.
Advertisement

Related Manuals for sparkfun ESP32


Summary of Contents for sparkfun ESP32
- Page 1 Shield DEV-1415 3 Required Materials You’ll need the ESP32 Thing board to interface with this shield. Other microcontroller boards will work, but since the shield is designed to stack on the ESP32 Thing, interfacing with them will be difficult.
- Page 2 PRT-00 116 Female Headers PRT- 00115 The ESP32 Environment Sensor Shield comes with connections for our weather station. You may also wish to add a soil moisture sensor, which you’ll need two three-position 3.5mm screw terminals and enough wire to connect the sensor to the board.
-
Page 3: Suggested Reading
Bit Set TOL- 12891 TOL- 10865 Suggested Reading If you have not yet used the ESP32 Thing Development Board, check out this guide first. ESP32 Thing Hookup Guide O CT OBE R 27, 2016 An introduction to the ESP32 Thing's hardware features, and a primer on using the WiFi/Bluetooth system-on-chip in Arduino. -
Page 4: Hardware Overview
Onboard Sensors All of the onboard sensors are connected to the ESP32 via I C connection. Pressure, Humidity, and Temperature The first onboard sensor is a Bosch BME280. This sensor measures relative humidity, temperature, and barometric pressure. - Page 5 Page 5 of 20 Air Quality and Temperature Next is the ams CCS811 air quality and temperature sensor. Note the routed out region around this sensor. That provides a buffer against thermal changes stimulated by the circuitry on the rest of the PCB. As with the BME280, it is possible to change the I C address of this sensor.
- Page 6 The pins for these two functions are connected to ESP32 Thing pins 14 (speed) and 35 (direction). One tick per second corresponds to 1.492mph (2.40 kph) of wind speed.
- Page 7 Our example code provides you with a solid example on using the direction sensor, as well. Soil Moisture SparkFun’s soil moisture sensor can be connected to the shield and monitored via analog voltage conversion. The sensor connects to pin 26 of the ESP32 Thing.
-
Page 8: Hardware Assembly
We’ve provided a header which will allow you to connect any other I2C sensor or device you may think useful to the board. In fact, the pinout of this header is such that many SparkFun I2C boards can be directly attached without any wire order change at all! Hardware Assembly As previously mentioned, it’s a good idea to use headers (both male and... - Page 9 Install the Male Headers We’re going to install the male headers on the ESP32 Thing board first. We’re going to do so “right side up”, with the headers extending down from the side of the board with no components on it.
- Page 10 Now, with the headers installed, you can easily drop the ESP32 Thing board into place on top of them. Go ahead and solder all the pins to the ESP32 Thing at this time. If you're new to soldering, check out our through-hole soldering tutorial.
- Page 11 Page 11 of 20 Now we need to install the female headers onto the ESP32 Environment Sensor Shield. We’ll do this using the pins we just soldered to the ESP32 Thing. Take your female headers and place them on the male headers on the ESP32 Thing, as shown here.
- Page 12 If you have not already, make sure to setup your own weather station with Wunderground. You will need to fill out a form and pick a username & password in order to receive a station ID. Sensor data from the ESP32 Thing and the ESP32 Environment Sensor Shield can then be pushed to Wunderground’s server.
- Page 13 Page 13 of 20 #include <SparkFunCCS811.h> #include "SparkFunBME280.h" #include "Wire.h" #include <Sparkfun_APDS9301_Library.h> #include <WiFi.h> BME280 bme; CCS811 ccs(0x5B); APDS9301 apds; // Variables for wifi server setup const char* ssid = "your_ssid_here"; const char* password = "password"; String ID = "wunderground_station_id"; String key = "wunderground_station_key"; WiFiClient client; const int httpPort = 80; const char* host = "weatherstation.wunderground.com"; // Variables and constants used in calculating the windspeed. volatile unsigned long timeSinceLastTick = 0; volatile unsigned long lastTick = 0;...
- Page 14 Page 14 of 20 k, RISING); // Rain sesnor setup. Rainfall is tracked by ticks per secon d, and timestamps of // ticks are tracked so rainfall can be "aged" (i.e., rain per hour, per day, etc) pinMode(RAIN_PIN, INPUT); // Rain sensor attachInterrupt(digitalPinToInterrupt(RAIN_PIN), rainTick, R ISING); // Zero out the timestamp array. for (int i = 0; i < NO_RAIN_SAMPLES; i++) rainTickList[i] = // BME280 sensor setup these are fairly conservative setti ngs, suitable for // most applications. For more information regarding the se ttings available // for the BME280, see the example sketches in the BME280 l ibrary. bme.settings.commInterface = I2C_MODE; bme.settings.I2CAddress = 0x77; bme.settings.runMode = 3; bme.settings.tStandby = 0; bme.settings.filter = 0; bme.settings.tempOverSample = 1; bme.settings.pressOverSample = 1; bme.settings.humidOverSample = 1; bme.begin();...
- Page 15 Page 15 of 20 { static unsigned long outLoopTimer = 0; static unsigned long wundergroundUpdateTimer = 0; static unsigned long clockTimer = 0; static unsigned long tempMSClock = 0; // Create a seconds clock based on the millis() count. We us e this // to track rainfall by the second. We've done this becaus e the millis() // count overflows eventually, in a way that makes trackin g time stamps // very difficult. tempMSClock += millis() clockTimer; clockTimer = millis(); while (tempMSClock >= 1000) { ...
- Page 16 Page 16 of 20 // Calculate and display rainfall totals. Serial.print("Rainfall last hour: "); Serial.println(float(rainLastHour)*0.011, 3); Serial.print("Rainfall last day: "); Serial.println(float(rainLastDay)*0.011, 3); Serial.print("Rainfall to date: "); Serial.println(float(rainTicks)*0.011, 3); // Trigger the CCS811's internal update procedure, then // dump the values to the serial port. ccs.readAlgorithmResults(); Serial.print("CO2: "); Serial.println(ccs.getCO2()); Serial.print("tVOC: "); Serial.println(ccs.getTVOC()); Serial.print("Luminous flux: "); Serial.println(apds.readLuxLevel(),6); // Calculate the amount of rain in the last day and hour. rainLastHour = 0; rainLastDay = 0; // If there are any captured rain sensor ticks... if (rainTicks > 0) { // Start at the end of the list. rainTickIndex will alwa ys be one greater // than the number of captured samples. int i = rainTickIndex1; // Iterate over the list and count up the number of samp les that have been // captured with time stamps in the last hour. while ((rainTickList[i] >= secsClock S_IN_HR) && rainT ickList[i] != 0) { ...
- Page 17 Page 17 of 20 url += "&PASSWORD="; url += key; url += "&dateutc=now&action=updateraw"; // Now let's add in the data that we've collected from ou r sensors // Start with rain in last hour/day url += "&rainin="; url += rainLastHour; url += "&dailyrainin="; url += rainLastDay; // Next let's do wind url += "&winddir="; url += windDir; url += "&windspeedmph="; url += windSpeed; // Now for temperature, pressure and humidity. url += "&tempf="; url += bme.readTempF(); url += "&humidity="; url += bme.readFloatHumidity(); url += "&baromin="; float baromin = 0.0002953 * bme.readFloatPressure();...
- Page 18 Note: When connecting to a WiFi network and the Wunderground server, make sure to modify the variables , and ssid password Expected output Here is a picture of what you should expect upon starting up your ESP32 and letting it connect to WiFi:...
- Page 19 Page 19 of 20 The first few lines are just diagnostics from the ESP32, and will be present at boot time regardless of the application being run. Immediately below the line “Connecting to sparkfun-guest” you see a series of dots. One dot...
- Page 20 TMP102 Digital Temperature HIH-4030 Humidity Sensor Sensor Hookup Guide Hookup Guide How to connect and use the Measure relative humidity with SparkFun Digital Temperature SparkFun's HIH-4030 Humidity Sensor Breakout - TMP102 with an Sensor Breakout. Arduino. https://learn.sparkfun.com/tutorials/esp32-environment-sensor-shield-hookup-guide?_ga=2... 7/10/2017...
Need help?
Do you have a question about the ESP32 and is the answer not in the manual?
Questions and answers