Advertisement
Quick Links
BMP180 Barometric Pressure Sensor Hookup
a
learn.sparkfun.com tutorial
Available online at:
Contents
Under Pressure!
Under Pressure!
The
BMP180 Breakout
is a barometric pressure sensor with an I
Barometric pressure sensors measure the absolute pressure of the air around them. This pressure varies with both the
weather and altitude. Depending on how you interpret the data, you can monitor changes in the weather, measure altitude,
or any other tasks that require an accurate pressure reading.
http://sfe.io/t151
C ("Wire") interface.
2
Advertisement

Subscribe to Our Youtube Channel
Related Manuals for sparkfun BMP180


Summary of Contents for sparkfun BMP180
-
Page 1: Table Of Contents
BMP180 Barometric Pressure Sensor Hookup learn.sparkfun.com tutorial Available online at: http://sfe.io/t151 Contents Under Pressure! Connecting the Hardware Installing the Arduino Library Running the Example Sketches Measuring Weather and Altitude Tips and Tricks Resources and Going Further Under Pressure! BMP180 Breakout is a barometric pressure sensor with an I C (“Wire”) interface. -
Page 2: Connecting The Hardware
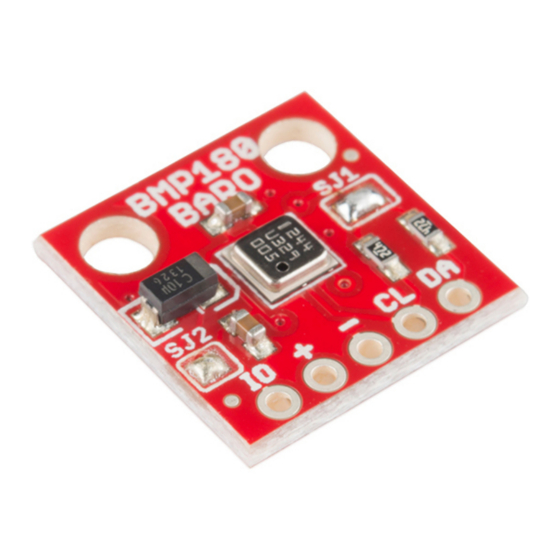
Connection Names The BMP180 Breakout Board breaks out five connections from the IC. We traditionally call these connections “pins” because they come from the pins on the IC, but they are actually holes that you can solder... - Page 3 BMP180 to your Arduino. Solder a 5-pin length of male-male header to the board. You can solder it to either side; the bottom is more useful for breadboards, and the top is more useful for jumper wires.
- Page 4 Note that the BMP180 is sensitive to moisture. When you’re done soldering, do not clean off the flux by rinsing the board in water or other fluids. Connecting the Board to your Arduino When you’re done soldering, connect the +, -, CL, and DA pins to your Arduino. Different Arduino models use different pins for the I C interface;...
-
Page 5: Installing The Arduino Library
We’ve written an Arduino library called SFE_BMP180 that allows you to easily talk to the BMP180 sensor. This library is not included with the stock Arduino software, but don’t worry, installing new libraries is easy. If you’d like to interface the BMP180 to a microcontroller other than an Arduino, the C++ source code in the library... - Page 6 The library you just installed includes two example sketches that show basic operation of the BMP180. These are designed to be blueprints to help you write your own code. After you install the library, run the Arduino IDE, and open the following menu item: File / Examples / Sparkfun BMP180 / SFE_BMP180_example.
-
Page 7: Measuring Weather And Altitude
Measuring Weather and Altitude The BMP180 was designed to accurately measure atmospheric pressure. Atmospheric pressure varies with both weather and altitude; you can measure both of these using this sensor. Here’s how: What is Atmospheric Pressure? The definition of pressure is a force “pressing”... - Page 8 To compensate for temperature, the BMP180 includes a rather good temperature sensor as well as a pressure sensor. To perform a pressure reading, you first take a temperature reading, then combine that with a raw pressure reading to come up with a final temperature-compensated pressure measurement.
- Page 9 Weather Observations The atmospheric pressure at any given location on earth (or anywhere with an atmosphere) isn’t constant. The complex interaction between the earth’s spin, axis tilt, and many other factors result in moving areas of higher and lower pressure, which in turn cause the variations in weather we see every day.
-
Page 10: Tips And Tricks
5V Arduino, as the pullup resistors on the BMP180 board will keep the voltage below 3.6V. Give it air: Remember that the BMP180 needs access to ambient air to measure its pressure, so don’t put it in a sealed case. - Page 11 C uses two wires, usually labeled SCL (Serial Clock) and SDA (Serial Data). To function properly, I C requires a pullup resistor on each of those lines. The BMP180 board includes these resistors. They’re enabled by default, but you can disable them by clearing solder jumper SJ1.
-
Page 12: Resources And Going Further
1.8V, you can do so by removing the solder from the jumper labeled “SJ2”. Once you do this, you will need to provide the board with your desired I/O voltage via the “IO” header. The BMP180 will accept I/O voltages from 1.62V to 3.6V.
Need help?
Do you have a question about the BMP180 and is the answer not in the manual?
Questions and answers