Table of Contents

Related Manuals for Tacony Powr-Flite PAS14G


Summary of Contents for Tacony Powr-Flite PAS14G
- Page 1 OPERATOR’S MANUAL Automatic Scrubber PAS14G WARNING: OPERATOR MUST READ AND UNDERSTAND THIS MANUAL COMPLETELY BEFORE OPERATING THIS EQUIPMENT. © Tacony Corporation, All rights reserved PAS14G-MAN 02/2020 Save These Instructions...
-
Page 2: Table Of Contents
Contents Getting to know the machine ....................3 Product Information ....................4 1.1 Important Safety Advice ................4 1.2 Non intended use of the machine ..............4 1.3 General warnings about batteries ..............4 1.4 Guidelines for the operator ................5 1.5 Transporting the machine ................5 1.6 Symbols &... -
Page 3: Getting To Know The Machine
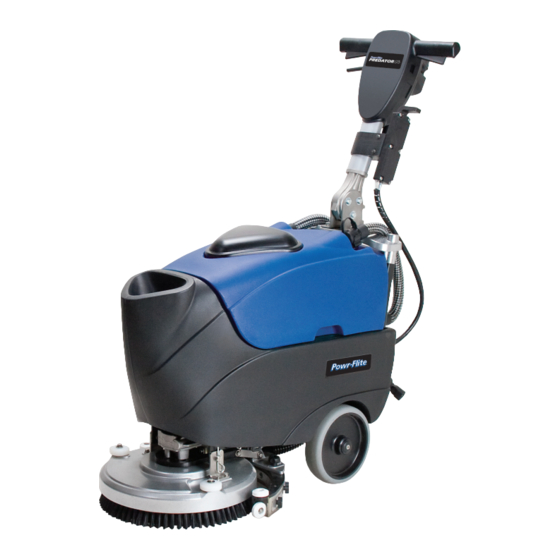
Getting to know the machine 1. Handle 11. Brush guard 2. Control panel 12. Brush 3. Squeegee lifting lever 13. Squeegee 4. Lever for starting brush rotation 14. Recovery tank drain hose and/or dispensing water 15. Vacuum hose 5. Handle adjusting lever 16. -
Page 4: Product Information
1. Product Information • Do not operate the machine if it malfunctions or is damaged in any way. Contact an authorized This commercial automatic scrubber is designed service agent for repair or adjustment. for the scrubbing/cleaning of hard floors in •... -
Page 5: General Warnings About Batteries
1.3 General warnings about batteries WARNING machine must switched off before adding or changing WARNING Use appropriate personal accessories. protection equipment to avoid contact with the skin (see standards in force in 1.5 Transporting the machine the country in which the machine is used). CAUTION - THIS MACHINE IS HEAVY •... -
Page 6: Preparing For Use
2. Preparing for use 2.1 Connecting the batteries • Unscrew the bolts that fasten the tank to the handle support (Fig 1). Fig 3 Fig 1 • Remove the recovery water tank (Fig 2). Fig 4 • Replace the recovery water tank and screw into place. -
Page 7: Adjusting The Handle Height
Fig 5 NOTE: 10 hours are required for complete Fig 6 battery charge. • Attach the brush/drive disc onto the clutch • IMPORTANT - Overcharging will damage plate and rotate the brush/drive disc until the batteries. This will cause run time to be secure (Fig 7). -
Page 8: Controls
Fig 9 Fig 8 1 - LEDs Battery charge indicator • Turn on the faucet and fill the tank. The LED lights will indicate the charging status. • Pour the liquid detergent into the tank. Green LED (1c) maximum. IMPORTANT - Only chemicals recommended Yellow LED (1b) half by the appliance manufacturer should be... -
Page 9: Operation
4 – Water dispensing button The solution is controlled by pressing both switch 3 and by pulling the lever on the right or left hand side of the handle 5 (Fig 10). Button is illuminated when in the ON position. Fig 11 •... -
Page 10: Preparing The Machine And Choosing The Cycle
4.2 Preparing the machine and choosing • Set the handle at a comfortable working the cycle height. • Start the machine and select the type • Press the brush motor button (#3, Fig 9). The of cycle. Start the cleaning operation by light illuminates. -
Page 11: Warnings While Using The Machine
NOTE: When any of the above mentioned error Fig 16 Solution tap fully opened signals are displayed, it is necessary to turn off • Check the status of the battery charge (see the machine and then turn the machine back LEDs Battery charge indicator). -
Page 12: Draining And Cleaning The Solution Tank
Fig 19 • Push the blue ring inward while pulling the red plug outward Fig 19). • Allow tank to drain completely. • Wash the inside of the tank, leaving the drain open and adding clean water though the front opening. •... -
Page 13: Storage
• Charge the batteries once a month. • Pull the squeegee unit (1) outwards. • Disconnect the hose (2) from the squeegee 7. Maintenance (1). • Loosen the knobs (3) and remove the WARNING - Before making adjustments squeegee (1) or performing maintenance, switch off the machine, unplug from the power supply and disconnect the non-grounded pole of the... -
Page 14: Squeegee Set Up (Correct Position)
NOTE: When the rubber blades (3) are worn on one side, they may be turned over one time. • Replace or turn over the rubber blades (3) without inverting them. • Replace all the components in reverse order. Fig 22 NOTE: Fig 23 It is possible to have two types of rubber... -
Page 15: Replacing The Fuses (Fig 23)
7.4 Replacing the fuses (Fig 25) WARNING Replace the blown fuse with one with the same amperage. • Remove the squeegee lift pedal from the squeegee lift arm. • Unscrew the two bolts (1) that fasten the external box (2) and remove it. •... -
Page 16: Technical Specification
8. Technical specification Class I construction. Enclosure to IPX3. Model Predator 14 Battery Scrubber Charging voltage AC (~) / Frequency V / Hz 100 – 120 / 50 – 60 Voltage DC Charging time hours Run time hours 1 hour 20 minutes Brush/cleaning width Drying width Brush pressure... -
Page 17: Fault Diagnosis
13. Fault diagnosis WARNING - Before performing maintenance or making adjustments, switch off the machine and unplug from the electricity supply. In addition safely disconnect the non-grounded pole of the battery (or by equivalent method). The following simple checks may be performed by the operator. Trouble Reason Solution... - Page 18 For warranty information go to www.Powr-Flite.com A Tacony Company 3101 Wichita Court • Fort Worth, TX 76140-1755 1-800-880-2913 • Fax: 1-817-551-0719 PAS14GA-MAN 02/2020...
Need help?
Do you have a question about the Powr-Flite PAS14G and is the answer not in the manual?
Questions and answers