
Related Manuals for IntelliCam SYSTEM II


Summary of Contents for IntelliCam SYSTEM II
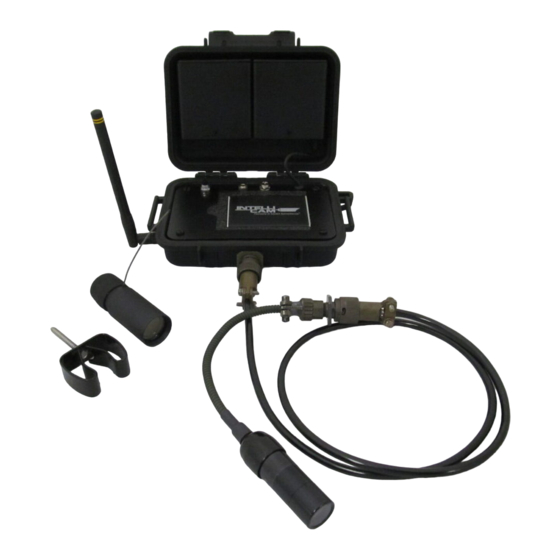
- Page 1 SYSTEM II Low Light Surveillance System DocRef # 0030603 System II User Guide Revised 2019-9-19...
-
Page 2: Table Of Contents
TABLE OF CONTENTS: INTRODUCTION Page 3 SYSTEM CONTROLS AND INDICATORS Page 3 Power/Receiver Processor Programming/Reset Button Red LED Antenna SYSTEM RECEIVER / PROCESSOR Page 4 Receiver / Processor Video Run Time SYSTEM QUICK SETUP Page 5 IR-903 SENSOR CONTROLS AND INDICATORS Page 8 Battery Holder Programming Button... -
Page 3: Introduction
The System II is packaged in a weatherproof enclosure containing a 32G Digital Video Recorder with the integrated RX-930 Receiver Processor and AA Battery Pack. The System II is the smallest, lightest, and most advanced video surveillance system on the market today. This... -
Page 4: Power/Receiver Processor
Power/Receiver Processor The Receiver/Processor Module accepts 12-Volt DC power from the integrated “AA” battery pack. The Receiver pulls approximately 2.6 ma while it is “awake” and 5ua in the “sleep” mode. This translates to about 14 days of operation (awake continuously) using alkaline batteries and about 1 month using Lithium batteries. -
Page 5: System Quick Setup
SYSTEM II QUICK SETUP: 1. Setup the Sensor (refer to section on Range Test, Walk Test). 2. Open System II Pelican Case. Remove battery pack insulator. (Replace 8 “AA” battery cells if necessary.) 3. Prepare Digital Recorder. a. Insert SD card into slot on left side of DVR (32G max) b. - Page 6 The entire unit is water-resistant, but not submersible. 6. The System II comes with two antennas. Select the desired antenna and attach to the system’s SMA receptacle. If using the optional ANT-4 dipole antenna, tie off the antenna to a small bush or hang it from a tree.
- Page 7 7. Runtime Programming: Open the System II top cover, remove the two battery pack covers, and remove the battery tab to activate the Video Controller’s “AA” battery pack (or insert “AA” batteries). The factory “default runtime” is one minute. To program a specific runtime, press and hold the Program/Reset Button until the Red LED comes “on”...
-
Page 8: Ir-903 Sensor Controls And Indicators
IR-903 SENSOR CONTROLS AND INDICATORS Passive IR-903 Infrared Sensor A) BATTERY COMPARTMENT B) PROGRAMMING BUTTON BLUE PROGRAMMING & ALARM LED D) ANTENNA E) LENS Battery Compartment: The IR-903’s batteries are self-contained. Slide the rubber boot off the back of the sensor and replace the batteries with 2 CR1225 Lithium Batteries. -
Page 9: Red Led
The other option is to use any Intellicam System II receiver, the unit can either be carried while range testing or can be placed near the target area on the ground, in which case the operator can... -
Page 10: Sensor Walk Test Mode
With the Sensor aimed at the target area, walk back and forth in the area where the sensor is aimed. This motion will trigger the Sensor and the sensor’s BLUE LED will flash and an alarm will be transmitted to the System II’s Receiver/Processor. The Receiver’s will flash when it receives the sensor’s alarm. (The RED LED... -
Page 11: Sensor Programming
SENSOR PROGRAMMING: IR-903 Passive Infrared Sensors: The IR-903 Passive Infrared Sensors can be programmed with a different Sensor ID and Sensitivity Levels, or it can be used in the Default Mode, where the Sensor ID 3 and the Sensitivity is set to Full Auto Chameleon. Programming Sensor ID’s is helpful when deploying multiple sensors in the same area. - Page 12 IR-903 Sensitivity Table Press Button Value Maximum Sensitivity Description No entry Full Auto Chameleon The Sensitivity automatically varies from maximum range to Mode minimum range depending on how thermally stable the environment is acting. If the environment is quiet, such as during Human Target to 50 feet.
-
Page 13: Using Passive Ir Sensors
USING PASSIVE INFRARED SENSORS Narrow Beam Passive Infrared Sensors offers many advantages over other sensor types. When combined with Auto-Threshold Sensing (ATS) circuitry, this technology is the most advanced when used in an outdoor environment. Its versatility, small size, long range, precise targeting, and target classifying allow it to be used reliably in many diverse applications. -
Page 14: Infrared Noise
(if possible) prior to doing installation, or degraded reliability could result. Warning: This device operates under Part 15 of the FCC Rules. Any modification not expressly approved by IntelliCam, LLC may void the warranty and the user’s authority to operate this device. -
Page 15: Technical Information
TECHNICAL INFORMATION Sensor Specifications IR-903 Sensing Method Dual Element Pyroelectric Detector Max. Detection Range @ 80 deg. Ambient) Human Targets 50 feet Vehicles 200 feet RF Output Power 1 mw, per FCC Part 15 Rules (FCC ID RVL- SICSAW916) Modulation OOK, 2-4Khz RF Frequency 916.5 MHz (SAW stabilized) -
Page 16: Accessories
The illuminator should be programmed with the same Video Runtime as the System II, plus an additional 10 seconds to allow for DVR boot up time, so that the illumination period will coincide with the recording times, thereby conserving power only when it’s needed. -
Page 17: Llc Low Light Camera
RIL-1 Remote Infrared Illuminator. Attach the camera to the System II Video Connector. Next turn the System II “on” by pressing the button on the receiver/processor. Go to a “live view” mode as viewed through the Video Monitor. Clip the LLC- 12 camera into the supplied TC-1 tree mount and aim the camera at the target area.
Need help?
Do you have a question about the SYSTEM II and is the answer not in the manual?
Questions and answers