Table of Contents
Advertisement
Quick Links
Frame Grabber and Simulator
Hardware Reference & Installation Guide
International Distributors
May 2020 - Rev 1.0
Sky Blue Microsystems GmbH
Geisenhausenerstr. 18
81379 Munich, Germany
+49 89 780 2970, info@skyblue.de
www.skyblue.de
In Great Britain:
Zerif Technologies Ltd.
Winnington House, 2 Woodberry Grove
Finchley, London N12 0DR
+44 115 855 7883, info@zerif.co.uk
www.zerif.co.uk
Advertisement
Table of Contents

Related Manuals for Kaya Instruments Predator II CoaXPress

Summary of Contents for Kaya Instruments Predator II CoaXPress
- Page 1 Frame Grabber and Simulator Hardware Reference & Installation Guide May 2020 - Rev 1.0 International Distributors In Great Britain: Sky Blue Microsystems GmbH Zerif Technologies Ltd. Winnington House, 2 Woodberry Grove Geisenhausenerstr. 18 81379 Munich, Germany Finchley, London N12 0DR +49 89 780 2970, info@skyblue.de +44 115 855 7883, info@zerif.co.uk www.skyblue.de...
-
Page 2: Table Of Contents
9.3.6 Isolated Output ..........................16 10 Mechanical Specifications ..........................17 10.1 Mechanical Drawings ..........................17 10.1.1 Predator II CoaXPress Mechanical Drawing ..................17 10.1.2 Chameleon II CoaXPress / Komodo II CoaXPress Mechanical Drawing ...........17 10.1.3 Komodo II CLHS Mechanical Drawing .....................18 10.2 Weight & Environmental Conditions.......................19 11 Power Specification ............................20... -
Page 3: Figures And Tables
1 Figures and Tables 1.1 List of figures Figure 1 – Predator II connector topology ........................ 7 Figure 2 – Chameleon II connector topology ......................7 Figure 3 – Komodo II CoaXPress connector topology ....................8 Figure 4 – Komodo II CLHS connector topology ......................8 Figure 5 –... -
Page 4: Revision History
2 Revision history Version Date Notes 70.05.2007 Initial release Table 1 – Revision History International Distributors In Great Britain: Sky Blue Microsystems GmbH Zerif Technologies Ltd. Geisenhausenerstr. 18 Winnington House, 2 Woodberry Grove 81379 Munich, Germany Finchley, London N12 0DR +49 89 780 2970, info@skyblue.de +44 115 855 7883, info@zerif.co.uk www.skyblue.de... -
Page 5: Introduction
3 Introduction 3.1 Safety precautions With your card in hand, please take the time to read through the precautions listed below in order to prevent preventable and unnecessary injuries and damage to you, other personnel or property. Read these safety instructions carefully prior to your first use of the product, as these precautions contain safety instructions that must be observed. -
Page 6: Disclaimer
3.2 Disclaimer KAYA Instruments will assume no responsibility for any damage that may ensue by the use of this product for any purpose other than intended, as previously stated. Without detracting from what was previously written, please be advised that the company will take no responsibility for any damages caused by: ... -
Page 7: Document Scope
This document is meant to serve as a hardware reference and installation guide for KAYA’s second generation frame grabbers: the Predator II CoaXPress, Komodo II CoaXPress, Komodo II CLHS and Chameleon II. The guide consists of 8 chapters split into two main parts: the first (chapters 5 through 11) refers to the hardware of the cards and includes an overview and interface layouts, PCIe working modes, LED sates, GPIO connectors and pinout, mechanical drawings, environmental conditions and electrical specifications. -
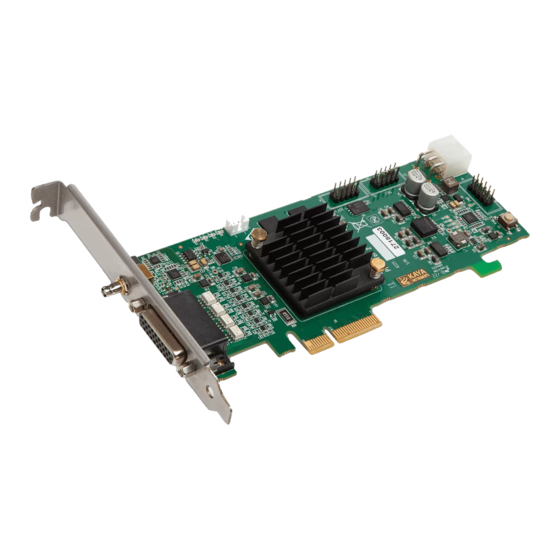
Page 8: Card Overview
5 Card Overview 5.1 Predator II CoaXPress Connectors and LEDs Layout Figure 1 – Predator II connector topology 5.2 Chameleon II Connectors and LEDs Layout Figure 2 – Chameleon II connector topology Page no. 7 | Card Overview... -
Page 9: Komodo Ii Coaxpress Connectors And Leds Layout
5.3 Komodo II CoaXPress Connectors and LEDs Layout Figure 3 – Komodo II CoaXPress connector topology 5.4 Komodo II CLHS Connectors and LEDs Layout Figure 4 – Komodo II CLHS connector topology Page no. 8 | Card Overview... -
Page 10: Pcie Working Modes
Newest PCIe generations supported and maximal bandwidth for each card are listed in the following table: Card Newest Supported PCIe Generation Maximal Bandwidth (Newest PCIe Generation) Predator II CoaXPress Gen 2.4, up to 4 lanes 12 [Gbps] Chameleon II CoaXPress... -
Page 11: Card Leds
CoaXPress). Lane's indicator. When lit, indicates that all PCIe lanes are up. If not lit, one or four lanes are up (only one for the Predator II CoaXPress). Table 5 – Status indicator lamp states Page no. 10 | Card LEDs... -
Page 12: Coaxpress Cables
8 CoaXPress Cables CoaXPress is a new digital transmission standard that allows high speed data from a device, such as a camera, to be transferred to a host, such as a frame grabber. Each CoaXPress link supports up to 12.5 Gbps data rates, along with device power up to 13W and device control at up to 30 Mbps –... -
Page 13: General Purpose Input Output
9 General Purpose Input Output 9.1 GPIO Connectors Our second-generation cards come with one of two possible GPIO connectors: the 26-pin, 3-row D-Sub connector accessible from the front bracket (Komodo II CoaXPress and Predator I CoaXPress) and the 26-pin, dual row pin header connector that is located on the PCB itself (Komodo II CLHS and Chameleon II CoaXPress). -
Page 14: Gpio Output / Input
9.3 GPIO Output / Input 9.3.1 LVDS Inputs DS90LV049 Data In Figure 6 – LVDS inputs schematics DC Characteristics: Parameter Conditions Typical Units Common mode voltage 0.05 Differential sensitivity Input impedance ESD protection HBM, 1.5 kΩ, 100 pF MM, 0 Ω, 200 pF Table 9 –... -
Page 15: Ttl Inputs/Outputs
9.3.3 TTL Inputs/Outputs 74LVCH1T45 Data In/Out Direction Figure 8 – LVDS inputs/outputs schematics DC Characteristics: Parameter Conditions Typical Units Low-level output current Low-level output voltage IO = 32 mA 0.55 High-level output current High-level output voltage IO = -32 mA Low-level input voltage High-level input voltage Absolute maximum input... -
Page 16: Isolated Input
AC Characteristics: Parameter Conditions Typical Units Pulse width Pulse rate Table 16 – LTTL inputs/outputs AC characteristics 9.3.5 Isolated Input MOCD207M Data In Isolated GND Figure 10 – Isolated input schematics When input current exceeds the threshold, the input logic state is HIGH. DC Characteristics: Parameter Conditions... -
Page 17: Isolated Output
9.3.6 Isolated Output Isolated GND Input Figure 11 – Isolated output schematics When logic state is HIGH the output is in conductive state (switch ON) DC Characteristics: Parameter Conditions Typical Units Input Voltage Input current threshold DC Isolation AC Isolation Table 19 –... -
Page 18: Mechanical Specifications
10 Mechanical Specifications 10.1 Mechanical Drawings 10.1.1 Predator II CoaXPress Mechanical Drawing 10.1.2 Chameleon II CoaXPress / Komodo II CoaXPress Mechanical Drawing Page no. 17 | Mechanical Specifications... -
Page 19: Komodo Ii Clhs Mechanical Drawing
10.1.3 Komodo II CLHS Mechanical Drawing Page no. 18 | Mechanical Specifications... -
Page 20: Weight & Environmental Conditions
10.2 Weight & Environmental Conditions Table no. 21 lists the weight of each card: Card Weight Predator II CoaXPress ~ 130 [gr] Chameleon II CoaXPress ~ 225 [gr] Komodo II CoaXPress ~ 225 [gr] Komodo II CLHS ~ 225 [gr] Table 21 –... -
Page 21: Power Specification
11 Power Specification 11.1 Absolute Maximum Ratings Specification Values 3.3V power supply -0.3V to +3.7V 12V power supply -0.3V to 14V Table 23 – Absolute maximum electrical ratings Card Minimum voltage [V] Maximum voltage [V] LVDS -0.3 Opto-isolated (in) -6.0 Opto-isolated (out) -7.0 -0.5... -
Page 22: Installation & Configuration
5. Anchor the PCIe bracket to the computer chassis using M3 screw. 6. Verify the card is inserted correctly to the PCIe slot. 7. Connect external power supply to dedicated connector (Komodo II CoaXPress and Predator II CoaXPress). 8. Power on the computer. - Page 23 Figure no. 12 illustrates the process: Figure 12 – Pushing the Micro-BNC connector into place Once pushed all the way through, twist the connector clock-wise. The pin will move in the channel locking the connector in position: Figure 13 – Twisting the connector and securing it in position To remove the cable, repeat the process from finish to start: twist the connector counter-clock-wise and pull it out.
-
Page 24: Clhs Cards
12.3 CLHS Cards 12.3.1 Installing & Removing SFP+ Modules The purpose of this section is to demonstrate how to install SFP+ transceiver module, attach an optical network cable and remove an SFP+ transceiver module. It is necessary to understand the correct way of installing and removing an SFP+ transceiver, as correct operation can protect the module from being damaged and ensure its stable performance. -
Page 25: Connecting The Interface Cable To The Sfp+ Module
8. Follow the exact steps to insert additional module into the camera’s fiber interface. Figure 14 – SFP+ Module Installation. (a) bale clasp open and dust plug removed, (b) Installing an SFP+ Module into a port 12.3.4 Connecting the Interface Cable to the SFP+ Module In order to properly connect the fiber optic cables, the following steps must be taken: 1. -
Page 26: Removing The Sfp+ Module
12.3.5 Removing the SFP+ Module 1. Turn the camera and the computer off. 2. Disconnect and remove all interface cables from the ports. 3. Open the bale clasp on the SFP+ module with your index finger, or a small flat-blade screwdriver, in a downward direction, as shown in figure 15.
Need help?
Do you have a question about the Predator II CoaXPress and is the answer not in the manual?
Questions and answers