BIGSTONE C500B-LCD Instructions Manual
For ion electric bicycles
Hide thumbs
Also See for C500B-LCD:
- Instructions manual (19 pages) ,
- Instructions manual (17 pages) ,
- Instructions manual (26 pages)
Table of Contents
Advertisement
Advertisement
Table of Contents

Related Manuals for BIGSTONE C500B-LCD


Summary of Contents for BIGSTONE C500B-LCD
- Page 1 Model C500B-LCD Instructions...
-
Page 2: Table Of Contents
CONTENT ABOUT THE USER MANUAL…………………………………………..………..………….. 2 OUTLOOK AND SIZE………………………………………………..….……..…………….…… 2 MATERIAL AND SIZE……………………………………………………………………………… 2 BUTTON DEFINITION……………………...............………….. 3 FUNCTION SUMMARY…………………..............…………………. 4 FUNCTION SUMMARY……………………………………………………………………………. 4 FULL VIEW AREA………………………………………………………………………………….. 6 NORMAL VIEW AREA…………………………………………………………………....6 NORMAL OPERATION…………………………………………………..…….………………..…..7 1.ON/OFF…………………………………………………………………………………………… 7 2. CURRENT DISPLAY……………………………………………………………………………... 7 3.RIDING MODE SELECTION………………………………………………………….………… 7 4. -
Page 3: About The User Manual
ABOUT THE USER MANUAL Dear users, To ensure better performance of your e-bike, please read through the C500-LCD product introduction carefully before using it. OUTLOOK AND SIZE MATERIAL AND SIZE C500B display is made of black ABS and the bracket is made of nylon material. -
Page 4: Button Definition
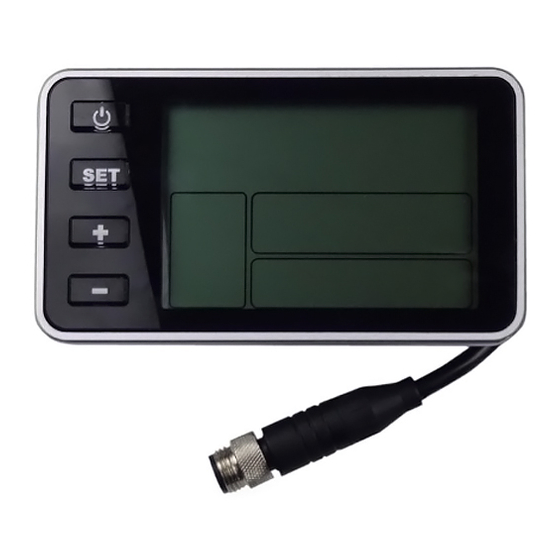
Dimension figure (unit: mm) BUTTON DEFINITION C500B has four buttons including ON/OFF、SET、UP and DOWN. “ON/OFF” names to “ ”, “SET” names to “SET”;“UP” names to “ +” and “DOWN” names to “-”. page 3... -
Page 5: Function Summary
FUNCTION SUMMARY FUNCTION SUMMARY C500B provides a wide range of functions and indicators to fit the users’ needs. The indicated contents are as below. 1. ON/OFF 2. Current display 3. Riding mode selection - Optional Not Available On All Bikes 4. - Page 6 Battery residual capacity indicator 13.1 Battery voltage 13.2 Battery capacity percentage (without this function by default) 13.3 Battery charging and discharging times (without this function 13.4 by default) 14. Mobile phone charging indicator 15. Cable definition 16. Auto sleep after 5 minutes page 5...
-
Page 7: Full View Area
FULL VIEW AREA NORMAL VIEW AREA With the display on ,the default display are riding speed、ODO、PAS level、battery indicator as show in fig below. Press SET to switch the display information. In turn shows: ODO, trip distance and trip time. page 6... -
Page 8: Normal Operation
NORMAL OPERATION 1.ON/OFF Hold ON/OFF and start the display. The display will provide power for the controller. Hold ON/OFF again can open the backlight. With display on, press ON/OFF for 3 seconds to turn off the power. With the display off, there is no battery consumption battery power. The leakage current is no more than 2µA. -
Page 9: Speed Display
4. SPEED DISPLAY , The speed display is as below and user can select KM/H or MPH in SET4. 5. KM/H & MPH Select KM/H or MPH for the speed and mileage, display will be to the currently selected units display. BACKLIGHT INDICATOR With the power on, click the ON/OFF and turn on the backlight. -
Page 10: Km/H Work
7. 6KM/H Walking Cruise Control Hold the DOWN(-)for 2 seconds to get in 6km walking mode to work, and when you release the button the walking mode will stop The display is as below. 8. PAS LEVEL SELECTION Click UP or DOWN to change the stages and output power ratio, the default mode is mode 6 and it’s output power range from level 1 to level 5 The default value is level 1. -
Page 11: Set Operation
last page Error code table for details. ※ Display will return to normal only after problem is fixed. 10. SET OPERATION Hold the SET for 2 seconds and enter into the setting interface, then the display will flash at 1 HZ. Click the SET to cycle from 0 to 4 setting interface, press UP or DOWN to select the wanted parameter, and hold the SET for 1 second to exit. -
Page 12: Distance Indicator
10.2:SET2: MAX SPEED LIMITED SETTING The max speed is 25 km/h for the default, user can modify the value of max speed, when the riding speed exceeds the set value, the controller will stop supplying power to the e-bike, in order to ensure the safety of rider. - Page 13 11.1 ODO The ODO records the driving mileage, the accumulated value cannot be cleared. 11.2 Trip distance Trip distance is reset by hand in the SET 1 interface.(when the riding mileage >=500km, it will be resetted automatically. The value will be accumulated without resetting.) (the default is no) 11.3 Remaining distance This function need to be customized.
-
Page 14: Trip Time Indicator
12. TRIP TIME INDICATOR The riding time parameter is automatically reset after shut down. 13. BATTERY INDICATOR 13.1 Battery residual capacity indicator The battery indicator has five segments, each segment represent 20% battery capacity. When the battery capacity is full, the five battery segments are all lit. -
Page 15: Mobile Phone Charging Indicator
13.2 Battery voltage Displays the current voltage of the battery. 13.3 Battery capacity percentage without this function by default Display the percentage of battery capacity. This function needs customization. 13.4 Battery charging and discharging times without this function by default This function needs customization. -
Page 16: Auto Sleep After 5 Minutes
16. AUTO SLEEP AFTER 5 MINUTES When the riding speed is 0 km/h for 5 minutes, the system will go to sleep automatically. QUALITY & WARRANTY : QUALITY & WARRANTY The warranty period of 12 months from date of purchase for materials and workmanship. :... -
Page 17: Error Code Table
1. Damage due to accident. 2. The damage caused by wrong installation or operation. 3. Forced disaster (such as fire, earthquake, etc.) or natural disasters like lightning, etc. 4. Beyond Warranty period. ERROR CODE TABLE The error code corresponds with the fault definition. Error code definition normal...
Need help?
Do you have a question about the C500B-LCD and is the answer not in the manual?
Questions and answers