Table of Contents
Advertisement
Quick Links
A520007 WindTec
A520008 WindTec Lux
I
SENSORE VENTO E VENTO/LUCE
GB
WIND SENSOR & SUN SENSOR
D
WETTERSTATION WINDWÄCHTER & SONNENSENSOR
F
CAPTEUR DE VENT ET DE VENT-LUMIÈRE
ANEMÓMETRO CON SENSOR LUZ
E
PARA EL CONTROL DEL TOLDO
ISTRUZIONI - INSTRUCTIONS - EINSTELLANLEITUNGEN
INSTRUCTIONS - INSTRUCCIONES
Advertisement
Table of Contents

Related Manuals for CHERUBINI A520007 WindTec


Summary of Contents for CHERUBINI A520007 WindTec
- Page 1 A520007 WindTec A520008 WindTec Lux SENSORE VENTO E VENTO/LUCE WIND SENSOR & SUN SENSOR WETTERSTATION WINDWÄCHTER & SONNENSENSOR CAPTEUR DE VENT ET DE VENT-LUMIÈRE ANEMÓMETRO CON SENSOR LUZ PARA EL CONTROL DEL TOLDO ISTRUZIONI - INSTRUCTIONS - EINSTELLANLEITUNGEN INSTRUCTIONS - INSTRUCCIONES...
-
Page 3: Table Of Contents
TRANSLATION OF THE ORIGINAL INSTRUCTIONS Table of contents: Electrical connections ..................... p. 16 Technical features ....................p. 16 Lux function ......................p. 17 Compatible remote controls ................... p. 18 Key to symbols ....................... p. 18 Command sequences example ................p. 19 Where to place the Wind &... -
Page 4: Electrical Connections
ELECTRICAL CONNECTIONS WINDTEC A520007 WINDTEC LUX Blue A520008 Brown TECHNICAL FEATURES There are two versions of the WindTec sensor: - WindTec: Wind sensor - WindTec Lux: Wind & Sun sensor. WINDTEC WINDTEC LUX WIND & SUN SENSOR WIND SENSOR Power supply (V) / (Hz) 230 / 50 230 / 50 Radio frequency (MHz) -
Page 5: Lux Function
LUX FUNCTION ATTENTION! The light function in model “WindTec Lux” can by activated only by using a remote control series SKIPPER or GIRO with the LUX function (Skipper Lux / Skipper P-Lux or Giro Lux / Giro P-Lux). Series SKIPPER Activating/ Deactivating the Sun sensor Skipper Skipper... -
Page 6: Compatible Remote Controls
COMPATIBLE REMOTE CONTROLS LED - Skipper Skipper Skipper Skipper Skipper Skipper Display - Skipper Skipper Skipper Skipper Skipper stop Channel selector down Activating/ Deactivating the Sun sensor Check the specific Skipper instruction book Skipper GIRO GIRO Wall stop DOWN down STOP GIRO Lux GIRO P-Lux... -
Page 7: Command Sequences Example
COMMAND SEQUENCES EXAMPLE Most of the command sequences have three distinct steps, at the end of which the motor indicates if the step has been concluded positively or not, by turning in different ways. This section is provided to demonstrate the motor indications. The buttons must be pressed as shown in the sequence, without taking more than 4 seconds between one step and the next. -
Page 8: Where To Place The Wind & Sun Sensor
WHERE TO PLACE THE WIND & SUN SENSOR ATTENTION! The WindTec sensor must be positioned to the side, as close as possible to its awning, and not above or below the awning coverage area. RIGHT WRONG WRONG SETTING OF SEVERAL MOTORS TO ONE SENSOR One single WindTec sensor can be used to automate a group of motorised awnings. -
Page 9: Fitting The Wind & Sun Sensor
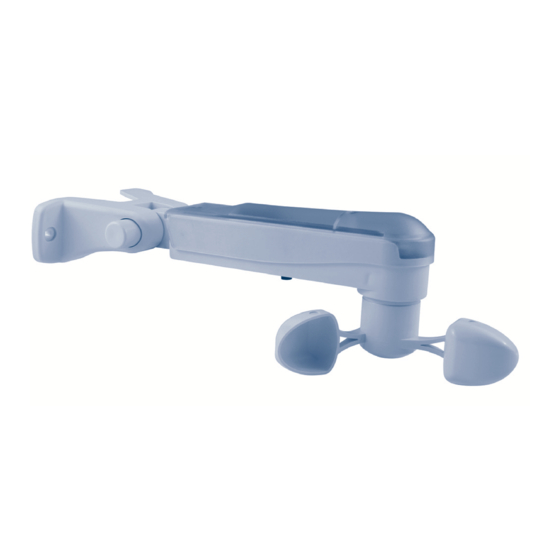
FITTING THE WIND & SUN SENSOR The WindTec sensor has a positioning mechanism for fitting to any surface. To adjust fitting-angle, press the button to rotate the support (see drawing). PRESS... -
Page 10: Setting The Wind & Sun Sensor
SETTING THE WIND & SUN SENSOR To associate WindTec sensor to a motor, a remote control must be already memorised on the motor. The setting sequence is the following: Tn: Already programmed remote control 2 sec Button set DELETING THE WIND & SUN SENSOR To delete the WindTec sensor from the motor, an already programmed remote control must be used. -
Page 11: Setting The Wind Sensor
SETTING THE WIND SENSOR The wind level point can be set using the button provided in the lower part of the WindTec sensor, identified by the windsock symbol. The speed can be set from a minimum of 7,5 Km/h to a maximum of 45 Km/h. It’s prudent not to set the wind speed over the fourth level, which corresponds to 35 Km/h. -
Page 12: Deactivating Automatic Reopening
DEACTIVATING AUTOMATIC REOPENING - only with Wave RX / Senso RX motors - The automatic reopening function can be deactivated at any moment with the following command sequence: Tn: Already programmed remote control Tn (2 sec) SETTING THE SUN SENSOR (WindTec Lux) The light level point can be set using the button provided in the lower part of the WindTec Lux sensor,... -
Page 13: Activating The Automatic Or Manual Setting Mode By The Remote Control Series Giro
ACTIVATING THE AUTOMATIC OR MANUAL SETTING MODE BY THE REMOTE CONTROL SERIES GIRO The manual mode (wind only), or automatic mode (wind Wind & Sun sensor + sun) setting has to be done by the Giro Lux or Giro activate. P-Lux remote control. -
Page 14: Test Mode
EU DECLARATION OF CONFORMITY CHERUBINI S.p.A. declares that the product is in conformity with the relevant Union harmonisation legislation: Directive 2014/53/EU, Directive 2011/65/EU. The full text of the EU declaration of conformity is available upon request at the... - Page 16 CHERUBINI S.p.A. Via Adige 55 25081 Bedizzole (BS) - Italy Tel. +39 030 6872.039 | Fax +39 030 6872.040 info@cherubini.it | www.cherubini.it CHERUBINI Iberia S.L. Avda. Unión Europea 11-H Apdo. 283 - P. I. El Castillo 03630 Sax Alicante - Spain Tel.
Need help?
Do you have a question about the A520007 WindTec and is the answer not in the manual?
Questions and answers