
Related Manuals for Magnimage MIG-F4


Summary of Contents for Magnimage MIG-F4
- Page 1 4K Video Mosaic Box User ManualV1.1 △ Before using this video mosaic box,please read this manual carefully and preserved for reference in the future. MIG-F4...
- Page 2 Statements Without the written permission, any unit or individual could not copy, reproduction or translate the book or part of it. Also could not transmit it in any form or any way(electronic, mechanical, photocopying, record or other way) for any business and profitable purpose. The product specifications and information mentioned in this manual is just for reference, will not give prior notice if there is any updated.
-
Page 3: Table Of Contents
Safety Instructions .................... 2 Function Introduction ..................3 Brief ........................3 Technical Specifications ..................4 MIG-F4 Front panel introduction ..............5 Controlling Software operation introduction ............7 Install and unload ..................... 7 Running Environment ..................7 Installing processing .................. 8 Unload the software ................. -
Page 4: Briefs
Briefs Thanks for your purchasing our MIG-F4 video mosaic box. Do hope you can enjoy the experience of the product performance. The design of the video mosaic box conforms to international and industry standards. But if with improper operation, there will be a personal injury and property damage. In order to avoid the danger, please obey the relevant instructions when you install and operate the product. -
Page 5: Safety Instructions
Safety Instructions Please use the correct power supply according that the power input voltage for this product range is 100~240V AC, 50/60Hz. When you need connect or pull out any signal or bound guideline. Please confirm that all the power supply cords have been pulled out ahead. ... -
Page 6: Function Introduction
Function Introduction Brief 4K video mosaic box is a mini video equipment that released by magnimage company recently, it has greater uploading capacity and with the characteristics of single machine 4 screens mosaic, smart control and auto backup; it supports multiple DP and HDMI input ports, single input supports maximum 4K×2K/60Hz , DP supports 8K×1k/60Hz input resolution, and... -
Page 7: Technical Specifications
Technical Specifications Input Indication Port Quantity Resolution HDMI 2.0 standard 3840×2160/60Hz and EDID management DP 1.2 standard 3840×2160/60Hz, 7680×1080/60Hz input and EDID management Output Indication Port Quantity Resolution(each DVI output) 1024×768、1366×768、1440×900、 1280×1024、1680×1050、1600×1200、 2560×816、1440×1440; DVI or 50Hz and 60Hz optional HDMI Customized output resolution (Bandwidth optimized)... -
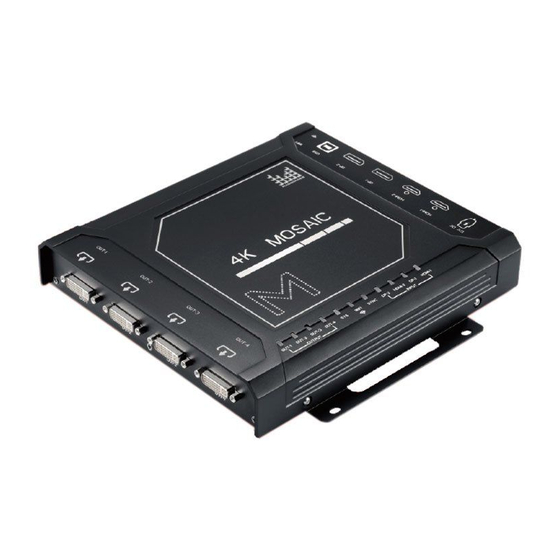
Page 8: Mig-F4 Front Panel Introduction
MIG-F4 Front panel introduction output connection indicator light: Indicator light is green when connection valid, red when output not available. working conditions indicator light: Green light flashes when system is working. WIFI indicator light: Green light when WIFI working conditions OK. - Page 9 MIG-F4 left side The outputs of MIG-F4 can be 4 DVI or 4 HDMI; two types of outputs are optional.
-
Page 10: Controlling Software Operation Introduction
Controlling Software operation introduction Install and unload MIG-F4 computer control software(called software as following), is a professional control software mainly developed for the F4 mosaic box screen display controllers. The software interface is intuitive concise, easily handled and almost all the functions of the controller is achieved by the software. -
Page 11: Installing Processing
Installing processing... -
Page 12: Unload The Software
Double-click program to start install,click "Next" to continue. Select program installation location, and setup the program user. Confirm all the setting, and click “Next” to go on. Installing process starting Ask for uses-permission, please select “Yes”. ... - Page 13 Double-click the installer, start the uninstalling with the software, click "Next" to go on. Finish and click “Close”. ...
-
Page 14: Open The Software
Open the software After opened the software, you will see software interface as the above 1、connection prompt window 2、input status display area 3、function area... -
Page 15: Connection Indication Window
Connection indication window Select corresponding Baud Rate display, normally select connection serial port, normally the default value COM3, refresh rate selection After the corresponding connection serial port selected, click”connect”to proceed connection, click ”disconnect” to proceed disconnection. -
Page 16: Main Program Window
Main program window Function menu after the software connected with the device successfully, the top right indicator light in the software will be green, and will become red if not successfully connected. 1.、Find the left bottom function setting menu in the MISC after connection confirmed. - Page 17 Frame Synchronization menu Two modes in the frame synchronization menu 1、Frame Synchronization mode: In this mode input and output refresh rare should be the same, the output will be synchronous and at the same time indicating current input and output refresh rate 2、Frame conversion mode:...
- Page 18 Preset setting menu 10 presets in total, click the below “LOAD” ” SAVE” and “SELECT” to load save and delete presets after select the current preset. Image crop menu Image crop can crop the edge of signal source, enter this menu and switch on the function, set the height width and H pos V pos value to crop the selected input signal, there will be the part of the area of the signal after cropped.
- Page 19 EDID menu EDID function can lock the input resolution of the current select input signal, can apply the input width, height and refresh rate in current interface, or can go to the Advance to precede more specific value setting, and also can reset the parameters.
- Page 20 Picture setting menu Picture setting can set not only brightness, contrast, gamma and color temperature of each output separately, but also the color temperature configuration of all the outputs at the same time, and also can customize RGB value.
- Page 21 Layer setting menu There are two functions in layer setting menu 1、layer parameters setting area, F4 maximum 4 layers, can set each layer switch and layer width and height or H and V position, and can also drag 2、 Zoom setting area, to zoom individual layer, can drag to set in the box or to modify in the layer display area input parameters to accurately set, and can also reset to original parameters.
-
Page 22: Output Setting
Output Setting Output setting menu The output setting menu can be divided to 4 boxes area from top to bottom 1、The first box area is each output resolution setting area, the four outputs can set their output resolution separately, and can select from 9 optional resolution of fixed value or customized resolution. - Page 23 Quick set menu In Quick Set mode all the outputs resolution and window are default 1920× 1080 for all the 4 types of quick mosaic, and can be set “cross” ,” horizontal” and “vertical”, select any one of the 4 modes to achieve quick mosaic.
-
Page 24: Software Usage
Software usage Preparation COM connection mode a) Use USB serial cable to connect the control software with the device. b) Open computer control software, select the connected port such as COM3 in the dialog of serial communication configuration, then click”connect” button, computer control software will then begin communication. -
Page 25: Specific Application
Specific application Quick set menu can be used to achieve the whole set up if F4 uploading resolution is 1920×1080, as below If the screens to be set are not standard resolution, as the example below,... - Page 26 Output setting The four outputs of F4 can connect with 4 screens maximum, output DVI1 connect with screen1, output DVI2 connect with screen 2, and output DVI3 connect with screen 3, output DVI4 connect with screen 4, each screen resolution for the sending card setting is as the above. Setting procedure is as follows: Set each output window parameters according to the actual pixel of the corresponding each output area, set “apply one”, or select the biggest area...
- Page 27 Then select auto arrangement configuration to auto mosaic Or select manual, to set each output mosaic parameters manually.
- Page 28 Layer setting Enter layer setting menu after output setting menu configuration finished Directly click right bottom four layer switch quick button to open relevant layer, then use mouse to drag the layer edge to modify the size and position. Also can input accurate figure in the layer setting menu, modify the size and position.
- Page 29 Presets setting After the outputs and layers setting finished and screen display is confirmed in normal display, save a presets in order to restore to the normal state after actions have been taken. Select a preset and click “save button”, there will be a dialog box popped up, click “YES”...
-
Page 30: Warranty
Warranty The whole unit warranty One year (from the buying date); If the invoice is lost; the 60 days after the production date will be the warranty start date for the product. The warranty provisions The machine soaking and collisions produced besmirch or surface scratches and other abnormal using causes of malfunction or damage;...
Need help?
Do you have a question about the MIG-F4 and is the answer not in the manual?
Questions and answers