Fireye NXD410TS Installation And Operation Manual
Touchscreen interface
Hide thumbs
Also See for NXD410TS:
- Installation manual (9 pages) ,
- Installation and operations (28 pages)
Table of Contents
Advertisement
Quick Links
DESCRIPTION
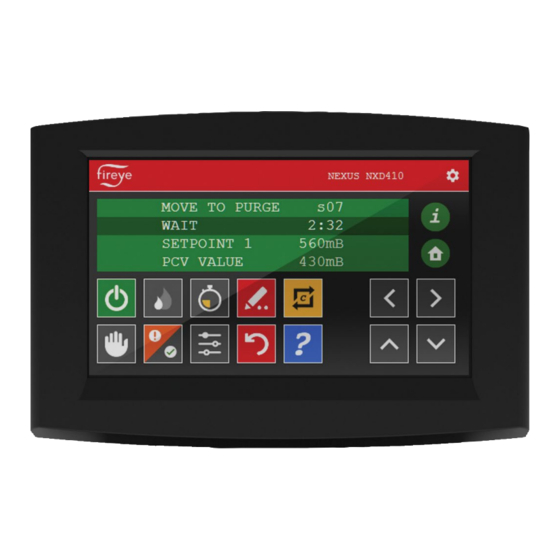
The NXD410TS provides the means to setup, monitor and display information from the NXF4000 and
PPC4000 series of controls as well as any connected accessories. It provides a full touchscreen
interface for monitoring, configuration and commissioning. The NXD410TS touchscreen is panel
mounted and connects to the NXF4000 or PPC4000 control using a serial communication cable.
NOTE: This bulletin is intended to be a supplement to bulletins NXF-4001 and PPC-4001, which
covers the installation and operation of the NXF4000 and PPC4000 controls, respectively. Please
refer to those bulletins for any specific information on installation, features, commissioning or
operation of the connected controls.
WARNING: Failure to properly install, operate, or commission the equipment
in this manual could result in significant property damage, severe injury, or
death. It is the responsibility of the owner or user to ensure that the
equipment described is installed, operated and commissioned in compliance
`
with this manual and other system component manuals, as well with all
applicable national and local codes.
WARNING: Boiler operation, maintenance, and troubleshooting shall only be
conducted by trained personnel. Persons troubleshooting lockouts or
resetting the control must respond properly to troubleshooting error codes as
described in this product bulletin. Jumpers being used to perform static test
on the system must only be used in a controlled manner and must be removed
prior to the operation of the control. Such tests may verify the external
controllers, limits, interlocks, actuators, valves, transformers, motors and
other devices are operating properly. Such tests must be conducted with
manual fuel valves in the closed position only. Replace all limits and interlocks
not operating properly, and do not bypass limits in interlocks. Failure to follow
these guidelines may result in an unsafe condition hazardous to life and
property.
© 2020 Carrier
Touchscreen Interface
Installation and Operation
NXD-4102
July 24, 2020
NXD410TS
1
Advertisement
Table of Contents

Related Manuals for Fireye NXD410TS


Summary of Contents for Fireye NXD410TS
-
Page 1: Description
Installation and Operation DESCRIPTION The NXD410TS provides the means to setup, monitor and display information from the NXF4000 and PPC4000 series of controls as well as any connected accessories. It provides a full touchscreen interface for monitoring, configuration and commissioning. The NXD410TS touchscreen is panel mounted and connects to the NXF4000 or PPC4000 control using a serial communication cable. -
Page 2: Table Of Contents
TABLE OF CONTENTS DESCRIPTION ................................1 TECHNICAL DATA NXD410TS ..........................3 ORDERING INFORMATION ............................4 MOUNTING NXD410TS ............................. 5 Method ..................................5 Cutout ..................................6 Template ..................................6 WIRING ..................................7 Terminals ................................... 7 Wiring ..................................8 OPERATION ................................9 Quick Keys ................................ -
Page 3: Technical Data Nxd410Ts
TECHNICAL DATA NXD410TS Screen type: Projected capacitive Resolution: 480 x 272 Diagonal screen area: 109.2mm (4.3 in.) Interface method: Terminal mode via RS-422 Nominal voltage 24 VDC ± 20% Nominal power consumption: 0.21A @ 24VDC (5W) Operating temperature range: 0°C to +50°C (32°F to +122°F) Storage temperature range: -30°C to +80°C (-22°F to +176°F) -
Page 4: Ordering Information
Touchscreen interface, 4.3 inch diagonal screen size, 24VDC, for use with NXD410TS NXF4000 or PPC4000 parallel positioning system Accessories Cable to connect NXD410TS to NXF4000 or PPC4000, separate power and 59-561 communication, sold by the foot. WARNING: Use of third party power supply is permitted, provided the power supply meets NEC CLASS 2 to protect against fire and electrical shock. -
Page 5: Mounting Nxd410Ts
MOUNTING NXD410TS Method The NXD410TS requires a non-symmetrical cutout and is secured using two knurled-head thumb nuts. Refer to the figure below for the layout of these thumb nuts. View of NXD410TS showing placement of the knurled-head thumb nuts (one on each side) The thumb nuts attach to threaded posts which are threaded into inserts on each side of the screen. -
Page 6: Cutout
Cutout Use the following dimensions to mark the necessary cutout and holes to mount the screen. The orientation of the diagram is from the face of the panel where the cutout is being made. A template is also provided below that may be printed at 100% scale and used to provide a guide. Template ©... -
Page 7: Wiring
WIRING Terminals The recommended cable (59-561) contains six wires: two power wires (18AWG) and four communication wires (22AWG) in two twisted pairs. There is also a drain wire. The figures below show the connectors for both power and communications. Power Communications The connector labeled 24V supplies the 24VDC power to the unit. -
Page 8: Wiring
Wiring If the NXD410TS is being used to replace the NXD410, the existing 59-562-2 cable can be used simply by removing and discarding the DSUB connector on the terminal end. The cable itself is identical and may be reused. The wiring between the devices is shown in the table below:... -
Page 9: Operation
The next section shows the various symbols and their functions. The NXD410TS contains a number of Quick Keys that allow the user to access that function directly. For these Quick Keys to operate, the installer or operator must first access the KEYPAD SETUP menu where the user defines if a Quick Key is used or unused. -
Page 10: Quick Keys
Quick Keys Button Key Name Description Used to turn the burner on or off. The button changes from gray to green when the burner is in the ON BURNER ON mode. This button can be enabled via the KEYPAD SETUP menu. Note that this button does not override any recycle limits. - Page 11 Quick Keys Button Key Name Description In modify mode the button changes from red to green. MODIFY/SAVE In this mode changes to a value are allowed. Pressing again restores the button to red and saves the entry. Used to navigate up and down through the menu structure.
-
Page 12: Certifications Nxd410Ts
CERTIFICATIONS NXD410TS UL File # MP1537 The products have been designed for use in an industrial environment in compliance with the 2014/30/EU EMC Directive. The installation of these devices into the residential, commercial and light-industrial environments is allowed only in the case that special measures are taken in order to ensure conformity to EN 61000-6-3. -
Page 13: Notice
When Fireye products are combined with equipment manufactured by others and/or integrated into systems designed or manufactured by others, the Fireye warranty, as stated in its General Terms and Conditions of Sale, pertains only to the Fireye products and not to any other equipment or to the combined system or its overall performance.
Need help?
Do you have a question about the NXD410TS and is the answer not in the manual?
Questions and answers