Table of Contents
Advertisement
Quick Links
Professional ultrasonic nebulizer
1
Dear customer,
Thank you for purchasing this ultrasonic nebulizer. Please read this instruction manual
carefully before using the unit as it contains important health and safety information. Please
keep your instruction manual at hand all the time.
Be sure to use unit properly according to instructions given by veterinary professionals. Only
use solutions to nebulize as prescribed and instructed by your veterinary professional.
We wish you good health and all the best in the future.
With best regards,
PRIZMA
Advertisement
Table of Contents

Summary of Contents for Prizma Profi Sonic A
- Page 1 Be sure to use unit properly according to instructions given by veterinary professionals. Only use solutions to nebulize as prescribed and instructed by your veterinary professional. We wish you good health and all the best in the future. With best regards, PRIZMA...
-
Page 2: Table Of Contents
Instruction manual IMPORTANT INFORMATION - READ THROUGHLY History of document revisions ..........2 Intended use . -
Page 3: Intended Use
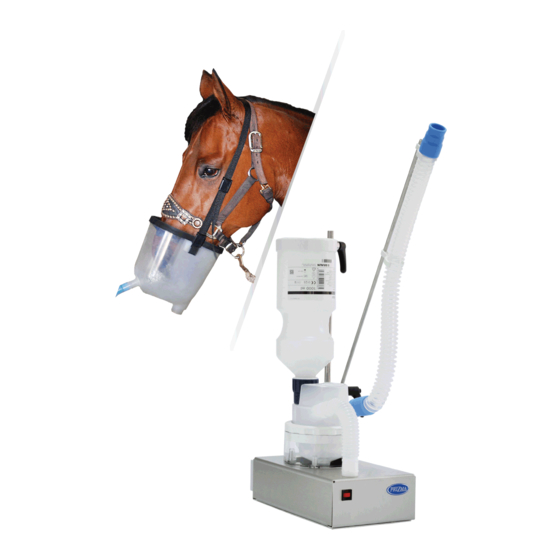
Professional ultrasonic nebulizer Intended use The device is intended for successful treatment of equine respiratory Intended use disorders. Use it only according to recommendations issued by veterinarian. Device is intended for use in veterinarian facility, general horse stable or Working environment horse trailer. -
Page 4: Exclusions And Limitations Of Liability
However, if you find any omission or error, please inform your local PRIZMA representative or dealer. It is prohibited to copy all or a part of this Instruction manual without getting PRIZMA's permission. Unless you use this Instruction manual for your personal (corporate) purpose, you are not allowed to use it without PRIZMA's permission in accordance with the Copyright Act. -
Page 5: Safety Notes
Be sure to immediately dry the cleaned and disinfected parts of device, and then store them in a dry place in order to prevent them from getting contaminated in the future. In case of any problem with your nebulizer please contact PRIZMA service representative. - Page 6 Instruction manual Safety notes Warning Do not use this device in presence of explosive gases or in areas with high risk of explosion. Use with non-flammable liquids only. When assembling the cleaned, disinfected and dried parts, do not touch the places where the medication and nebulized medication pass through directly with your hands to prevent possible infection.
- Page 7 Do not disassemble, repair, or modify the unit in any way. • The unit may malfunction or cause injury. Contact your nearest PRIZMA service representative. Do not use the power cord other than the supplied one. • The unit may ignite or you may suffer electric shock.
- Page 8 1) Power-off the unit and unplug the power plug from the electric outlet. 2) Write ‘Faulty-Do not use’ on the main unit so that it will not be used. 3) Contact the store where you purchased the unit or PRIZMA.
-
Page 9: Components Of The Product
Professional ultrasonic nebulizer Components of the product ❶ - Main unit ❷ - Bacterial filter ❸ - Aeration hose 15cm ❺ ❹ - Chamber holder ❾ - Water tank ❿ - Start/stop button ❸ ❹ ❷ ❻ ❾ ❼ ❶ ❽... - Page 10 Instruction manual 10 10 Components of the product ⓫ - Inhalation hose 90cm ⓬ - Inhalation hose holder ⓫ ⓭ - Bottle holder ⓮ - Power button ⓯ - Fuses ⓬ ⓭ ⓰ - Electric power socket 220V AC ⓱ - Electric power socket 12V DC ⓲...
-
Page 11: Principles Of Nebulization
Professional ultrasonic nebulizer Principle of nebulization Principle of nebulization PROFI SONIC A transmits the energy of ultrasonic vibration from the vibrator located at the bottom of the water tank into water. The ultrasonic vibrations are transmitted to the Isapak® chamber through the water in the water tank. -
Page 12: How To Prepare Therapy
Instruction manual How to prepare therapy 1. Assembling the device. Insert the inhalation hose holder with Isapak® bottle ⓬ holder in the pivot and screw it with the key provided ⓭ with the device. 2. Filling the cooling water Fill the cooling water into water tank . - Page 13 Professional ultrasonic nebulizer How to prepare therapy 3. Attaching the nebulization unit Remove the Isapak® chamber from its sterile ❺ packaging and attach it to the chamber holder ❹ Warning: The interior of the Isapak® aerosol chamber sterile and shall not come into contact with a ❺...
- Page 14 Instruction manual How to prepare therapy 2. Filling the drug/inhalant directly into the Isapak® sterile water bottle Carefully fill the medicine into the sterile water bottle ❼. Screw the Isapak® adapter onto the sterile water ❻ bottle . Only touch the adapter at the screw cap. ❼...
- Page 15 Professional ultrasonic nebulizer How to prepare therapy 5. Attaching the bacterial filter and the hoses Attach bacterial filter to the air opening on main ❷ device . Attach the aeration hose (15 cm) ❶ ❸ bacterial filter and to the Isapak® chamber ❷...
- Page 16 Instruction manual How to prepare therapy 6. Plugging the nebulizer into the electrical power Device can operate connected directly to mains electrical outlet (220V AC) or to a car cigarette lighter adapter (12V DC). Plugging into mains electrical outlet (220V AC) Make sure that the power button is in the OFF/0 ⓮...
-
Page 17: How To Perform Therapy
Professional ultrasonic nebulizer How to perform therapy Nebulizing aerosol in cabin or horse trailer in front of equine Nebulizing aerosol in atmosphere around equine can be performed if equine is in cabin made for that purpose or adjusted horse trailer. The volume of the trailer/cabin should be as small as possible to make the therapy more effective. -
Page 18: How To Finish Therapy
Instruction manual How to finish therapy When the treatment is finished you should: 1. Turn off the power button (position 0). ⓮ 2. Remove inhalation hose , aeration hose ⓫ and bacterial filter as it explained on ❸ ❷ illustrations. 3. -
Page 19: Product Care& Maintenance
(due to the high level of dirt in the air). CLEANING AND DISINFECTION Warning: Adhere to the following hygiene instructions at all times to prevent any health hazard through contaminated PROFI SONIC A. Clean the dust from the main unit , inhalation hose holder and chamber holder ❶... - Page 20 Instruction manual Cleaning and disinfection Wipe disinfection The surface of the unit and its parts are disinfected: By wiping the outer surface of the nebulizer unit and other parts with cotton wool slightly moistened with alcohol. Do not allow contact between the disinfectant and the inside of the unit. Immersion disinfection Note: Do not immerse the main unit in a disinfectant!
-
Page 21: Troubleshooting
150 • If the unit does not operate normally after taking the above-mentioned measures, do not touch the internal mechanism and consult the store where you purchased the unit or PRIZMA service centre. PRIZMA Kragujevac Ltd. Kumanovska 8... -
Page 22: Specification
Instruction manual Specifications Product name : PRIZMA Ultrasonic Nebulizer Model : PROFI SONIC A : 100-240V AC, 50-60Hz; Power source 12V DC, car cigarette lighter adapter Power consumption : 55W Fuse : 2 x T2AH/250VAC Ultrasonic frequency : 1.7MHz Nebulization rate : 3 ml/min : 0.5 - 5 m... -
Page 23: Important Information Regarding Electro Magnetic Compatibility (Emc)
Recommendation is to keep a minimum distance of 7 m. Verify correct operation of device in case the distance is shorter. Further documentation is available at PRIZMA at address mentioned in this instruction manual. Documentation is also available at www.prizma.rs Correct disposal of this product (Waste electrical &... -
Page 24: Optional Accessories
Instruction manual Optional accessories Inhalation hose Isapak® chamber Aeration hose Bacterial filter (90cm) (15cm) Packaging unit: 1 pc Packaging unit: 1 pc Packaging unit: 1 pc Packaging unit: 1 pc Equine mask Isapak® adapter Seal stopper Isapak® sterile water bottle Packaging unit: 1 pc Packaging unit: 1 pc Packaging unit: 1 pc...
Need help?
Do you have a question about the Profi Sonic A and is the answer not in the manual?
Questions and answers