
Related Manuals for Badger Meter Oval Gear FMS Compact


Summary of Contents for Badger Meter Oval Gear FMS Compact
- Page 1 FMS Compact Fluid Management System Firmware v3.7 until v5.16 User manual LMS_FMS Compact_BA_02_0163 (November 2016)
-
Page 2: Table Of Contents
FMS Compact CONTENT 1. Basic safety recommendations ......................................1 2. General description ..........................................2 2.1 Technical data..........................................2 2.2 Front plate description......................................2 2.3 Connections ..........................................3 3. Standard dispense procedure ......................................4 4. Supervisor menu: PIN 8888 (default) ....................................5 5. -
Page 3: Basic Safety Recommendations
Basic safety recommendations 1. BASIC SAFETY RECOMMENDATIONS Before installing or using this product, please read this instruction manual thoroughly. Only qualified personnel should install and/or repair this product. If a fault appears, contact your distributor. Installation Do not place any unit on an unstable surface that may allow it to fall. Never place the units above a radiator or heating unit. -
Page 4: General Description
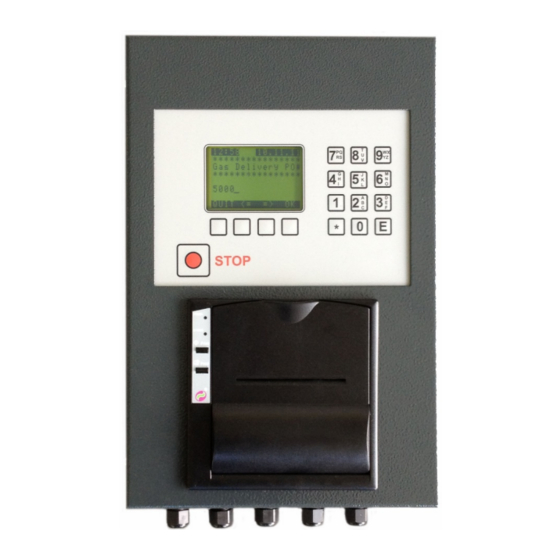
General description 2. GENERAL DESCRIPTION 2.1 Technical data Dimensions CPU: 20cm (7.9") x 30cm (11.8") x 13cm (5.1") W x H x D Atmel, AT103 (AT128), 8-bit, serial flash, 128 K bytes of In–System programmable flash Memory: Flash, 1Mbit Interfaces: 9-pole RS232 plug to be use as External printer, PC software or barcode reader Baudrate 9600 - Parity none - Databits 8, LF/CR... -
Page 5: Connections
General description 2.3 Connections Valve 3 - 24VDC/2A Valve 3 - GND L1 230VAC/50Hz Pulse Input 3 + Pulse Input 3 GND Valve 2 -24VDC/2A Valve 2 - GND Pulse Input 2 + +12VDC RS232 Port for software, Pulse Input 2 GND +24VDC external printer or Barcode scanner... -
Page 6: Standard Dispense Procedure
Standard dispense procedure 3. STANDARD DISPENSE PROCEDURE ----------------- ----------------- Startup screen - displays of firmware version MINI FLUID MGR SYSTEM v5.14UK 18.11.12 02:42 13.02.08 Enter your 4-digit PIN-No. for the user E N T E R PIN: 1111 (Default user by factory) 0000 Press key "OK"... -
Page 7: Supervisor Menu: Pin 8888 (Default)
Supervisor menu: PIN 8888 (default) 02:42 13.02.08 000.00 The display moves on count mode. Once the fluid has been dispensed, the attached solenoid valve will close and the internal printer will print a ticket. 000001.00 L Quit <= => 4. SUPERVISOR MENU: PIN 8888 (DEFAULT) Set Date &... - Page 8 Supervisor menu: PIN 8888 (default) Set Stock Level Tank level correction Select Product: Product 1 Select a product and confirm with “OK” Product 2 or return with “Quit”. Product 3 Product 4 Enter the new stock (tank) level and confirm with “OK” or return with “Quit”. Quit <= =>...
-
Page 9: Installer Menu: Pin 9999 (Default)
Installer menu: PIN 9999 (default) 5. INSTALLER MENU: PIN 9999 (DEFAULT) Products Defines a new product name. Select Product: Product 1 Select a product and confirm with “OK” or return with “Quit”. Product 2 Product 3 Enter the new product name and confirm with “OK” or return with “Quit”. Product 4 Quit <=... - Page 10 Installer menu: PIN 9999 (default) Initial Timeout Defines the delay after the PIN n° entry until the valve opens and the batch Dispense to: starts. Product 1 Product 2 Select a product and confirm with “OK” or return with “Quit”. Product 3 Product 4 Enter the new timeout and confirm with “OK”...
- Page 11 Installer menu: PIN 9999 (default) Hose Offset Will correct a difference between the preselected quantity and the actual Dispense to: dispensed quantity. Product 1 Note: Should be used by fix topoff error caused by a slow valve. Product 2 Product 3 Hose 1 Product 4 CO: 000000...
- Page 12 Installer menu: PIN 9999 (default) Inac. Delay Defines how long the pump will keep running once the dispense has been completed. Dispense to: Product 1 Pump control has to be connected to terminal 25/26. Product 2 Product 3 See also chapter 2.3 and chapter 11 Product 4 Quit <=...
-
Page 13: General System Reset
General system reset Ticket Count The amount of tickets you would like to print. Print Ticket ----------------- Quantity: (1 … 3) Quit <= => Additive This menu is only needed for Special Mode 2 Select Product: See chapter 9.2. Product 1 Product 2 ppm = Parts per Million Product 3... -
Page 14: Printer
Printer 7. PRINTER 7.1 Internal ticket printer To change the paper roll, please proceed as follows: • Open the printer cover and press down "Push". • Insert the end of the paper roll in the slit of the print mechanism and position the paper roll so that it rotates in the right direction, as shown below. -
Page 15: Barcode Scanner
Barcode scanner 8. BARCODE SCANNER The serial port of the FMS Compact can be connected to a barcode scanner. It will work parallel to the existing keypad. You always have the choice to use the keypad or the scanner. Note: If the barcode is activated, the PC software or external printer port cannot be used anymore. Connection: RS232, D-Sub 25-pole, 9600 Baud, 8 DataBit, ParityNone, 1 Stop Bit Recommended barcode scanner: Datalogic Gryphon, Datalogic Magellan 1000i Barcode sample... -
Page 16: Dispense Modes
Dispense modes 9. DISPENSE MODES 9.1 Flow chart - Dispense Mode 0 and 1 Enter PIN Number: 1111 Quit <= => Good day MR.MUELLER Quit <= => **************** Menu Special Mode Job Number Direct mode = 1 **************** System will not ask for the job number 1234 Quit <=... -
Page 17: Flow Chart - Dispense Mode 2
Dispense modes 9.2 Flow chart - Dispense Mode 2 Customized dispense flow, will calculate a required quantity based on a preconfigured factor. Dispense will start with the Job Number request, no PIN number entry requested. System will use the first user as the default user. Administration Menu **************** Changes to the Supervisor... -
Page 18: Warning And Status Messages
Warning and status messages 10. WARNING AND STATUS MESSAGES The requested quantity has been higher than specified quantity in the !INPUT - ERROR ! Menu Max.Dispense - Page 11 Maximum dispense quantity exceeded Quit <= => Dispense has been stopped with "Pulse Time Out". No pulse are arriving from the meter, the Inactive Timeout has been exceeded. -
Page 19: Dispense Timing
WHATSOEVER INCLUDING BUT NOT LIMITED TO IMPLIED WARRANTIES (EXCEPT OF TITLE) OF MERCHANTABILITY AND FITNESS FOR A PARTICULAR PURPOSE. Badger Meter shall not be liable for any defects attributable to acts or omissions of others after shipment, nor any consequential, incidental or contingent damage whatsoever. - Page 20 www.badgermeter.de...
Need help?
Do you have a question about the Oval Gear FMS Compact and is the answer not in the manual?
Questions and answers