
Related Manuals for Sinclair ZX81


Summary of Contents for Sinclair ZX81
- Page 2 IMPORTANT: Read through the instructions before you start assembly. If anything seems unclear or difficult, contact us for advice before going ahead. 1. PREPARATION You will need a clean, dry and well lit workspace in which to assemble your kit. If possible, try to find somewhere where the parts can stay undisturbed in case you do not finish the kit all at once.
- Page 3 Although the I C. sockets do not need to go any particular way round, you may like to put the bevelled corner at the notch end of the I.C. position as a reminder, since the semicircie printed on the board will be covered by the socket in some cases.
-
Page 4: Circuit Board Assembly
4. CIRCUIT BOARD ASSEMBLY The circuit board will be supplied with one side printed with all the component locations - this is the side the components go. This printing is reproduced as fig. 6 (See reverse side of sheet) since some of the markings will be covered by components. -
Page 5: Fault Finding
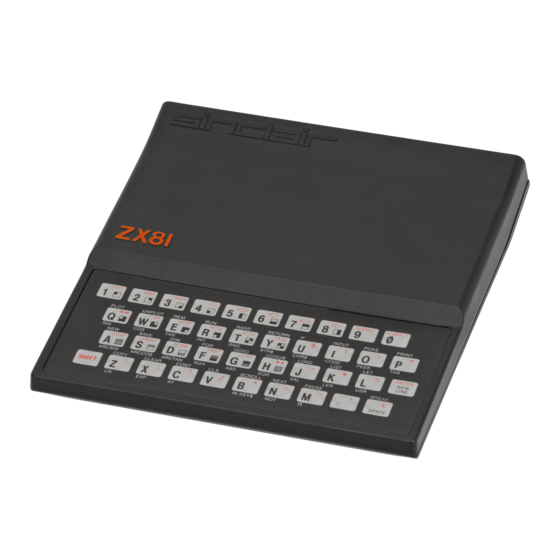
7 CASE ASSEMBLY (i) Take the case top - the part with the raised "Sinclair" logo and "ZX81" printed on it - and feed the "tails" of the keyboard through the slot at the top right hand corner of the keyboard recess. Do not remove the backing paper form the keyboard yet, just locate it in the recess: see fig. -
Page 6: Component List
these locate Serious damage will result if the long screws are inserted in the wrong holes. (iii) Locate the board on the pillars in the case, make sure the jack sockets are behind the holes in the side, and screw it into the case. Only two holes need screws in them at this point - Fig. 11 tells you which two;... - Page 7 47nF 473 Z C I O lOnF l O n , 103 47nF 473 Z 47pF (d) Semiconductors Type Comment Sinclair Logic 1C 40 pins 158 printed underside 2364 24 pins Z80A or D780C-1 40 pins MK4118 24 pins IC4a...
-
Page 8: Power Supply
SERVICE We will repair your completed ZX81 kit f o r a fixed fee of £10 00 We cannot assemble your kit for you, nor can we start work until the fee is received. In exceptional cases, say if the t.C.s have been damaged by being put in the wrong way round, we may ask for an additional payment. - Page 13 COMPGIli£ITS & ACCESSORIES i ' O F TKS SUGGESTED APPLICATIONS FOR USER FORT 7416 HID 507 (Single Digit Display) 11 Op 74LS47 16 pin DIL Header Plug OA 91 diode 16 pin Header with 24" Cable Open ended 180p 0.2" LED RED Low current Solid State Buzzer lOOp 0.2"...
- Page 15 2. ZX81 with original IK RAM still on ZX81 board with .r.cremental containing full 16K of RAM. No external memory. 18 21,23 25 3. ZX81 with 16K add-on pack and original IK RAM still 5.1 ZX81 board {£. with Incremental containing 2K of RAM.
- Page 16 IK RAM on tho ZX81 board. Henoe it is not possible to use the IK RAM on the ZX81 board if such- an external memory is in use. As well as this it is necessary to roake the Incremental RAM selection agre* wdth the •ea-Uiriial fIwyaas^c - ie the ZE plug must be set for dibble (see Appendix B).
- Page 17 INCREMENTAL SERIES HINTS and TIPS Extracting chips from their sockets. Take your time. The danger is that you are exerting a lot of force and suddenly ons gj_ end of the chip comes away bending the remaining pins drastically. For this reason it : a good idea to lever the chip out with a screwdriver or pencil thus avoiding sudden men Care should he takeb when levering not to damage the tracks under the socket ( i f the $oc is of the open window type), it is usually possible to actually lever on the socket.
- Page 18 Remove the two additional bolts now visible, remembering thai* position. Note that the ZX81 board is now attached to the keyboard half of the case by just a thin ribbon cable which you must take care not to damage. We do not recommend that the ribbon be removed from its socket on the ZX8l board and there is no necessity to do this if thes instructions are followed.
- Page 19 (111) The cursor hasn't come up so try turning on ZXSl a couple more times. If still unsuccessful the problem is almost certainly a bad connection between the memory I and the ZX81 board. So - IP you have a multitestcr TfiElT Test all 40 pins of the GPU connect through to the ZXSl board.
- Page 20 ZX81 board track. Check that the washers are nbt causing shorts on the ZX81 board (this can happen if the ZX8l board coatings are worn away - the washers are there to prevent such \vear from the bolt heads.)
- Page 21 Fig 3 shows LED indicator lamps attached to channels zero and one To light pads on the upper side of the board except these, execute POKE 25000, 3 (or POKE 11000, 3 on the ZX81) EITHER the three marked «A" if the board is...
- Page 22 Shis allows the simultaneous use of the RAM pack and port boaid on the ZX81, though this IB not possible on the ZX80. The extender card solders to the rear of the edge connector to effectively extend the extension plug at the rear of the 2X81.
- Page 28 INCREMENTAL SERIES DOCUMLHTATI ON PLEASE NOTE ! - the position of the 40 protruding pins protected by the clock polystyrene foam. We suggest that this protection be retained until actual fitting. Also we strongly recommend the fitting and testing of the memory board as supplied before carrying out any adjustment to switch settings, plugging- in extra chips etc..
- Page 31 £ ° 56 • 59 100 101 102 103 104 105 106 107 108 109 no 111 7 112 113 114 115 116 117 118 119 120 121 122 123 124 125 126 8 128 129 130 131 132 133 134 135 136 137 136 159 140 141 142 145 2 144 145 146 147 146 149 150 151...
- Page 34 If you do not wish to use a connector the cable may be soldered to the PCB. The completed keyboard may now be fitted to your 2X80 or ZX81. First study the connection details for your computer. (Fig 2 and fig 3) (More details on figs 4 and 5) Carefully solder the ribbon cable to the computer PCB as indicated.
- Page 37 47nF 473 2 • 47nF 473 Z 10nF 47nF 473 Z 47pF (d) Semiconductors Type Comment Sinclair Logic 1C 40 pir.s 158 printed underside 2364 24 pins Z80A or D780C-1 40 pins MK4118 24 pins IC4a |iPD2114LC or as IC4b...
Need help?
Do you have a question about the ZX81 and is the answer not in the manual?
Questions and answers