Table of Contents
Advertisement
Quick Links
DOODLE
DOODLE
Copyright
2012 by DAGU Hi-tech Electronic Co., Ltd.
C
All rights reserved. No portion of this instruction sheet or any artwork contained herein may be reproduced in any
shape or form without the express written consent of DAGU Hi-tech Electronic Co., Ltd.
The manufacturer and distributor cannot be held responsible for any damages occurred by mishandling, mounting
mistakes or misuse due to non-respect of the instructions contained in this manual.
Address:NO.4-107/108 HengXing Street, HengHai Rd, South District, ZhongShan City of GuangDong China
TEL:0760-88811951
http://www.arexx.com.cn
E-mail:info@arexx.com.cn
Manufacturer:
DAGU Hi-Tech Electronic Co.,LTD
WWW.AREXX.COM.CN
BOT
BOT
RS025
Advertisement
Table of Contents

Related Manuals for DAGU Doodle Bot

Summary of Contents for DAGU Doodle Bot
- Page 1 All rights reserved. No portion of this instruction sheet or any artwork contained herein may be reproduced in any shape or form without the express written consent of DAGU Hi-tech Electronic Co., Ltd. The manufacturer and distributor cannot be held responsible for any damages occurred by mishandling, mounting mistakes or misuse due to non-respect of the instructions contained in this manual.
-
Page 2: Table Of Contents
Contents Product description Warnings Required tools Parts list Assembly instructions Wiring instructions Installing the software Changing the text message and size Changing "low battery" sensitivity Create your own charactors Troubleshooting Troubleshooting continued Using the controller as an Arduino board Specificatons... -
Page 3: Product Description
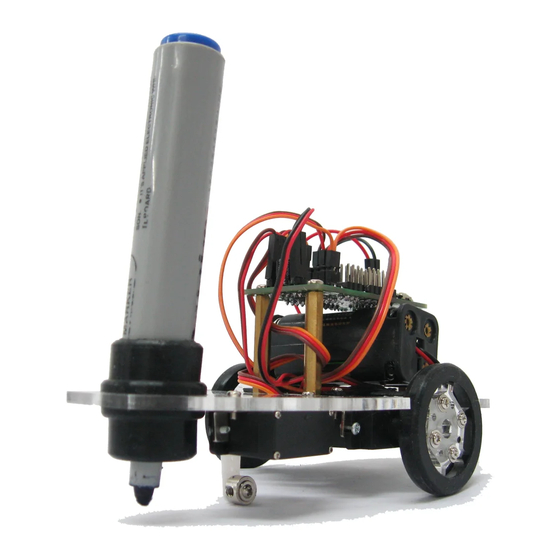
Product Description Thank you for selecting the Doodle Bot for your next do-it-your-self project. This kit allows you to build and program a small drawing robot that can write messages and draw pictures using a large pen, crayon or chalk stick. -
Page 4: Parts List
Parts List: 9g geared motor Base plate 1pc Wheel 2pcs Rubber tire 2pcs Rubber pen gripper 1pc (two wires) 2pcs L shape mounting 12g Miniature servo Round servo horn 2pcs Servo horn-2 1pc bracket 6pcs L30 distance holder 4pcs (three wires) 1pcs M2*5 self-tapping screw M2.3*10 self-tapping M2*5 self-tapping... - Page 5 Step 3: Step 4: servo Attach the 8 pole magnets to the round left servo horns using the adhesive rings motor provided. Attached to the motors with right M2x5mm screws. motor Step 5: Step 1 Loosen the screws holding the fibreboard strips and adjust the wheel sensors so that they are close to the magnets but not touching.
- Page 6 Step 8: Step 9: Note: The cable tie is re-useable and can be loosened when the batteries need replacing. Step 10: Step 11: The large rubber grip can accept whiteboard markers, jumbo chalk and large crayons. Try inserting 3 small crayons of different colours for a rainbow effect.
-
Page 7: Wiring Instructions
Wiring Instructions: Once you have assembled the robot you need to connect the wires. Start by checking that the jumper near the power switch is selecting 5V for power. If it is set to battery voltage then the sensor outputs might be high enough to damage the digital inputs D2 &... -
Page 8: Installing The Software
You may also need to install VCP (virtual com port) drivers for the CP2102 USB interface. You can download the latest drivers from here: http://www.silabs.com/products/mcu/Pages/USBtoUARTBridgeVCPDrivers.aspx The sample code for this robot should be available from the distributor. It is also available from the DAGU product support site here: https://sites.google.com/site/daguproducts/home/download-page Unzip the sample code and copy the folder into your sketch pad or other directory of your choice. - Page 9 USB cable while you upload the program but there will be no power to the motors. Go to the "Tools" menu and select your USB serial port. From the "Tools" menu choose the board type. The Doodle Bot controller is compatible with an Arduino NG or older using an ATmega8 processor.
-
Page 10: Changing The Text Message And Size
Changing the text message and size: The first tab contains the setup and loop functions required for all Arduino code. The main loop is where you will program the robot with different messages. When you run the program, the robot will print the message: "I AM A ROBOT". There are two other samples that allow the robot to print the alphabet or the numbers 0-9. -
Page 11: Create Your Own Charactors
Creating your own charactors: If you look in the tabs "Alphabet" and "Numbers" you will see that all the numbers and letters are created using combinations of only 4 commands. If you look in the tabs "Alphabet" and "Numbers" you will see that all the numbers and letters are created using combinations of only these 4 functions. -
Page 12: Troubleshooting Continued
USB cable. Make sure you have the latest CP2102 USB interface drivers installed (Installing the Software). Using the controller as an Arduino board: The DAGU mini driver is software compatible with an Arduino NG. It has been designed specifically for robotics so it has a few extra features.
Need help?
Do you have a question about the Doodle Bot and is the answer not in the manual?
Questions and answers