Table of Contents
Advertisement
Quick Links
Advertisement
Table of Contents

Related Manuals for Audio Research Reference Phono 3


Summary of Contents for Audio Research Reference Phono 3
- Page 1 H I G H D E F I N I T I O N ® Reference Phono 3...
- Page 3 Thank you for choosing the Reference Phono 3 to be a part of your high performance music listening system. Since 1970, Audio Research has been creating some of the world’s finest audio equipment. Each piece is handcrafted in Minnesota, and has been designed to provide many years of listening enjoyment.
-
Page 4: Table Of Contents
Contents Warnings Installation Before Operating the Reference Phono 3 In Your System A Note about Vacuum Tubes Connections Back Panel Connections Input Connectors Output Connectors Operation Record Output Front Panel Controls and Display A.C. Power Connection Start-Up RS-232 and IR Input... - Page 5 ‘Mute’. This condition will persist until The detachable power cord on your the line voltage returns to a safe operating Reference Phono 3 is equipped with a heavy level; please note the unit will remain gauge, 3-conductor (where applicable) in ‘Mute’...
-
Page 6: Before Operating The Reference Phono 3
Installation Before operating the Reference Phono 3 Remove all screws fastening the top cover. Your Reference Phono 3 preamplifier is Carefully remove each vacuum tube shipped with the vacuum tubes packed from its protective foam and match its in a separate foam-lined carton. These location ‘V’... -
Page 7: Installation
A Note about Vacuum Tubes soft surface such as a thick rug or carpet. The vacuum tubes in your Reference Phono 3 Due to its weight, this preamplifier must have been burned in, tested and electrically... -
Page 8: Connections
Connections Back Panel Connections RS-232 connector Main IR Input Outputs Fuse Holder Phono Inputs A.C. Mains connector... -
Page 9: Input Connectors
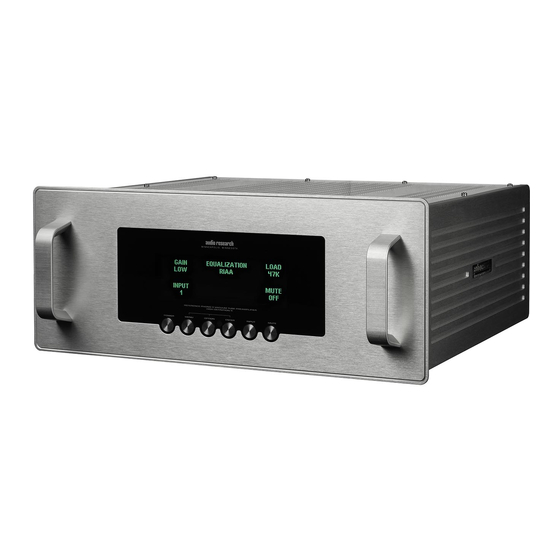
Connections Input Connectors IR Input The Reference Phono 3 provides two sets of The IR input allows a remote IR sensor or input connectors, labeled Input 1 and Input repeater system to be connected to the 2. Both input connectors are single-ended. - Page 10 Operation Front Panel Controls and Display Vacuum Fluorescent Display Power On/Off Menu Mute Option Input (used with Menu) Enter (used with Menu)
- Page 11 ‘MUTE’ will flash on the display. in your system. If the Reference Phono 3 After the warm-up sequence is complete, is turned on after the preamplifier and the unit will be muted. Depress the amplifier, it will amplify any extraneous front panel ‘MUTE’...
- Page 12 The Reference Phono 3 requires the total accumulated hours of operation approximately 2 minutes to warm up; this for the Reference Phono 3. This is useful time is required to stabilize the circuitry. to determine the approximate number See ‘Start-Up Procedure’ on page 11 for of hours the vacuum tubes have been in details.
- Page 13 EQ curve; for this purpose, the display to indicate the unit is powered on. ‘DECCA’ and ‘COLUMBIA’ options have been included in the Reference Phono 3. Input Select Buttons To change the equalization curve, select The input buttons labeled ‘INPUT 1’ and one of the three buttons (RIAA, DECCA, ‘INPUT 2’...
- Page 14 Operation System Settings - Menu Tree...
- Page 15 ‘MENU’ button will step you through the different setting options: Auto Shutdown The Reference Phono 3 is equipped with an auto shut-off feature, designed to turn the preamplifier off after a period of time during which it is not used. The auto shut-...
- Page 16 The tube hours display shows the independent load and gain settings for the accumulated time the Reference Phono two inputs on the Reference Phono 3. The 3 has been powered on. This is useful settings are stored in the unit’s memory for determining the number of usage and will be retained until changed.
- Page 17 Operation Display Brightness Equalization The display brightness feature offers six The Equalization feature allows different EQ different settings (including off) for the curves to be employed for listening. vacuum fluorescent display on the front To change the EQ settings, press the ‘MENU’ panel.
-
Page 18: Maintenance
Please contact your dealer or importing distributor for instructions on proper Caution disposal of this product in your country. Your Reference Phono 3 preamplifier contains Or, contact Audio Research Corporation sufficient levels of voltage and current to (763.577.9700) for the name of your be lethal. -
Page 19: Fuse Values And Locations
Microprocessor Fuse CE Fuse (220-240 V units only) A.C. Mains Fuse The Reference Phono 3 has three replaceable fuses to help protect 120 V units: 5A slow blow the unit in the event of a spurious 220-240 V units: T3.15A electrical surge or other situation. -
Page 20: Warranty
Limited Warranty are listed on the Audio Research factory, along with a the warranty card accompanying the photocopy of the dated purchase receipt product in its shipping carton. The... -
Page 21: Specifications
Specifications Frequency Response: ±.2 dB of RIAA, 10 Hz to 60kHz; 3 dB points below 0.3Hz and above 300 kHz. Distortion: Less than .002% at 1.0V RMS 1kHz output. Gain: Selectable 51 dB (Low) and 73 dB (High) at 1kHz BAL; 45 dB (Low) and 67 dB (High) at 1kHz SE. (MC and MM compatible). - Page 22 D E F I N I T I O N ® 3900 Annapolis Lane North Plymouth, MN 55447 www.audioresearch.com Specifications subject to change without notice. ©2016 Audio Research Corporation. Reproduction of this document in part or whole is expressly forbidden without written consent from Audio Research Corporation. 95000000...
Need help?
Do you have a question about the Reference Phono 3 and is the answer not in the manual?
Questions and answers