Advertisement
Quick Links
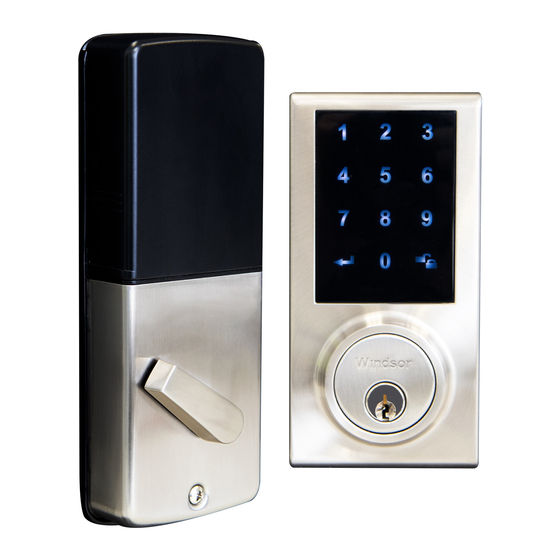
TOUCHPAD ELECTRONIC DEADBOLT LOCK
Operational Interface
Operating Instructions
Do not use any chemical liquid or lubricant oil with additives to clean the lock body. It can damage the surface and mainboard.
Keep the door open while programming to avoid being locked out accidentally.
The lock contains one factory-preset user code but can be programmed to store up to a total of thirty additional unique user codes.
Codes can be added and deleted at any time.
For first-time programming, use the factory default programming code.
It is recommended to change the default programming code and default user code right after you install the lock.
Every programming step should be done within 6 seconds.
Operating Indicator Sounds and Lights
1 Beep
2 Long Beeps
3 Beeps
5 Beeps
10 Rapid Beeps
3 Long Beeps
Lock button flashes slowly
1. Door Handing Identification Process
The lock needs to learn if your door is right-handed or left-handed.
2. Change Programming Code
3. Add New User Code
Up to 30 sets of user codes can be saved.
User codes should be 4–10 digits in length.
4. Delete Existing User Code
5. Delete All User Codes
Auto-locking and keypad locking functions will be invalid when
user codes are deleted. The lock can only be operated by key during that time.
Successful Operation
Successful Programming
Operation Error
Code Input Error; System Shuts Down
Low Battery Power
Default Setting Restored
In Programming Mode
PROGRAMMING
INSTRUCTIONS
1
Programming Button
Setting function
2
Lock Button
Lock/unlock function
3
Cylinder
Lock/unlock the lockset from outside
4
Washer
Prevents water from permeating
into lockset
Default programming code (PC): 0000
Default user code (UC): 1234
Your new programming code (PC):________
Your new user code (UC):________
Note: The same programming code and user code cannot be accepted.
The lock will cease operation if unauthorised codes are entered over 5 times.
The system will unfreeze after 45 seconds.
6. Toggle Auto-Lock On/Off
The preset delay-time is 30 seconds, you can change the time by
following instruction #7. Repeat the steps in #6 to cancel the
auto-locking function.
7. Set Auto-Lock Time Delay
10–99 seconds delay-time available.
8. Enable/Disable All User Codes
Auto-locking and keypad locking functions will be invalid when
user codes are disabled. The lock can only be operated by a key
during the time. Repeat the steps in #8 to enable the user codes
again.
9. Create One-Time User Code
It will automatically cancel after it is used one time.
0800 607 028
sales@windsorhardware.co.nz
windsorhardware.co.nz
Product codes: 1390
5
Battery Lid
Slide the lid off to change batteries
6
Battery Holder
Four AA (1.5V) alkaline batteries
7
R Button (Reset)
Restore default settings
8
Turn-piece
To lock/unlock the lockset from inside
© WINDSOR ARCHITECTURAL HARDWARE
Version 1
Advertisement

Related Manuals for Windsor 1390


Summary of Contents for Windsor 1390
- Page 1 0800 607 028 PROGRAMMING sales@windsorhardware.co.nz INSTRUCTIONS windsorhardware.co.nz TOUCHPAD ELECTRONIC DEADBOLT LOCK Product codes: 1390 Operational Interface Programming Button Battery Lid Setting function Slide the lid off to change batteries Lock Button Battery Holder Lock/unlock function Four AA (1.5V) alkaline batteries...
- Page 2 PROGRAMMING sales@windsorhardware.co.nz INSTRUCTIONS windsorhardware.co.nz Product codes: 1390 TOUCHPAD ELECTRONIC DEADBOLT LOCK 10. Activate/Deactivate Leading Code Random digits will show up when you first touch the screen. This is a security function to confuse the finger print marks left on screen.
- Page 3 TOUCHPAD ELECTRONIC DEADBOLT LOCK Product codes: 1390 1. Download the ‘Windsor Smart Lock’ App on Once the installation is completed, turn on the device’s Bluetooth and open the Windsor App to begin pairing. Windsor Smart Lock Windsor Smart Lock 2.
- Page 4 0800 607 028 BLUETOOTH sales@windsorhardware.co.nz INSTRUCTIONS windsorhardware.co.nz TOUCHPAD ELECTRONIC DEADBOLT LOCK Product codes: 1390 Administrator Functions Load paired devices list. Delete paired devices from the Select the setting icon in the top list. right corner of the locking setting On the ‘Paired Devices’ screen, screen to view the paired select the ‘Edit’...
Need help?
Do you have a question about the 1390 and is the answer not in the manual?
Questions and answers
I have been through the setup process for keyless entry as per the manual- steps 1-10 and it isn't working. It seems bizzare that you set up a new user code in Step 3 and delete the factory UC in step 4 then have to delete all user codes in step 5? For setup do you only go to Step 4?
To set up keyless entry on a Windsor 1390 lock, follow these steps:
1. Install the lock: Ensure the deadbolt keypad is straight and mounted properly. Insert the IC wire and batteries as instructed.
2. Perform Door Handing Identification: The lock needs to determine if the door is right-handed or left-handed.
3. Change default codes: Change the default programming code (PC: 0000) and default user code (UC: 1234). These codes must be different.
4. Program the lock: All programming steps must be done within 6 seconds. Use the programming code to enter programming mode and set a new user code.
5. Test the lock: Use the new user code to ensure the lock works correctly.
6. Enable Auto-Lock (optional): Use the correct steps to toggle or set the auto-lock time delay (10–99 seconds).
Yes, Step 4 (programming the lock) should only be followed after setting a new user code to ensure secure and accurate operation.
This answer is automatically generated