Table of Contents
Advertisement
Advertisement
Table of Contents

Related Manuals for degdrive DGI900

Summary of Contents for degdrive DGI900
- Page 1 User Manual DGI900...
- Page 2 Contents Preface Chapter 1 Safety Precautions 1.1 Unpackage Inspection 1.2 Safety Information 1.3 General Precautions 1.4 Disposal Chapter 2 Models and Specifications 2.1 Models 2.2 Specifications 2.3 Parts of Inverter 2.4 Dimensions 2.5 Optional Parts Chapter 3 Installation and Wire Connection 3.1 Installation 3.2 Removing and Mounting Front Cover of Inverter 3.3 Wire Connection...
- Page 3 Chapter 4 Running of Inverter 4.1 Running of Inverter 4.2 Operation and Using of the Control Panel 4.3 Inverter power switch on Chapter 5 Function Code Table Chapter 6 Description of Function Codes 6.1 Basic Parameters ( Group P0 ) 6.2 Start/Stop Control (...
- Page 4 7.2 Fault Record Search 7.3 Fault Reset Chapter 8 Preservation and Maintenance 8.1 Preservation and Maintenance 8.2 Periodic Preservation and Maintenance 8.3 Warranty of Inverter Chapter 9 Serial port RS485 communication protocol 9.1 Communication overview 9.2 Communication protocol specification 9.3 RTU protocol...
- Page 5 AC drive, certificate of conformity, user manual and warranty card. • Whether the AC drive is damaged during transportation. If you find any omission or damage, contact your supplier immediately. DGI900 - 4 T 0015 G Code Inverter type...
- Page 6 Fig 1-1. Models description 1.2 Safety Information The use phase Safety class Precaution ◆ Before Do not install the product if the package is with water, or component is missing or broken. Danger Installation ◆ Do not install the product if the label on the package is not identical to that on the inverter.
- Page 7 ◆ Do not leave cable strips or screws in the inverter. Risk of inverter damage. Caution ◆ Install the product at the place with less vibration and no direct sunlight. ◆ Consider the installation space for cooling purpose when two or more inverters are placed in the same cabinet.
- Page 8 ◆ Wiring Wiring must be performed by authorized and qualified personnel. Risk of danger. Danger ◆ Circuit-breaker should be installed between inverter and the mains. Risk of fire. ◆ Make sure the input power supply has been completely disconnected before wiring. Failure to comply may result in personnel injury and/or equipment damage.
- Page 9 ◆ Since all adjustable frequency AC drives from our company has been subjected to hi-pot test Caution before delivery, users are prohibited from implementing such a test on this equipment. Failure to comply may result in equipment damage. ◆ Signal wires should to the best of the possibility be away from main power lines.
- Page 10 ◆ After Power-on Do not open the cover after power. Rick of electrical hazard. Danger ◆ Do not touches any input/output terminals of inverter with bare hands. Rick of electrical hazard. ◆ If auto tuning is required, be careful of personal injury when motor is running.
- Page 11 capacitor to discharge to a safe value. Failure to comply will result in personal injury. ◆ All pluggable components can be inserted or pulled out only when power has been turned off. ◆ Set and check the parameters again after the AC drive is replaced. General Precautions 1.
- Page 12 The AC drive may encounter the mechanical resonance point at some output frequency, which can be avoided by setting the skip frequency. 5. Voltage-sensitive device or capacitor on output side of the AC drive Do not install the capacitor for improving power factor or lightning protection voltage sensitive resistor on the output side of the AC drive because the output of the AC drive is PWM wave.
- Page 13 In places where the altitude is above 1000 m and the cooling effect reduces due to thin air, it is necessary to de-rate the AC drive. Fig 1-3. Inverter output current derating and Altitude 10. Protection class DGI900 protection level is IP20 when inverter with keypad.
- Page 14 Disposal The electrolytic capacitors on the main circuits and PCB may explode when they are burnt. Poisonous gas is generated when the plastic parts are burnt. Treat them as ordinary industrial waste.
- Page 15 Chapter 2 Models and Specifications 2.1 Models DGI900 series inverter has 2 kinds of voltage levels, 220V and 380V. The Power range is from 0.4KW to 450KW. Models of DGI900 series are shown in Table 2-1. Table 2-1. Models description...
- Page 16 DGI900-4T0550G DGI900-4T0550P 73.7 DGI900-4T0750G DGI900-4T0750P DGI900-4T0900G DGI900-4T0900P DGI900-4T1100G DGI900-4T1100P DGI900-4T1320G DGI900-4T1320P DGI900-4T1600G DGI900-4T1600P DGI900-4T1850G DGI900-4T1850P DGI900-4T2000G DGI900-4T2000P 380V DGI900-4T2200G DGI900-4T2200P Three phase DGI900-4T2500G DGI900-4T2500P DGI900-4T2800G DGI900-4T2800P DGI900-4T3150G DGI900-4T3150P DGI900-4T3500G DGI900-4T3500P DGI900-4T4000G DGI900-4T4000P DGI900-4T4500G DGI900-4T4500P 2.2 Specifications Items Specifications Input Rated...
- Page 17 Overload 150% rated current for1minute, 180% rated current for3 seconds ability Modulation Optimized space voltage vector SVPWM modulation modes Control V/F, Sensor less vector and Closed loop vector control mode Frequency Digital setting: The highest frequency×± 0.01% Analog accuracy setting: The highest frequency ×±0.2% Frequency Digital setting: 0.01Hz;...
- Page 18 Jog frequency range:0.1Hz~50.00Hz, JOG Acc./Dec. time: running 0.1~60.0s PI built-in Easily constitute a close loop control system Multi-stage Multi-stage speed running available through built-in PLC or speed control terminals Control running function Textile Swing frequency available with preset and central frequency swing adjustable frequency...
- Page 19 Running Control panel : control terminal :serial port :3 channels command switchable channel 、 control panel keys Frequency Control panel potentiometer setting: ▲ ▼ setting setting; Function code setting: Serial port setting; Terminal channel up/down setting: Input Analog voltage setting: Input Analog Running current setting: Input pulse setting;...
- Page 20 Parameter Function code parameters are able to be copied between copy inverters when use remote control panel。 Protection function Overcurrentprotection:overvoltageprotection:undervoltageprotec tion:overheating protection: overload protection, etc. Optional parts Braking unit: remote control panel: cable: panel mounting feet, etc. Indoors, free from direct sunlight, dust, corrosive gas, oil mist, Environment steam, water dropper salt, etc Altitude...
- Page 21 2.3 Parts of Inverter Control panel Front cover Control cable exit Input Output Air intake Mounting hole 2.4 Dimensions Table 2-2 Dimensions (mm)
- Page 22 Wall mounting Inverter Model Mount G Type P Type hole DGI900-2S0004G Φ5 DGI900-2S0007G DGI900-2S0015G DGI900-4T0007G DGI900-4T0015P Φ5 DGI900-4T0015G DGI900-4T0022P DGI900-2S0022G DGI900-4T0022G DGI900-4T0037P Φ5 DGI900-4T0037G DGI900-4T0055P DGI900-4T0055G DGI900-4T0075P Φ5 DGI900-4T0075G DGI900-4T0110P DGI900-4T0110G DGI900-4T0150P Φ6 DGI900-4T0150G DGI900-4T0185P DGI900-4T0185G DGI900-4T0220P Φ8 DGI900-4T0220G DGI900-4T0300P...
- Page 23 The following parts are optional. If require, please order 2.5.1 Remote control Keypad Model: DGI900-YK01(LED keypad)and DGI900-YK02 (LCD Keypad) RS 485 communications applied between remote control keypad and inverter which are connected by a 4-core cable via RJ45 network port.
- Page 24 (2) Monitor slave inverter’s running frequency, setting frequency, output voltage, output current, bus bar voltage, etc. 2.5.2 Communication cable for remote control panel Type:DGI900-LAN0020 (2.0m) Standard options:1m, 2m, 5m, 10m, 20m. Which is more than 20m can be customized for the remote keypad and inverter connection.
- Page 25 2.5.4 Braking Resistors DGI900 series inverters under 22KW have built-in braking units. If energy consuming braking is needed, please choose braking resistors according to Table 2-3. The wire connection of braking resistors is shown in Fig. 2-3. Fig.2-2 The wire connection of braking resistors...
- Page 26 Model Applicable motor Resistance Resistance Braking unite (KW) (Ω ) power (W) DGI900-2S0022G Built in DGI900-4T0007G 0.75 Built in DGI900-4T0015G Built in DGI900-4T0022G Built in DGI900-4T0037G Built in DGI900-4T0055G Built in DGI900-4T0075G Built in DGI900-4T0110G 1000 Built in DGI900-4T0150G 1500...
- Page 27 Model Applicable motor Resistance Resistance Braking unite (KW) (Ω ) power (W) DGI900-4T2200G 13.6*5 45000 External DGI900-4T2500G 13.6*5 45000 External DGI900-4T2800G 13.6*6 54000 External DGI900-4T3150G 13.6*6 54000 External DGI900-4T3500G 13.6*7 63000 External DGI900-4T4000G 13.6*8 72000 External DGI900-4T4500G 13.6*8 90000 External...
- Page 28 Chapter 3 Installation and Wire Connection 3.1 Installation 3.1.1 Environment Requirements (1) Please mount inside a well-ventilated location. The ambient temperature is required to be within the range of -10 ~40 . If the temperature is higher than 40 ℃ ℃...
- Page 29 Forced convection More than 200mm Air flow diverting More than 100mm More than 100mm plate More than 200mm Fig.3-1 Mounting space and distance Fig.3-2 Mounting of multiple inverters 3.2 Removing and Mounting Front Cover of Inverter Removing: Remove 4screws on the cover and take the cover out. Mounting: Align the mounting holes and screw them.
- Page 30 36V. (3) Wiring work can only be done by trained or professional personnel. (4) Before usage, check whether the mains voltage meets the requirement of inverter input voltage. 3.4 Main Circuit Wiring DGI900 Circuit breaker R(R) power...
- Page 31 Fig. 3-3 Main circuit wiring 3.4.1 Main Circuit Wiring Main Circuit input/output terminals, shown as Table 3-1 Table 3-1 Description of Main Circuit input/output terminals Main circuit terminal Apply to Terminal Function name 220V 1-phase L1、L2 220V 1-phase Input terminals U、V、W 3-phase Output terminals’...
- Page 32 3.5 Basic Wiring Diagram Fig. 3-5 Basic Wiring Diagram 3.6 Control Circuit Terminal Wiring 3.6.1 Position and Function of Terminals and Jumpers on Control Circuit...
- Page 33 Fig. 3-6 Position of terminals and jumpers on control circuit Before using the inverter, Please make correct terminals wiring and jumpers setting. It is suggested to use above 1mm wire as terminal connection wire. Table 3-2 Jumper switch function Function Setting Setting Factory COM and CME connecting...
- Page 34 Current selection :AO2: 0~20mA or AO1 AO1 terminal current/ 0-10V voltage selection 4~20mA output Voltage selection :AO2: 0~10V output Current selection :AO2: 0~20mA or AO2 AO2 terminal current/ 0-10V voltage selection 4~20mA output Voltage selection :AO2: 0~10V output Current selection :CI: 0~20mA or CItermial current/ voltage 0-10V input selection...
- Page 35 Fig.3-7 CN2 terminal order (3) Function of CN 2 terminal shown as T able 3-4 2 terminal function Table 3-4 CN Terminal Name Sort Function Specification 485+ RS485 RS485 differential signal Twisted or shielded wire Commu interface positive terminal needed nication 485- RS485 differential signal...
- Page 36 High speed The programmable multi Output range defined by pulse output function terminal defined by P4.09, Max 100KHz collector P4.06 (FM input mode selection), As open-collector output, its specification is the same as that of DO1. ( Common terminal:COM) Analog input VI Analog voltage input Input voltage range:...
- Page 37 Analog output Analog voltage/ current output, Current output range: voltage/ current selected by 4~20mA Jumper AO2,voltage output as Voltage output range: default. (Common terminal: 0~10V GND). Multifunctional Can be defined as Optical coupling input terminal 1 multifunctional isolation, compatible on-off input terminal by dual polarity input Multifunctional programming, refer to Chapter...
- Page 38 Isolated inside +24Vcommon Digital signal input, output terminal common terminal 3.6.3 Analog Input/Output Terminal Wiring (1) Analog voltage signal input through VI terminal as follow wiring: DGI900 0~+10V ― Shielded cable — proximal grounding Fig. 3-7 VI terminal wiring (2) Analog signal input through CI terminal, jumper selection for input voltage (0~10V) or input...
- Page 39 Fig. 3-8 CI terminal wiring (3) Analog output terminal AO1 wiring Analog output terminal can be connected with external analog meter indicating various physical quantity, jumper selection for output voltage (0~10V) or output current (4~20mA) as follow wiring. Analog voltage output Analog meter Inverter Analog current output...
- Page 40 Notes: (1) Filter capacitor or common-mode inductor can be installed between VI and GND terminal or CI and GND terminal when using analog input mode. (2) Please use shielded cable and do well grounding, keep the wire as short as possible in order to prevent external interference when using analog input/o output mode.
- Page 41 DGI900 Fig. 3-10 RS485-(RS485/232)-RS232 communication wiring Multi inverters can communicate via RS485, controlled by PC/PLC as a Master shown as Fig.3-12. It also can be controlled by one of inverters as a Master shown as Fig.3-13 DGI900 DGI900 DGI900 DGI900...
- Page 42 DGI900 DGI900 DGI900 DGI900 DGI900 +485- PE +485 +485 +485 +485- PE Fig. 3-13 Multi inverters communication The more inverters connected, the more the communication interference may accure. Please make wiring as above and do well grounding for inverters and motors, or adopt the following measures to prevent interference as even above wiring can’t work.
- Page 43 (2) Noise Suppression Methods Path Noise suppression methods ② If a closed loop is formed between the peripheral equipment and the inverter wiring,the grounding leakage of the inverter will misoperate the equipment. Solution: Remove the grounding of the peripheral equipment. ③...
- Page 44 ④⑤⑥ Electronic equipment such as computers, measuring meters, sensors and radio equipment, when in the same cabinet with inverter, with their wiring close to the inverter, may misoperate due to radio interference. Solution: (1) The susceptible equipment and its signal lines should be kept away from the inverter.
- Page 45 cable/motor cable).They should not be bent together and should be kept away as least 20cm from each other. If cable crossing is inevitable, please make sure it is same as Fig.3-1 (6) Please ground the control signal cable separately with power cable/motor cable. (7) Please don’t connect other devices to inverter power input terminals(R/S/T).
- Page 46 Chapter 4 Running of Inverter 4.1 Running of Inverter 4.1.1 Running Command Channels There are three channels for inverter receiving commands like START,STOP, JOG and others. Control panel STOP Keys o on the panel to control the inverter.(Factory default ) RESET Control terminal Use one of terminals amongX1~X7 and COM to constitute a 2-wire control mode.
- Page 47 ▲ ▼ 1: by control panel key, with memory after power off 2: analog setting via VI terminal 3: analog setting via CI terminal 4: Pulse terminal setting (PULSE) 5: combination setting 6: Simple PLC function 7: PID setting 8: serial port setting (remote control) 4.1.3 Inverter Running States When inverter power on, there are two states which are Standby and running state.
- Page 48 JOG frequency, for example, by pressing control panel key to give JOG command(refer to function codeP2.00~P3.02). 1:Close loop running By setting close loop running control parameter enabled (P0.01=8),the inverter will enter close loop running, that is PI regulation (refer to function code P6). To make close loop running invalid, please set multifunctional input terminal (function22)and switch to lower priority running mode.
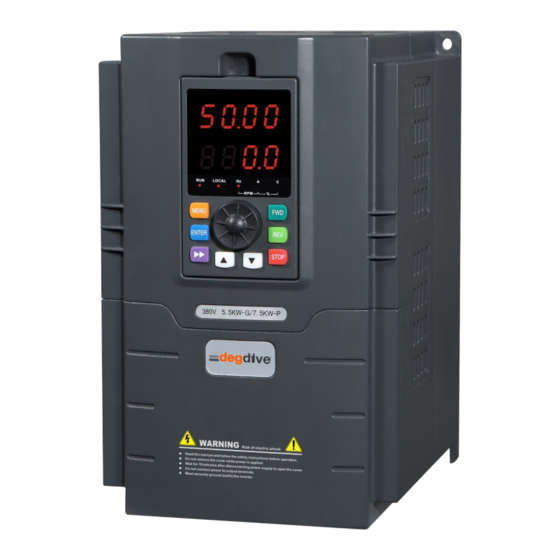
- Page 49 Fig.4-1 Running mode logic diagram Normal run The above 5 kinds of running modes can be running in multiple frequency setting channel except JOG running. PLC running, multi-stage speed running and normal running can carry out swing frequency running 4.2 Operation and Using of the Control Panel 4.2.1 Control Panel Layout User can control inverters’...
- Page 50 Fig. 4-2 Control panel diagram 4.2.2 Control Panel Function There are 8 keys and 1 analog potentiometer on the inverter’s panel. The function are shown as follow: Name Function Description In keypad mode, pressing the key, inverter will run...
- Page 51 Multifunction REV key is defined as Reverse function. It is also self-defined key which can be set by Parameter Stop/Reset Inverter in running status, pressing the key will stop inverter when STOP command given by keypad. In fault status, pressing the key can reset MENU Function/Data...
- Page 52 Table 4-2 State indicator description Item Function Description Displ LED digital Display inverter’s running state parameters and setting parameters. State When the motor is running forward, this When the inverter is in DC indicator is on. indica braking funct When the motor is running reverse, this state, the FWD and REV indicator is on.
- Page 53 Display without flashing Initializing Display and flashing Fig C Fig B Fig A in running state after power on in stopping state Fig.4-4 Parameter display in initialization, stopping and running state. B、Parameter displaying in running state The inverter enters running state after receiving valid running command, and the panel displays running state monitoring parameter.
- Page 54 inverter before clearing the fault for sure, otherwise there is a danger of damage. Fig. 4-5 Fault alarm display state D、Function code programming state MENU In the state of stopping, running, and fault alarm, press key to enter programming state (A password is required, If it has been set.
- Page 55 Parameter b-01 50.00 b-02 b-03 Parameter Parameter Display Output freq Output current Output voltage Set freq. ►► ►► ►► operation b-14 b-04 Parameter Parameter Bus bar voltage Module temperature …… ►► ►► ►► Fig. 4-7 Operation to display monitoring parameter ENTER (2) When viewing monitoring parameter, press key for switching to default monitoring...
- Page 56 Fig. 4-8 Example of function code parameter setting Note: In third level menu, if the parameter displayed is not in flashing, it means that this function code is unable to be revised. Probably the reasons are: (1) This function code parameter is unmodifiable, such as actual detected state parameter, record running parameter, etc.
- Page 57 -P0- 2.3.4.5 2.3.0.5 2.3.0.5 2.0.0.5 ►► ►► ENTER ▲ ▲ DATA Press confirmation key to enter programming Switch to the Increase to 3 Switch to the second Increase to 4 state after authentication third bit Fig. 4-10 Example of password authentication operation E、Inquiring fault related parameter:...
- Page 58 increase from unit’s digit again. ▼ (3) As press key and hold it, LED begins to decrease from unit’s digit to ten’s digit , and ▼ then to hundred’s digit. If release ▼ key and then press key again, LED will decrease from unit’s digit again.
- Page 59 After inspecting cable connection and power source for sure, switch on inverter input AC power switch. The inverter’s LED on control panel will display dynamic start menu. When it displays set frequency, it means initialization has been completed.: Fig. 4-12 Inverter first power applied operation process...
- Page 60 Chapter 5 Function Code Table 5.1 The symbols in the function code table are described as follows “○”: The parameter can be modified when the AC drive is in either stop or running state. “×”: The parameter can not be modified when the AC drive is in the running state. “* ”: The parameter is factory parameter and can not be modified.
- Page 61 GND) 5:Pulse setting 6:Multi-reference 7:Simple PLC 8:PID 9:485 communication P0.07lower limit frequency ~ P0.02 Preset frequency 0.01HZ 50.00HZ ○ P0.06 upper limit frequency P0.03 Command source 0:Operation panel control ○ selection (LED off) 1:Terminal control(LED on) 2:Communication control(LED blinking) P0.04 Rotation direction 0:Same direction ○...
- Page 62 limit offset frequency (P0.05) P0.10 Carrier frequency 0.5KHZ~16.0KHZ 0.1KHZ Model ○ dependent P0.11 Carrier frequency 0:No 1:Yes ○ adjustment with temperature P0.12 Acceleration time 1 0.1~6000.0s 0.1s Model ○ dependent P0.13 Deceleration time 1 0.1~6000.0s 0.1s Model ○ dependent Acceleration/ 0:1s ×...
- Page 63 P0.19 Frequency source Unit’s digit:(Frequency ○ selection spurce selection) 0:Main frequency source 1 1:1 and 2 operation (operation relationship determined by ten’s digit) 2:Switchover between 1 and 3:Switchover between 1 and “1 and 2 operation” 4:Switchover between 2 and “1 and 2 operation” Ten’s digit (1 and 2 operation relationship) 0:1+2...
- Page 64 P0.23 Base frequency for 0: Running frequency × UP/DOWN 1:Set frequency modification during running P0.24 Binding command Unit’s digit (binding operation 0001 0000 ○ source to frequency panel command to frequency source source) 0:No binding 1: Frequency source by digital setting 2:VI setting(VI-GND)...
- Page 65 2:P type dependent P0.26 Motor parameter 0:Motor parameter group 1 × group selection 1:Motor parameter group 2 2:Motor parameter group 3 3:Motor parameter group 4 P0.27 Serial 0:MODBUS protocol × communication protocol Group P1: Start/Stop Parameter Function Parameter Name Setting Range Minimu Default Property...
- Page 66 stop DC braking frequency P1.07 Waiting time of stop 0.0~100.0s 0.1s 0.0s ○ DC braking P1.08 Stop DC braking 0.0~100.0s 0.1s 0.0s ○ time P1.09 Stop DC braking 0%~100% 1% 0% ○ current P1.10 Brake use ratio 0%~100% 100% ○ P1.11 Rotational speed 0:From frequency at stop...
- Page 67 quency P2.01 JOG acceleratio 0.1~6500.0s 0.1s Model ○ n time dependent P2.02 JOG deceleratio 0.1~6500.0s 0.1s Model ○ n time dependent P2.03 Acceleration tim 0.1~6500.0s Model ○ dependent P2.04 Deceleration tim 0.1~6500.0s Model ○ dependent P2.05 Acceleration tim 0.1~6500.0s Model ○...
- Page 68 P2.14 Running mode 0:Run at frequency lower ○ when set limit frequency lower 1:Stop than frequency 2:Run at zero speed lower limit P2.15 Drop control 0.00HZ~10.00HZ 0.01HZ 0.00HZ ○ P2.16 Accumulative 0h~65000h ○ power-on time threshold P2.17 Accumulative 0h~65000h ○ running time threshold P2.18...
- Page 69 /deceleration P2.23 Frequency 0.00Hz to maximum frequency 0.01Hz 0.00HZ ○ switchover point between acceleration time 1 and acceleration time P2.24 Frequency 0.00Hz to maximum frequency 0.01Hz 0.00HZ ○ switchover point between deceleration time 1 and deceleration time P2.25 Terminal JOG 0:Disabled 1:Enabled ○...
- Page 70 P2.29 Any frequency 0.0%~100.0% ( maximum 0.1% 0.0% ○ reaching frequency) detection amplitude 1 P2.30 Any frequency 0.00Hz to maximum frequency 0.01HZ 50.00Hz ○ reaching detection value 2 P2.31 Any frequency 0.0%~100.0% ( maximum 0.1% 0.0% ○ reaching frequency) detection amplitude 2 P2.32 Zero current...
- Page 71 amplitude P2.38 Any current 0.0 %~300.0 %(100.0% rated 0.1% 100.0 % ○ reaching 2 motor current) P2.39 Any current 0.0 %~300.0 %(100.0% rated 0.1% 0.0 % ○ reaching 2 motor current) amplitude P2.40 Timing function 0:Disabled 1:Enabled ○ P2.41 Timing duration 0: P2.42 setting ○...
- Page 72 time P2.51 Current running 0.0~6500.0Min 0.1Min 0.0Min ○ time reached Group P3 : Input Terminals Function Parameter Name Setting Range Minimum Default Property Code Unit × P3.00 X1 function 0:No function selection 1:Forward RUN (FWD) 2:Reverse RUN (REV) 3:Three-line control 4:Forward JOG (FJOG) 5:Reverse JOG (RJOG) 6:Terminal UP...
- Page 73 16:Terminal 1 for acceleration /deceleration time selection 17:Terminal 2 for acceleration /deceleration time selection 18:Frequency source switchover 19:UP/DOWN setting clear (terminal, operation panel) 20:Command source switchover 1 21: Acceleration/Deceleration prohibited 22:PID pause 23:PLC status reset 24:Swing pause 25:Counter input 26:Counter reset 27:Length count input 28:Length reset 29:Torque control...
- Page 74 32:Immediate DC braking 33:Normally closed(NC)input of external fault 34:Frequency modification forbidden 35:Reverse PID action direction 36:External STOP terminal 37:Command source switchover terminal 2 38:PID integral pause 39:Switchover between main frequency source X and preset frequency 40:Switchover between main frequency source Y and preset frequency 41:Motor selection terminal 1...
- Page 75 control switchover 47:Emergency stop 48:External STOP terminal 49:Deceleration DC braking 50:Clear the current running time 51:Switchover between two-line mode and three-line mode 52:Reverse forbidden 53~59:Reserved P3.01 X2 function Same as above × selection P3.02 X3 function Same as above × selection P3.03 X4 function...
- Page 76 P3.08 X9 function Reserved × selection P3.09 X10 function Reserved × selection P3.10 VI function 0~59 × selection(DI) P3.11 CI function 0~59 × selection(DI) P3.13 Terminal filter time 0.000S~1.000S 0.010S × P3.14 Terminal command 0:Two-line mode 1 ○ mode 1:Two-line mode 2 2:Three –line mode 1 3:Three –line mode 2 0.001HZ/S ~...
- Page 77 minimum input P3.18 ~ +10.00V P3.23 CI maximum input 0.01V 10.00V ○ -100.0% ~ +100.0% P3.24 Corresponding 0.01Hz 100.0% ○ setting of CI maximum input 0.00S ~ 10.00S P3.25 CI filter time 0.01S 0.10S ○ 0.00KHZ ~ P3.30 P3.31 Pulse minimum 0.01V 0.00KH ○...
- Page 78 5:Curve 5(4 points,see PF.28~PF.35) Ten’s digit:CI curve selection,same as VI P3.37 Unit’s digit:setting for VI ○ Setting for AI less less than minimum input than minimum 0:Minimum value input 1:0.0% Ten’s digit:setting for CI less than minimum input 0.0S ~ 3600.0S P3.38 X1 delay time 0.1S...
- Page 79 P3.43 AI as valid status 0:High level valid × selection of DI 1:Low level valid Unit’s digit:VI Ten’s digit:CI Group P4: Output Terminals Function Parameter Setting Range Minimum Default Property Code Name Unit P4.00 FM terminal 0:Pulse output (FMP) ○ output mode 1:Switch signal output(FMR)...
- Page 80 P4.05 DO2 function 10:Length reached ○ selection 11:PLC cycle complete (Reserved) 12:Accumulative running time reached 13: Frequency limited 14:Torque limited 15:Ready for RUN 16:VI > CI 17: Frequency upper limit reached 18:Frequency lower limit reached 19:Under voltage state output 20:Communication setting 21:Positioning complete 22:Positioning approach 23 :...
- Page 81 P4.06 FMP function 0:Running frequency ○ selection 1:Set frequency 2:Output current 3:Output torque P4.07 AO1 function 4:Output power selection 5:Output voltage 6:Pulse input(100.0% at P4.08 AO2 function 100.0KHZ) selection 7:VI 8:CI 10:Length 11:Count value 12:Communication setting 13:Motor rotational speed 14:Output current(100.0% at 1000.0A)...
- Page 82 -10.00 ~ +10.00 P4.13 AO2 gain 0.01 1.00 ○ 0.0S ~ 3600.0S P4.14 FMR output 0.1s 0.0s ○ delay time 0.0S ~ 3600.0S P4.15 Relay 1 output 0.1s 0.0s ○ delay time 0.0S ~ 3600.0S P4.16 Relay 2 output 0.1s 0.0s ○...
- Page 83 8:1.8-power V/F 9: Reserved 10:V/F complete separation 11:V/F half separation P5.01 Torque boost 0.0%(fixed torque boost) Model ○ 0.1% ~ 30.0% depende P5.02 Cut-off frequency 0.00HZ to maximum output 0.01HZ 50.00HZ × of torque boost frequency 0.00HZ ~ P5.05 P5.03 Multi-point V/F 0.01HZ 0.00HZ...
- Page 84 suppression gain depende P5.13 Voltage source 0:Digital setting ○ for V/F 1:VI separation 2:CI 4:Pulse setting 5:Multi-reference 6:Simple PLC 7:PID 8:Communication setting (100.0% corresponds to the rated motor voltage) P5.14 Voltage digital 0V to rated motor voltage ○ setting for V/F separation 0.0S ~...
- Page 85 0.0% ~100.0% P6.01 PID digital ○ setting P6.02 PID feedback 0:VI ○ source 1:CI 3:VI-CI 4:Pulse setting 5:Communication setting 6:VI+CI 7:MAX(|VI|+|CI|) 8:MIN(|VI|,|CI|) P6.03 PID action 0:Forward action ○ direction 1:Reverse action 0 ~ 65535 P6.04 PID setting 1000 ○ feedback range 0.0 ~...
- Page 86 change time 0.00 ~ 60.00S P6.12 PID feedback 0.01S 0.00S ○ filter time 0.00 ~ 60.00S P6.13 PID output filter 0.01S 0.00S ○ time P6.14 Reserved ○ 0.0 ~ 100.0 P6.15 Proportional gain 20.0 ○ 0.01S ~ 10.00S P6.16 Integral time TI2 0.01 2.00S ○...
- Page 87 deviation between two PID outputs in forward direction 0.00% ~ 100.00% P6.24 Maximum 0.01% 1.00% ○ deviation between two PID outputs in reverse direction P6.25 PID integral Unit’s digit:Integral 00~11 ○ property separated 0:Invalid 1:Valid Ten’s digit:whether to stop integral operation when the output reaches the limit 0:Continue integral operation 1:Stop integral operation...
- Page 88 Group P7: Operation Panel and Display Function Parameter Setting Range Minimum Default Property Code Name Unit P7.00 REV key 0:RVE key disabled ○ 1 : Switchover between function selection operation panel control and remote command control(terminal or communication) 2:Switchover between forward rotation and reverse rotation 3:Forward JOG...
- Page 89 P7.02 LED display 0000~FFFF 001F ○ running Bit00: Running frequency parameters 1 1(Hz) Bit01: Set frequency (Hz) Bit02: Bus voltage(V) Bit03: Output voltage(V) Bit04: Output current(A) Bit05: Output power(KW) Bit06: Output torque (%) Bit07:DI input status Bit08:DO output status Bit09:A/1 voltage(V) Bit10:A/2 voltage(V) Bit11:A/3 voltage(V) Bit12: Count value...
- Page 90 correction(V) Bit06:A/2 voltage before correction(V) Bit07:A/3 voltage before correction(V) Bit08: Linear speed Bit09: Current power-on time(Hour) Bit10: Current running time(Min) Bit11: Pulse setting frequency(kHZ) Bit12: Communication setting value Bit13: Encoder feedback speed Bit14: Main frequency X display(HZ) Bit15: Auxiliary frequency Y display(HZ)...
- Page 91 Bit06:A/3 voltage(V) Bit07: Count value Bit08: Length value Bit09:PLC stage Bit10: Load speed Bit11:PID setting Bit12:Pulse setting frequency(kHZ) P7.05 Load speed 0.0001~6.5000 0.0001 1.0000 ○ display coefficient P7.06 Heatsink 0.0℃~100.0℃ temperature of inverter module P7.07 Product number 0.00~10.00 0.01 P7.08 Accumulative 0H~65535h running time...
- Page 92 Ten’s digit:U0-19/U0-29 number of decimal places 1:1 decimal place 2:2 decimal place 0 ~ 65535h P7.12 Accumulative power-on time 0 ~ 65535kwh P7.13 Accumulative power consumption Group P8: Motor Parameters Function Parameter Setting Range Minimum Default Propert Code Name Unit P8.00 Motor type 0:Common asynchronous...
- Page 93 rotational speed dependent P8.06 Stator resistance 0.001Ω~65.535Ω(AC 0.001Ω Tuning × (asynchronous power≤55KW) parameter motor) 0.0001Ω~6.5535Ω(AC power≥55KW) P8.07 Rotor resistance 0.001Ω~65.535Ω(AC 0.001Ω Tuning × (asynchronous power≤55KW) parameter motor) 0.0001Ω~6.5535Ω(AC power≥55KW) P8.08 Leakage 0.01mH~655.35mH(AC 0.01mH Tuning × inductive power≤55KW) parameter reactance 0.001mH~65.535mH(AC (asynchronous power≥55KW) motor)
- Page 94 3: SIN/COS encoder 4:Wire-saving UVW encoder P8.29 Reserved P8.30 A,B phase 0:Forward × sequence of ABZ 1:Reverse incremental encoder P8.31 Encoder 0.0~359.9° 0.1° × installation angle P8.32 U,V,W phase 0:Forward × sequence of 1:Reverse UVW encoder P8.33 UVW encoder 0.0~359.9° 0.1°...
- Page 95 P9.01 Speed loop 1~100 ○ proportional gain P9.02 Speed loop 0.01s~10.00s 0.01s 0.50S ○ integral time1 P9.03 Switchover 0.00~P9.06 0.01Hz 5.00HZ ○ frequency 1 P9.04 Speed loop 1~100 ○ proportional gain P9.05 Speed loop 0.01s~10.00s 0.01s 1.00s ○ integral time 2 P9.06 Switchover P9.02~to maximum output...
- Page 96 7:MAX(VI,CI) P9.11 Digital setting of 0.0%~200.0% 0.001 150.0% ○ torque upper limit in speed control mode P9.12 Torque upper 0: P9.13 setting ○ limit source in 1:VI speed 2:CI control(stop) 4:Pulse setting mode 5:Communication setting 6:MIN(VI,CI) 7:MAX(VI,CI) P9.13 Digital setting of 0.0%~200.0% 0.001 150.0%...
- Page 97 P9.17 Torque 0~60000 1300 ○ adjustment integral gain P9.18 Speed loop Unit’s digit:integral ○ integral property separation 0:Disabled 1:Enabled P9.24 Driving torque 0:Digital setting1(P9.26) × upper limit 1:VI source 2:CI 4:Pulse setting 5:Communication setting 6:MIN(VI, CI) 7:MAX(VI, CI) P9.25 Reserved P9.26 Digital setting of -200.0%~200.0%...
- Page 98 frequency in torque control mode P9.30 Acceleration 0.00s~65000s 0.01s 0.00s ○ time of torque control P9.31 Deceleration 0.00s~65000s 0.01s 0.00s ○ time of torque control Group PA: Fault and Protection Function Parameter Setting Range Minimum Default Property Code Name Unit PA.00 Motor overload 0: Disabled...
- Page 99 gain PA.06 Over current stall 100%~200% 150% ○ protective current PA.07 Short-circuit to 0:Disabled ○ ground upon 1:Enabled power-on PA.09 Fault auto reset 0~20 ○ times PA.10 DO action during 0:Not act ○ fault auto reset 1:Act PA.11 Time interval of 0.1s~100.0s 1.0s ○...
- Page 100 PA.16 3rd (latest) fault acceleration(E-01) type 2:Over current during deceleration(E-02) 3:Over current at constant speed(E-03) 4:Over voltage during acceleration(E-04) 5:Over voltage during deceleration(E-05) 6:Over voltage at constant speed (E-06) 7:Contactor fault(E-07) 8:AC drive overheat(E- 08) 9:AC drive overload(E- 09) 10: Motor overload(E-10) 11:Under voltage(E-11)...
- Page 101 PA.17 Frequency upon fault PA.18 Current upon 3 fault PA.19 Bus voltage upon 3 fault PA.20 Input terminal status upon 3 fault PA.21 Output terminal status upon 3 fault PA.22 AC drive status upon 3 fault PA.23 Power-on time upon 3 fault PA.24 Running time...
- Page 102 PA.29 Output terminal status upon 2nd fault PA.30 AC drive status upon 2 fault PA.31 Power-on time upon 2 fault PA.32 Running time upon 2 fault PA.33 Frequency upon fault PA.34 Current upon 1 fault PA.35 Bus voltage upon 1 fault PA.36 Input terminal...
- Page 103 PA.43 Fault protection Unit’s digit:Motor overload 11111 00000 ○ action selection1 (E-11) 0:Coast to stop 1:Stop according to the stop mode 2:Continue to run Ten’s digit:Power output phase loss (E-12) Hundred’s digit:External equipment fault(E-15) Thousand’s digit: Communication fault (E-16) Ten thousand’s digit: EEPROM read-write fault (E- PA.44 Fault protection...
- Page 104 Accumulative power-on time reached(E-24) Ten thousand’s digit:Motor overheat (E-27) PA.45 Fault protection Unit’s digit:Too large speed 11111 00000 ○ action selection deviation (E-28) Ten’s digit:Motor over-speed (E-29) Hundred’s digit:Load becoming 0 (E-31) Thousand’s digit:PID feedback lost during running (E-34) Ten thousand’s digit: Reserved PA.46 Fault protection...
- Page 105 upon fault 3:Frequency lower limit 4:Backup frequency upon abnormality PA.51 Backup 0.0%~100.0%(100.0% to 0.001 100.0% ○ frequency upon maximum frequency) abnormality PA.53 Motor overheat 0℃~200℃ 1℃ 110℃ ○ protection threshold PA.54 Motor overheat 0℃~200℃ 1℃ 90℃ ○ warning threshold PA.55 Action selection 0:Invalid ○...
- Page 106 PA.59 Protection upon 0:Disabled ○ load becoming 0 1:Enabled PA.60 Detection level 0.0~100.0% 0.001 10.0% ○ of load becoming PA.61 Detection time of 0.0~60.0s 0.1s 1.0% ○ load becoming 0 PA.63 Over-speed 0.0%~50.0%(Maximum 0.1% 20.0% ○ detection value frequency) PA.64 Over-speed 0.0s:Not detected 0.001...
- Page 107 Pb.05 Multi-reference 5 -100.0%~100.0% 0.0% ○ Pb.06 Multi-reference 6 -100.0%~100.0% 0.0% ○ Pb.07 Multi-reference 7 -100.0%~100.0% 0.0% ○ Pb.08 Multi-reference 8 -100.0%~100.0% 0.0% ○ Pb.09 Multi-reference 9 -100.0%~100.0% 0.0% ○ Pb.10 Multi-reference -100.0%~100.0% 0.0% ○ Pb.11 Multi-reference -100.0%~100.0% 0.0% ○ Pb.12 Multi-reference -100.0%~100.0%...
- Page 108 Ten’s digit:Retentive upon stop 0:NO 1:YES Pb.18 Running time of 0.0s(h)~6553.5s(h) 0.0s(h) ○ simple PLC reference 0 Pb.19 Deceleration 0~3 ○ time of simple PLC reference 0 Pb.20 Running time of 0.0s(h)~6553.5s(h) 0.0s(h) ○ simple PLC reference 1 Pb.21 Deceleration 0~3 ○...
- Page 109 PLC reference 3 Pb.26 Running time of 0.0s(h)~6553.5s(h) 0.0s(h) ○ simple PLC reference 4 Pb.27 Deceleration 0~3 ○ time of simple PLC reference 4 Pb.28 Running time of 0.0s(h)~6553.5s(h) 0.0s(h) ○ simple PLC reference 5 Pb.29 Deceleration 0~3 ○ time of simple PLC reference 5 Pb.30 Running time of...
- Page 110 reference 8 Pb.35 Deceleration 0~3 ○ time of simple PLC reference 8 Pb.36 Running time of 0.0s(h)~6553.5s(h) 0.0s(h) ○ simple PLC reference 9 Pb.37 Deceleration 0~3 ○ time of simple PLC reference 9 Pb.38 Running time of 0.0s(h)~6553.5s(h) 0.0s(h) ○ simple PLC reference 10 Pb.39...
- Page 111 time of simple PLC reference Pb.44 Running time of 0.0s(h)~6553.5s(h) 0.0s(h) ○ simple PLC reference 13 Pb.45 Deceleration 0~3 ○ time of simple PLC reference Pb.46 Running time of 0.0s(h)~6553.5s(h) 0.0s(h) ○ simple PLC reference 14 Pb.47 Deceleration 0~3 ○ time of simple PLC reference Pb.48...
- Page 112 Pb.51 Multi-reference 0 0:Set by PB.00 ○ source 1:VI 2:CI 4:Pulse setting 5:PID 6:Set by preset frequency,modified via terminal UP/DOWN Group PC: Communication Parameters Function Parameter Setting Range Minimum Default Property Code Name Unit PC.00 Baud rate MODBUS baud rate: ○...
- Page 113 0 : Broadcast address ○ PC.02 Local address 1~247 (Valid for MODBUS、Profibus- DP、CANlink) PC.03 Response delay 0~20ms(Valid for ○ MODBUS) 0.1s ○ PC.04 Communication 0.0:Invalid timeout 0.1:~60.0s ○ PC.05 Modbus protocol MODBUS: data format 0:Non-standard Modbus protocol 1:Standard Modbus protocol Group Pd: Function Code Management Function Parameter...
- Page 114 0:Not display 1:Display Pd.03 Individualized 0、Display basic group; ○ parameter 1、Switchover to user-defined display selection parameter display by press M 2、Switchover to user-modified parameter display by press M Pd.04 Parameter 0:Modifiable ○ modification 1:Not modifiable property Group PE: Swing Frequency, Fixed Length and Count Function Parameter Setting Range...
- Page 115 PE.05 Set length 0m~65535m 1000m ○ PE.06 Actual length 0m~65535m ○ PE.07 Number of pulse 0.1~6553.5 100.0 ○ per meter PE.08 Set count value 1~65535 1000 ○ PE.09 Designated 1~65535 1000 ○ count value Group PF: AIAO Correction and AI Curve Setting Function Parameter Setting Range...
- Page 116 PF.12 AO1 target 0.500V~4.000V 0.001V 2.000V ○ voltage 1 PF.13 AO1 measured 0.500V~4.000V 0.001V 2.000V ○ voltage 1 PF.14 AO1 target 6.000V~9.999V 0.001V 8.000V ○ voltage 2 PF.15 AO1 measured 6.000V~9.999V 0.001V 8.000V ○ voltage 2 PF.16 AO2 target 0.500V~4.000V 0.001V 2.000V ○...
- Page 117 1 input PF.24 AI curve 4 PF.22~PF.26 0.01V 6.00V ○ inflexion 2 input PF.25 Corresponding -100.0%~+100.0% 0.001 60.0% ○ setting of AI curve 4 inflexion 2 input PF.26 AI curve 4 PF.26~+10.00V 0.01V 10.00V ○ maximum input PF.27 Corresponding -100.0%~+100.0% 0.001 100.0% ○...
- Page 118 PF.33 Corresponding -100.0%~+100.0% 0.001 30.0% ○ setting of AI curve 5 inflexion 2 input PF.34 AI curve 5 PF.32~+10.00V 0.01V 10.00V ○ maximum input PF.35 Corresponding -100.0%~+100.0% 0.001 100.0% ○ setting of AI curve 5 maximum input PF.36 Jump point of VI -100.0%~100.0% 0.001 ○...
- Page 119 Function Parameter Setting Range Minimum Default Property Code Name Unit E0.00 User-defined P0.01~PE.xx P0.01 ○ function code 0 E0.01 User-defined P0.01~PE.xx P0.02 ○ function code 1 …… …… …… …… …… ○ E0.06 User-defined P0.01~PE.xx P0.18 ○ function code 6 E0.07~...
- Page 120 VI voltage (V) 0.00V~10.00V b0.09 0.01V 7009H 0.00V~10.00V b0.10 0.01V/0.01mA 700AH voltage ( V ) /current (mA) 0~65535 b0.12 Count value 700CH 0~65535 b0.13 Length value 700DH 0.00Hz~P0.05Hz b0.14 Load speed display 700EH 0~65535 b0.15 PID setting 700FH 0.00~300.00kHz b0.16 PID feedback 7010H 0~65535...
- Page 121 setting value 0.00Hz~P0.02Hz b0.29 Encoder feedback 0.01Hz 701DH speed 0.00Hz~P0.02Hz b0.30 Main frequency X 0.01Hz 701EH 0V~380V b0.31 Auxiliary frequency Y 0.01Hz 701FH 0V~380V b0.32 Viewing any register 7020H address value 0.0~6553.5 b0.34 Motor temperature 1℃ 7022H 0.0~6553.5 b0.35 Target torque(%) 0.1% 7023H 0.0~300.0kHz...
- Page 122 Chapter 6 Description of Function Codes 6.1 Basic Parameters(Group P0) P0.00 Control Mode Setting Range:0~2 0:V/F Control:It is applicable to applications with low load requirements or applications where one AC drive operates multiple motors, such as fan and pump. 1:Sensorless flux vector control (SFVC) :It indicates open-loop vector control, and is applicable to high-performance control applications such as machine tool, centrifuge, wire drawing machine and injection molding machine.
- Page 123 P3.31 to P3.34. 6 : Multi-reference. In multi-reference mode, combinations of different DI terminal states correspond to different set frequencies. The DGI900 supports a maximum of 16 speeds implemented by 16 state combinations of four DI terminals (allocated with functions 12 to 15) in Group Pb.
- Page 124 If the frequency source is digital setting (P0.01=0、 1), the value of P0.02 is the initial frequency of the AC drive. P0.03 Command source selection Setting Range:0、 1、 2 0 : Operation panel control. Using operation keyboard FWD 、 STOP/RESET 、 JOG to startup/stop.
- Page 125 Frequency lower limit P0.07 Setting Range: AC drive 0Hz~P0.06Hz dependent Source of frequency P0.08 Setting Range: upper limit 0~5 It is used to set the source of the frequency upper limit,including 0 : set by P0.02 ; 1 : V1 ; 2 : CI ; 4 : X5 Pulse setting ; 5 : Communication setting.
- Page 126 "Acceleration/Deceleration base frequency" (P0.05), that is, t1 in Figure 6-1. Deceleration time indicates the time required by the AC drive to decelerate from "Acceleration/Deceleration base frequency" (P0.05) to 0 Hz, that is, t2 in Figure 6-1. The DGI900 provides totally four groups of acceleration/deceleration time for selection. You...
- Page 127 0: 1s; 1: 0.1s 2: 0.01s satisfy requirements different applications, DGI900 provides three acceleration/deceleration time units, 1s, 0.1s and 0.01s NOTE : Modifying this parameter will make the displayed decimal places change and ponding acceleration/deceleration time also change.
- Page 128 time base frequency 0 : Maximum frequency ( P0.05 ) ; 1 : Set frequency ; 2 : 100.00Hz Auxiliary frequency source 2 P0.16 Setting Range:0~9 selection s P0.01(Main frequency source 1 selection) The same a Range of auxiliary frequency P0.17 Setting Range:0~1 2 for 1 and 2 operation...
- Page 129 4:Switchover between 2 and "1 and 2 operation" Ten’s digit (1 and 2 operation relationship) 0:1+2 1:1-2 2:Maximum 3:Minimum Frequency offset of auxiliary P0.20 Setting Range 0.00 frequency source for 1 and 2 operation 0.00Hz~Maximum frequency This parameter is valid only when the frequency source is set to "1 and 2 operation". The final frequency is obtained by adding the frequency offset set in this parameter to the 1 and results.
- Page 130 ▲and▼ or the terminal UP/DOWN function is cleared. : Retentive” : If P0-22 is set to 1, the digital setting frequency value is the set “ frequency at the moment when the AC drive stops. The modification by using keys ▲ and ▼...
- Page 131 Motor parameter group Setting Range:0~3 selection The DGI900 can drive four motors at different time. You can set the motor nameplate parameters respectively, independent motor auto-tuning, different control modes, and parameters related to running performance respectively for the four motors.
- Page 132 Serial communication P0.27 Setting Range:0~0 protocol DGI900 supports 0:MODBUS. 6.2 Start/Stop Control(Group P1) P1.00 Start mode Setting Range:0~2 0:Direct start – If the DC braking time is set to 0, the AC drive starts to run at the startup frequency.
- Page 133 – If the pre-excited time is not 0, the AC drive pre-excites first before startup, improving the dynamic response of the motor. P1.01 Startup frequency Setting Range:0.00~ 0.00 10.00Hz P1.02 Startup frequency holding Setting Range:0. 0~100.0s time To ensure the motor torque at AC drive startup, set a proper startup frequency. In addition, to build excitation when the motor starts up, the startup frequency must be held for a certain period.
- Page 134 Startup DC braking is valid only for direct start (P1.00 = 0). In this case, the AC drive performs DC braking at the set startup DC braking current. After the startup DC braking time, the AC drive starts to run. If the startup DC braking time is 0, the AC drive starts directly without DC braking.
- Page 135 braking 100.0s P1.08 Stop DC braking time Setting Range:0.0s~ 100.0s P1.09 Stop DC braking current Setting Range:0%~100% P1.06:During the process of decelerating to stop, the AC drive starts DC braking when the running frequency is lower than the value set in P1.06. P1.07:When the running frequency decreases to the initial frequency of stop DC braking, the AC drive stops output for a certain period and then starts DC braking.
- Page 136 Figure 6-2 Stop DC braking process Rotational speed tracking P1.11 Setting Range:0~2 mode 0:From frequency at stop - It is the commonly selected mode. 1:From zero frequency- It is applicable to restart after a long time of power failure. From the maximum frequency - It is applicable to the power- 2 :...
- Page 137 0: Linear acceleration/deceleration. The output frequency increases or decreases in linear mode,showing in figure 6-3. 1: S-curve acceleration/deceleration. The output frequency increases or decreases along the S curve, showing in figure 6-4. Figure 6-4 Figure 6-3 Time proportion of S- P1.14 Setting Range:10.0%~50.0%...
- Page 138 deceleration. NOTE: S-curve acceleration/deceleration suitable for startup/stop of elevator, conveyor, etc. 6.3 Auxiliary Functions(Group P2) P2.00 JOG running frequency Setting Range:0.10~50.00Hz 5.00Hz P2.01 JOG acceleration time Setting Range:0.1~60.0S 20.0S P2.02 JOG deceleration time Setting Range:0.1~60.0S 20.0S JOG acceleration time means the running time of AC drive from 0Hz to upper limit frequency.
- Page 139 Setting the jump frequency helps to avoid the mechanical resonance point of the load. The DGI900 supports two jump frequencies. If both are set to 0, the frequency jump function is disabled. The principle of the jump frequencies and jump amplitude is shown in the...
- Page 140 0:Run at frequency lower limit;1:Stop;2:Run at zero speed It is used to set the AC drive running mode when the set frequency is lower than the imit. The DGI900 provides three running modes to frequency lower l satisfy requirements of various applications...
- Page 141 Drop control P2.15 Setting Range:0.00Hz~ 10.00Hz This function is used for balancing the workload allocation when multiple motors are used to drive the same load. The output frequency of the AC drives decreases as the load increases. You can reduce the workload of the motor under load by decreasing the output frequency for this motor, implementing workload balancing between multiple motors.
- Page 142 In addition, the AC drive does not respond to the run command valid upon fault reset of the AC drive. The run protection can be disabled only after the run command is cancelled. to run commands upon In this way, the motor can be protected from responding power-on or fault reset in unexpected conditions.
- Page 143 Detection range of P2.21 Setting Range:0.00~100% 0.0% frequency reached (maximum frequency) If the AC drive running frequency is within the certain range of the set frequency, the corresponding DO terminal becomes ON. This parameter is used to set the range within which the output frequency is detected to reach the set frequency.
- Page 144 The following figure 6-10 shows the diagram when the jump frequencies are valid during acceleration/deceleration. DGI900 provides two group parameters of any frequency reaching detection, setting frequency value and frequency reaching detection range respectively, shown in the figure 6-...
- Page 145 Figure 6-10 Diagram when the jump frequencies are valid during acceleration/deceleration Figure 6-11 Diagram of any frequency reaching detection Frequency switchover point P2.23 Setting Range:0.00Hz~ 0.00Hz between acceleration time 1 and acceleration time 2 maximum frequency Frequency switchover point P2.24 Setting Range:0.00Hz~...
- Page 146 This function is valid when motor 1 is selected and acceleration/deceleration time switchover is not performed by means of DI terminal. It is used to select different groups of acceleration/deceleration time based on the running frequency range rather than DI terminal during the running process of the AC drive.
- Page 147 If terminal JOG is preferred, the AC drive switches to terminal JOG running state when there is a terminal JOG command during the running process of the AC drive. Frequency detection value P2.26 Setting Range:0.00Hz~ 50.00Hz (FDT2) maximum frequency Frequency detection P2.27 0.0%~100.0% 0.5%...
- Page 148 and the duration exceeds the zero current detection delay time, the corresponding DO becomes ON. The zero current detection is shown in the following figure 6-13. Figure 6-13 Zero current detection Output overcurrent P2.34 Setting Range: 5.0% threshold 0.0%~300.0% Output overcurrent P2.35 Setting Range:...
- Page 149 Figure 6-14 Output over current detection Any current reaching 1 P2.36 Setting Range: 100.0% 0.0%~300.0% (rated motor current ) Any current reaching 1 P2.37 Setting Range: 0.0% amplitude 0.0%~300.0% (rated motor current ) Any current reaching 2 P2.38 Setting Range: 100.0% 0.0%~300.0% (rated motor current )
- Page 150 If the output current of the AC drive is within the positive and negative amplitudes of any current reaching detection value, the corresponding DO becomes ON. The DGI900 provides two groups of any current reaching detection parameters, including current detection value and detection amplitudes, as shown in the following figure6-15.
- Page 151 can be queried by b0.25. The timing duration is set in P2.41 and P2.42, in unit of minute. P2.41 Timing duration selection: 0:P2.41 setting;1:VI;2:CI;; VI input voltage lower limit P2.43 Setting Range: 3.1V 0.00V~P2.44 VI input voltage upper P2.44 Setting Range: 6.8V limit P2.43~10.00V...
- Page 152 temperature is lower than 40°C. If this parameter is set to 1, the cooling fan keeps working after power-on. Wakeup frequency P2.47 Setting Range: 0.00Hz Dormant frequency(P2.49)~P0.05 Wakeup delay time P2.48 Setting Range: 0.0s 0.0s~6500.0s Dormant frequency P2.49 Setting Range: 0.00Hz~Wakeup frequency(P2.47) Dormant delay time...
- Page 153 are disabled. When the dormant function is enabled, if the frequency source is PID, whether PID operation is performed in the dormant state is determined by P6.28. In this case, select PID operation enabled in the stop state (P6.28 = 1). Current running time P2.51 Setting Range:...
- Page 154 Value Value Function Function No function Forward RUN (FWD) Reverse RUN (REV) Three-line control Forward JOG (FJOG) Reverse JOG (RJOG) Terminal UP Terminal DOWN Coast to stop(FRS) Fault reset RUN pause Normally open(NO) input of external fault Mulit-reference terminal 1 Mulit-reference terminal 2 Mulit-reference terminal 3 Mulit-reference terminal 4...
- Page 155 Reserved PID parameter switchover User-defined fault 1 User-defined fault 2 Reserved Reserved External STOP terminal 2 Deceleration DC braking Clear the current running time Description of the functions shown in table 6-1: 1~2 : Forward/Reverse terminals The terminal is used to control forward or reverse RUN of the AC drive. 3: Three-line control The terminal determines three-line control of the AC drive.
- Page 156 It is the same as coast to stop described in P1.05. 9:Fault reset (RESET) The terminal is used for fault reset function, the same as the function of RESET key on the operation panel. Remote fault reset is implemented by this function. 10:RUN pause The AC drive decelerates to stop, but the running parameters are all memorized, such as PLC, swing frequency and PID parameters.
- Page 157 Reference 5 Pb.05 Reference 6 Pb.06 Reference 7 Pb.07 Reference 8 Pb.08 Reference 9 Pb.09 Reference 10 Pb.10 Reference 11 Pb.11 Reference 12 Pb.12 Reference 13 Pb.13 Reference 14 Pb.14 Reference 15 Pb.15 If the frequency source is multi-reference, the value 100% of Pb.00 to Pb.15 corresponds to the value of P0.05 (Maximum frequency).
- Page 158 16~17:Acceleration/Deceleration time selection Two terminals for acceleration/deceleration time selection have four state combinations, as listed in the following table. Terminal 2 Terminal 1 Acceleration/Deceleration time selection Acceleration time 1/ Deceleration time 1 Acceleration time 2/ Deceleration time 2 Acceleration time 3/ Deceleration time 3 Acceleration time 4/ Deceleration time 4 Table 6-2 Acceleration/Deceleration time selection 18:Frequency source switchover...
- Page 159 21:Acceleration/Deceleration prohibited It enables the AC drive to maintain the current frequency output without being affected by external signals (except the STOP command). 22:PID pause PID is invalid temporarily. The AC drive maintains the current frequency output without supporting PID adjustment of frequency source. 23:PLC status reset The terminal is used to restore the original status of PLC control for the AC drive when PLC control is started again after a pause.
- Page 160 After this terminal becomes ON, the AC drive directly switches over to the DC braking state. 33:Normally closed (NC) input of external fault 34:Frequency modification forbidden After this terminal becomes ON, the AC drive does not respond to any frequency modification.
- Page 161 40:Switchover between auxiliary frequency source Y and preset frequency After this terminal is enabled, the frequency source Y is replaced by the preset frequency set in P0.02. 43:PID parameter switchover If the PID parameters switchover performed by means of DI terminal (P6.18 = 1), the PID parameters are P6.05 to P6.07when the terminal becomes OFF;...
- Page 162 When this terminal becomes ON, the AC drive's current running time is cleared. This function must be supported by P2.40 and P2.41. P3.10 VI function selection(DI) Setting Range:0~50 P3.11 CI function selection(DI) Setting Range:0~50 The functions of these parameters are to use AI as DI. When AI is used as DI, the AI state is high level if the AI input voltage is 7 V or higher and is low level if the AI input voltage is 3V or lower.
- Page 163 Figure6-18 Relationship of AI input voltage and corresponding DI status P3.13 X filter time Setting Range: 0.010s 0.000s~1.000s e to It is used to set the software filter time of X terminal status. If DI terminals are liabl interference and may cause malfunction, increase the value of this parameter to enhance the anti-interference capability.
- Page 164 0:Two-line mode 1 K2K1 YX9000 Command00Stop01Forward RUN10Reverse RUN11Stop Figure 6-19 Two-line mode 1 1:Two-line mode 2 K2K1 YX9000 Command00Stop10Stop01Forward RUN11Reverse RUN Figure 6-20 Two-line mode 2 YX9000 2:Three-line mode 1 SB1:Stop button SB2:Forward button SB3: Reverse button Figure 6-21 Three-line...
- Page 165 3:Three-line mode 2 YX9000 Running SB1:Stop button 0Forward1Reverse direction SB2:Run button Figure 6-22 Three-line mode 2 When alarm to stop, if running command model chose NOTE : terminals valid and FWD/REV is in valid status, reset the fault, the AC drive will start at once. Terminal UP/DOWN rate P3.15 Setting Range:0.001Hz...
- Page 166 P3.16~+10.00v P3.19 Corresponding setting of VI Setting Range: 100.0% curve 1 maximum input -100.0%~+100.0% P3.20 VI filter time Setting Range: 0.10s 0.00s~10.00s P3.21 CI curve 1 minimum input Setting Range: 0.00V 0.00v~P3.23 P3.22 Corresponding setting of CI Setting Range: 0.0% curve 1 minimum input -100.0%~+100.0% P3.23...
- Page 167 When the analog input voltage exceeds the maximum value (P3.18), the maximum value is used. When the analog input voltage is less than the minimum value (P8.16), the value set in P3.36 (Setting for AI less than minimum input) is used. When the analog input is current input, 1 mA current corresponds to 0.5 V voltage.
- Page 168 Figure 6-23 Corresponding relationship between analog input and set values P3.36 VI curve selection Setting Range:333~ The unit's digit, ten's digit and hundred's digit of this parameter are respectively used to select the corresponding curve of VI and CI. Any of the five curves can be selected for VI and CI.
- Page 169 corresponding to P3.21 to P3.25, Curve 3 corresponding to P3.26 to P3.30. P3.37 Setting for VI less Setting Range:333~ than minimum input This parameter is used to determine the corresponding setting when the analog input voltage is less than the minimum value. The unit's digit, ten's digit and hundred's digit of this parameter respectively correspond to the setting for VI and CI.
- Page 170 P3.42 X valid mode Setting Range: 00000 Selection 2 00000~11111 P3.43 AI as valid status selection of X Setting Range:000~ 0:High level valid, 1:Low level valid. These parameters are used to set the valid mode of X terminals. The X terminal is valid when being connected with COM, and invalid when being disconnected from COM.
- Page 171 (FMR) . FMR function (open-collector P4.01 Setting Range:0~41 output terminal) Relay function(T/A-T/B-T/C) P4.02 Setting Range:0~41 Extension card relay P4.03 Setting Range:0~41 function(R/A-R/B-R/C) DO1 function selection (open- P4.04 Setting Range:0~41 collector output terminal) Extension card DO2 function P4.05 Setting Range:0~41 These five parameters are used to select the functions of the five digital output terminals. T/A-T/B-T/C and P/A-P/B-P/C are respectively the relays on the control board and the extension card.
- Page 172 Accumulative running time Zero-speed running 2 (having output at reached stop) Accumulative power-on time Frequency level detection FDT2 output Frequency 1 reached Frequency 2 reached Current 1 reached Current 2 reached Timing reached VI input limit exceeded Load becoming 0 Reverse running Zero current state Module temperature reached...
- Page 173 5:Zero-speed running(no output at stop) If the AC drive runs with the output frequency of 0, the terminal becomes ON. If the AC drive is in the stop state, the terminal becomes OFF. 6:Motor overload pre-warning The AC drive judges whether the motor load exceeds the overload pre-warning threshold before performing the protection action.
- Page 174 frequency of the AC drive reaches the upper limit or lower limit, the terminal becomes ON. 15:Ready for RUN If the AC drive main circuit and control circuit become stable, and the AC drive detects no fault and is ready for RUN, the terminal becomes ON. 16 :...
- Page 175 If the output frequency of the AC drive is 0, the terminal becomes ON. In the state of stop, the signal is still ON. 24:Accumulative power-on time reached If the AC drive accumulative power-on time exceeds the value set in P2.17, the terminal becomes ON.
- Page 176 34:Zero current state:Refer to the descriptions of P2.32 and P2.33. 35:Module temperature reached If the heat-sink temperature of the inverter module (P7.06) reaches the set module temperature threshold (P2.45), the terminal becomes ON. 36:Software current limit exceeded:Refer to the descriptions of P2.32 and P2.33 37:Frequency lower limit reached (having output at stop) If the running frequency reaches the lower limit, the terminal becomes ON.
- Page 177 The output pulse frequency of the FMP terminal ranges from 0.01 kHz to "Maximum FMP output frequency" (P5.09). The value of P5.09 is between 0.01 kHz and 100.00 kHz. The output range of AO1 and AO2 is 0–10 V or 0–20 mA. The relationship between pulse and analog output ranges and corresponding functions is listed in the following table.
- Page 178 Count value 0 to maximum count value Maximum FMP output Setting Range : P4.09 0.01kHz~ 50.00kHz frequency 100.00kHz If the FM terminal is used for pulse output, this parameter is used to set the maximum frequency of pulse output. AO1 offset coefficient P4.10 Setting Range:-100.0%~...
- Page 179 Relay1 output delay time P4.15 Setting Range:0.0s~3600.0s 0.0s Relay2 output delay time P4.16 Setting Range:0.0s~3600.0s 0.0s DO1 output delay time P4.17 Setting Range:0.0s~3600.0s 0.0s DO2 output delay time P4.18 Setting Range:0.0s~3600.0s 0.0s These parameters are used to set the delay time of output terminals FM, relay 1, relay 2, DO1 and DO2 from status change to actual output.
- Page 180 2:Square V/F:It is applicable to centrifugal loads such as fan and pump. 10:V/F complete separation :In this mode, the output frequency and output voltage of the AC drive are independent. The output frequency is determined by the frequency source, and the output voltage is determined by "Voltage source for V/F separation" (PA.13).It is applicable to induction heating, inverse power supply and torque motor control.
- Page 182 Figure 6-24 Manual torque boost Cut-off frequency of P5.02 Setting Range:0.00 Hz to torque boost maximum output frequency This parameter defines the cut-off freqency of torque boost, see Fz in figure 6-24, this cut-off frequency suitable for any V/F curve in P5.00.
- Page 183 It can compensate the rotational speed slip of the asynchronous motor when the load of the motor increases, stabilizing the motor speed in case of load change. If this parameter is set to 100%, it indicates that the compensation when the motor bears rated load is the rated motor slip.
- Page 184 When the oscillation suppression function is enabled, the rated motor current and no-load current must be correct. Otherwise, the V/F oscillation suppression effect will not be satisfactory. Voltage source for V/F P5.13 Setting Range:0~8 Model separation dependent P5.00 setting to 10 or 11:the function is valid when V/F separation. 0:Digital setting(PA.13):The output voltage is set directly by PA.13.
- Page 185 8、Communication setting The output voltage is set by the host computer by means of communication. The voltage source for V/F separation is set in the same way as the frequency source. For details, see P0.01. 100.0% of the setting in each mode corresponds to the rated motor voltage. If the corresponding value is negative, its absolute value is used.
- Page 186 Figure 6-26 Principle block diagram of PID control Setting Range : 0~5 P6.00 PID setting source P6.01 PID digital setting Setting Range: 0.0%~100.0% 0:P6.01 setting;1~2: VI、CI;4:Pulse setting(X5/HDI) 5:Communication setting P6.00 is used to select the channel of target process PID setting. The PID setting is a relative value and ranges from 0.0% to 100.0%.
- Page 187 0.00~60.00s 0:Forward action. When the feedback value is smaller than the PID setting, the AC drive's output frequency rises. For example, the winding tension control requires forward PID action. 1:Reverse action. When the feedback value is smaller than the PID setting, the AC drive's output frequency reduces.
- Page 188 It decides the regulating intensity of the PID regulator. The higher the Kp1 is, the larger the regulating intensity is. The value 100. 0 indicates when the deviation between PID feedback and PID setting is 100.0%, the adjustment amplitude of the PID regulator on the output frequency reference is the maximum frequency.
- Page 189 P6.09 PID deviation limit Setting Range: 0.01% 0. 0%~100.0% If the deviation between PID feedback and PID setting is smaller than the value of P6.09, PID control stops. The small deviation between PID feedback and PID setting will make the output frequency stabilize, effective for some closed-loop control applications.
- Page 190 slowing the response of the process closed-loop system. P6.13 is used to filter the PID output frequency, helping to weaken sudden change of the AC drive output frequency but slowing the response of the process closed-loop system. 【20.0】 P6.15 Proportional gain Kp2 Setting Range:0.0~100.0 Setting Range :...
- Page 191 feedback and PID setting is smaller than the value of P6.19, group 1 is selected. When the absolute value of the deviation between PID feedback and PID setting is higher than the value of P6.20, group 2 is selected. When the deviation is between P6.19 and P6.20, the PID parameters are the linear interpolated value of the two groups of parameter values.
- Page 192 【1.00%】 P6.24 Maximum deviation between two PID Setting Range: outputs in reverse direction 0.0%~100.0% This function is used to limit the deviation between two PID outputs (2 ms per PID output) to suppress the rapid change of PID output and stabilize the running of the AC drive. P6.23 and P6.24 respectively correspond to the maximum absolute value of the output deviation in forward direction and in reverse direction.
- Page 193 with function 38 "PID integral pause" is ON or not. Ten's digit : Whether to stop integral operation when the output reaches the limit ; 0 : Continue integral operation;1:Stop integral operation. If "Stop integral operation" is selected, the PID integral operation stops, which may help to reduce the PID overshoot.
- Page 194 1 : Switchover between operation panel control and remote command control. You can perform switchover from the current command source to the operation panel control (local operation). If the current command source(P0.03 ) is operation panel control, this key is invalid.。 2:Switchover between forward rotation and reverse rotation:You can change the direction of the frequency reference by using the REV key.
- Page 195 Figure6-29 P7.02 unit’s definition Figure6-30 P7.03 unit’s definition LED display stop parameter P7.04 Setting Range: 0x33 0x11111 ~0xFFFF Figure 6-31 P7.04 unit’s definition Load speed display coefficient P7.05 Setting Range: 1.0000 0.0001~6.5000...
- Page 196 This parameter is used to adjust the relationship between the output frequency of the AC drive and the load speed. For details, see the description of P7.11. Function Code Parameter Name Setting Heatsink temperature of P7.06 Setting Range: 0℃ inverter module 0.0℃~100℃...
- Page 197 If the AC drive is in the stop state, the load speed is the speed corresponding to the set frequency, namely, "set load speed". If the set frequency is 50.00 Hz, the load speed in the stop state is 50.00 x 2.000 = 100.00 (display of 2 decimal places). Accumulative power-on time Setting Range :...
- Page 198 maximum frequency dependent Rated motor rotational speed P8.05 Setting Range: Model 1–65535 RPM dependent Set the parameters according to the motor nameplate no matter whether V/F control or vector control is adopted. To achieve better V/F or vector control performance, motor auto- tuning is required.
- Page 199 0:ABZ incremental encoder;1:UVW incremental encoder;2:Resolver;3:SIN/COS encoder; 4:Wire-saving UVW encoder. The DGI900 supports multiple types of encoder. Different PG cards are required for different types of encoder. Select the appropriate PG card for the encoder used. Any of the five encoder types is applicable to synchronous motor. Only ABZ incremental encoder and resolver are applicable to asynchronous motor.
- Page 200 If a resolver is applied, set the number of pole pairs properly. P8.37 Auto-tuning selection Setting Range: 0~2 0:No auto-tuning 1:Asynchronous motor static auto-tuning It is applicable to scenarios where complete auto-tuning cannot be performed because the asynchronous motor cannot be disconnected from the load. Before performing static auto-tuning, properly set the motor type and motor nameplate parameters of P8.00 to P8.05 first.
- Page 201 Setting Range: 0~1 0:Speed control;1: Torque control The DGI900 provides X terminals with two torque related functions, function 29 (Torque control prohibited) and function 46 (Speed control/Torque control switchover). The two X terminals need to be used together with P9.00 to implement speed control/torque control switchover.
- Page 202 ASR Speed loop integral time Ti2 P9.05 Setting Range: 1.00s 0.01s~10.00s Switchover frequency 2 P9.06 Setting Range: 1000Hz P9.03 to maximum output frequency Speed loop PI parameters vary with running frequencies of the AC drive. If the running frequency is less than or equal to "Switchover frequency 1" (P9.03), the speed loop PI parameters are P9.01 and P9.02.
- Page 203 proportional gain and integral time of the speed regulator. To achieve a faster system response, increase the proportional gain and reduce the integral time. Be aware that this may lead to system oscillation. The recommended adjustment method is as follows: If the factory setting cannot meet the requirements, make proper adjustment.
- Page 204 If the value of this parameter is small, the output torque of the AC drive may fluctuate greatly, but the response is quick. Vector control over-excitation gain P9.09 Setting Range: 0~200 During deceleration of the AC drive, over-excitation control can restrain rise of the bus voltage to avoid the overvoltage fault.
- Page 205 When the AC drive is in communication with the master, the host computer writes data -100.00% 100.00% communication address 0x1000, where 100.0% corresponds to the value of P9.11. Excitation adjustment proportional gain P9.14 Setting Range: 0 2000 ~20000 Excitation adjustment integral gain P9.15 Setting Range: 0 2000...
- Page 206 P9.28 Forward maximum frequency in torque 0.00Hz to 50.00Hz control maximum frequency P9.29 Reverse maximum frequency 0.00Hz to 50.00Hz in torque control maximum frequency Two parameters are used to set the maximum frequency in forward or reverse rotation in torque control mode. In torque control, if the load torque is smaller than the motor output torque, the motor's rotational speed will rise continuously.
- Page 207 PA00 Motor overload protection selection Setting Range:0~1 0:Disabled The motor overload protective function is disabled. The motor is exposed to potential damage due to overheating. A thermal relay is suggested to be installed between the AC drive and the motor. 1:Enabled The AC drive judges whether the motor is overloaded according to the inverse time-lag curve of the motor overload protection.
- Page 208 warning is performed before motor overload. The larger the value is, the less advanced the pre-warning will be. When the accumulative output current of the AC drive is greater than the value of the overload inverse time-lag curve multiplied by PA.02, the DO terminal on the AC drive allocated with function 6 (Motor overload pre-warning) becomes ON.
- Page 209 Figure 6-33 over-voltage stall protection function PA.05 Overcurrent stall gain Setting Range:0~100 PA.06 Overcurrent stall protective current Setting Range:120%~150% 150% When the output current exceeds the overcurrent stall protective current during acceleration/deceleration of the AC drive, the AC drive stops acceleration/deceleration and keeps the present running frequency.
- Page 210 If the overcurrent stall gain is set to 0, the overcurrent stall function is disabled. PA.09 Fault auto reset times Setting Range:0~20 PA.10 DO action during fault auto reset Setting Range:0~1 PA.11 Time interval of fault auto reset Setting Range:0.1s~100.0s 1.0s It is used to set the times of fault auto resets if this function (PA.09) is used.
- Page 211 It is used to determine whether to perform output phase loss protection. 0:Disabled; 1:Enabled PA.14 1st fault type Setting Range:0~99 PA.15 2nd fault type Setting Range:0~99 PA.16 3rd (latest) fault type Setting Range:0~99 It is used to record the types of the most recent three faults of the AC drive.
- Page 212 If an X is ON, the setting is 1. If the X is OFF, the setting is 0. The value is the equivalent decimal number converted from the X status.. PA.21 displays the status of all output terminals when the latest fault occurs, the sequence is BIT4-DO2, BIT3-DO1, BIT2-REL2, BIT1-REL1, BIT0-FM.
- Page 213 action selection 4 00000~22222 PA.43 、 PA.44 、 PA.35 and PA.36 are used to stop the AC drive when fault occurs, setting range, 0:Coast to stop;1:Stop according to the stop mode;2:Continue to run. PA.43 Fault protection action selection 1 Unit's digit : Motor overload(E-11); Ten's digit: Power input phase loss(E-12) ; Hundred's digit: External equipment fault (E-15);Thousand's digit:Communication fault (E-16);Ten thousand's digit:EEPROM read-write fault (E-17) PA.44 Fault protection action selection 2...
- Page 214 If a fault occurs during the running of the AC drive and the handling of fault is set to "Continue to run", the AC drive displays A-** and continues to run at the frequency set in PA.50. Note: (**)content is confirmed by fault,for example if the fault is Power input phase loss (E-12), then the ac drive display A-12.
- Page 215 Upon instantaneous power failure or sudden voltage dip, the DC bus voltage of the AC drive reduces. This function enables the AC drive to compensate the DC bus voltage reduction with the load feedback energy by reducing the output frequency so as to keep the AC drive running continuously.
- Page 216 Figure 6-34 AC drive action diagram upon instantaneous power failure PA.59 Protection upon load becoming 0 Setting Range: 0~1 PA.60 Detection level of load becoming 0 Setting Range: 10.0% 0.0%~100.0% PA.61 Detection time of load becoming 0 Setting Range: 1.0s 0.0s~60.0s 0:Disabled;1:Enabled If protection upon load becoming 0 is enabled, when the output...
- Page 217 If PA.66 (Detection time of too large speed deviation) is 0.0s, this function is disabled. 6.12 Multi-Reference and Simple PLC Function(Group Pb) The DGI900 multi-reference has many functions. Besides multi- speed, it can be used as the setting source of the V/F separated voltage source and setting source of process PID.
- Page 218 As frequency source, it is a percentage relative to the maximum frequency. As V/F separated voltage source, it is a percentage relative to the rated motor voltage. As process PID setting source, it does not require conversion. Multi-reference can be switched over based on different states of X terminals.
- Page 219 Figure 6-35 Simple PLC when used as frequency source Pb.17 Simple PLC retentive selection Setting Range: 00~11 Unit's digit:Retentive upon power failure;0:NO;1:YES Ten's digit:Retentive upon stop;0:NO;1:YES PLC retentive upon power failure indicates that the AC drive memorizes the PLC running moment and running frequency before power failure and will continue to run from the memorized moment after it is powered on again.
- Page 220 Pb.19 Acceleration/deceleration time of Setting Range: 0~3 simple PLC reference 0 Pb.20~46 Running time of simple PLC Setting Range: 0.0s(h) (even) reference n 0.0s(h)~6553.5s(h) Pb.21~46 Acceleration/deceleration time of Setting Range: 0~3 (singular) simple PLC reference n P b.48 Running time of simple PLC Setting Range: 0.0s(h) reference 15...
- Page 221 0~5555 If it is set to any non-zero number, the password protection function is enabled. After a password has been set and taken effect, you must enter the correct password in order to enter the menu. If the entered password is incorrect you cannot view or modify parameters. If Pd.00 is set to 00000, the previously set user password is cleared, and the password protection function is disabled Restore default settings...
- Page 222 It is used to set whether the parameters are modifiable to avoid mal-function. If it is set to 0, all parameters are modifiable. If it is set to 1, all parameters can only be viewed. 6.15 Swing Frequency, Fixed Length and Count(Group PE) The swing frequency function is applied to the textile and chemical fiber fields and the applications where traversing and winding functions are required.
- Page 223 PE.00 Swing frequency setting mode Setting Range: 0~1 This parameter is used to select the base value of the swing amplitude. 0:Relative to the central frequency It is variable swing amplitude system. The swing amplitude varies with the central frequency (set frequency).
- Page 224 PE.03 Swing frequency cycle Setting Range: 0.0s~3000.0s 10.0s PE.04 Triangular wave rising time Setting Range: 0.0%~100.0% 50.0% coefficient PE.03 specifies the time of a complete swing frequency cycle. PE.04 specifies the time percentage of triangular wave rising time to PE.03 (Swing frequency cycle).
- Page 225 Allocate corresponding X terminal with function 27 (Length count input) in applications. If the pulse frequency is high, X5/HDI must be used. PE.08 Set count value Setting Range: 1~65535 1000 PE.09 Designated count value Setting Range: 1~65535 1000 The count value needs to be collected by X terminal. Allocate the corresponding X terminal with function 25 (Counter input) in applications.
- Page 226 0.500 V~4.000 V PF.01 VI displayed voltage 1 Setting Range: Factory-corrected 0.500 V~4.000 V PF.02 VI measured voltage 2 Setting Range: Factory-corrected 6.000V~9.999V PF.03 VI displayed voltage 2 Setting Range: Factory-corrected 6.000V~9.999V These parameters are used to correct the VI to eliminate the impact of AI zero offset and gain.
- Page 227 4) Send a voltage signal (approximately 8 V) to AI. 5) Measure AI voltage and save it to PF.03. View the displayed value of b0.21 and save the value to PF.04. PF.04 CI measured voltage 1 Setting Range: Factory-corrected 0.500 V~4.000 V PF.05 CI displayed voltage 1 Setting Range:...
- Page 228 They have been corrected upon delivery. When you resume the factory values, these parameters will be restored to the factory-corrected values. Generally, you need not perform correction in the applications. Measured voltage indicates the actual output voltage value measured by instruments such as the multimeter. Displayed voltage indicates the voltage display value sampled by the AC drive.
- Page 229 Group E0 is user-defined parameter group. You can select the required parameters from all DGI900 functions codes and add them into this group, convenient for view and modification. Group E0 provides a maximum of 32 user-defined parameters. If "uP0.00" is displayed, it indicates that group E0 is null.
- Page 230 E3.38 to E3.55 is same with P9.01to P9.18. Motor 3 parameters E4.00 to E4.37 in group are the same with P8.00 to P8.37, while E4.38 to E4.55 is same with P9.01 to P9.18. Motor 4 parameters E5.00 to E5.37 in group E5 are the same with P8.00 to P8.37, while E5.38 to E5.55 is same with P9.01to P9.18.
- Page 231 When inverter trips, protection function acts as LED displays fault code, fault relay acts, inverter output stops and motor coasts to stop. DGI900 series inverter’s fault contents and troubleshooting are shown in Table 7-1. After fault alarm occurs, inverter should be inspected according to Table 7-1.
- Page 232 Fault Type of faults Possible fault reasons Troubleshooting code E-05 Dec Dec time is short Adjust the Dec time overvoltage Potential load or load inertia is big Add suitable braking device E-06 Overvoltage Input voltage abnormal Check input power supply at constant Acc or Dec time is short Adjust the Acc or Dec time...
- Page 233 Wrong setting of motor Set the factor right overload protection factor Motor chocked or sudden Check load change of load E-11 Under voltage Grid voltage is low Check grid voltage in running E-12 Output lack Cable between Inverter and Check the peripheral fault phases motor is fault Output 3-phases un balance...
- Page 234 Upper computer doesn’t work Check upper computer connecting cable STOP E-16 System Serious interference Press key to reset or install interference input power source filter DSP read/write error Reset or contact supplier STOP E-17 EP PROM Read/write error of control press key to reset or install error...
- Page 235 E-25 Motors switch Change the selection of the Perform motor switchover after over fault motor via terminal during inverter stops. during running running of Inverter E-26 Wave limiting Load heavy or motor blocked Reduce load or check mechanical current status Inverter power small Select big rating inverter E-27 Motor over...
- Page 236 E-32 User defined Input user defined fault 1 signal Reset fault 1 via multi-function terminal X E-33 User defined Input user defined fault 2 signal Reset fault 2 via multi-function terminal X E-34 Contactor Drive board or power supply is Change drive board or power supply fault abnormal...
- Page 237 (1) Reset the inverter after thoroughly investigating the cause of fault and clearing, otherwise, the inverter may be damaged. (2) If it can’t be reseted or fault occurs again after reset, please check the cause of fault, continuous reset may damage inverter. (3) Reset the inverter after waiting for 5min when overload or overheat protection occurs.
- Page 238 (5)Fan is working in good condition 8.2 Periodic Preservation and Maintenance 8.2.1 Periodic Maintenance Cut off the power when inverter is maintained thermally, check after the main circuit power indicator light is off. The checking content is shown in Table 8-1. able 8-1 Periodic inspections Checking item Checking content...
- Page 239 Electrolytic capacitors 4-5 years Printed circuit board 5-8 years Fuse 10 years The working condition of the inverter as following: (1) Environment temperature: average 30C. (2) Load coefficient: under 80%. (3) Running time: under 12 hour everyday. 8.3 Warranty of Inverter Our company supply warranty in the following condition: (1)Only inverter in the warranty range.
- Page 240 communication interface, in which The MODBUS standard protocol is used for communication. The inverters can be used as slave connected to the host (such as PLC controller, PC), both of which have the same communication interface and protocol, for the purpose of centralized monitoring of the inverters.
- Page 241 The inverter can either used as a host or slave in RS485 network. It can be used for controlling our other inverters as host to achieve multi-level linkage, or controlled by host (PC or PLC) as a slave. The specific communication mode as follows: Inverter is used as slave, in point-to-point communication of master-slave mode.
- Page 242 (1-8-1 format, odd parity) Start Stop parity (1-8-1 format, even parity) Start Even Stop parity Communications data structures RTU mode: START Maintaining no input signal for more than or equal to 10ms Address address:8-bit Binary address Function Function code:8-bit Binary address DATA(n - 1)...
- Page 243 function code Function code meaning 0x03 Read inverter function code parameters and operating status parameters 0x06 Rewrite the inverter's single function code or control parameters, do not save after power down 0x07 Rewrite the inverter's single function code or control parameters, save after power down The function code, control and status parameters of the inverter are all mapped as Modbus read and write registers.
- Page 244 ( Decimal) 0x5001 Operating frequency 0x5012 PLC steps 0x5002 bus voltage 0x5013 PULSE Input pulse frequency, unit 0.01KHz 0x5003 output voltage 0x5014 Feedback speed, unit 0.1Hz 0x5004 Output current 0x5015 Remaining runtime 0x5005 Output power 0x5016 All sampling voltage 0x5006 Output torque 0x5017 AI2 sampling voltage...
- Page 245 Control command address: Control word addr Order content Control word address Order content 0x6000 (control 0001:Forward running 0x6001(Communicatio 0x0~0x7FFF command word n control analog AO1 address) output address) 0002:Reverse running 0x6002(Communicatio 0x0~0x7FFF n control analog AO2 output address) 0003:Positive rotation 0x6003(Communicatio BIT0:DO1 output control n DO output address)
- Page 246 Inverter fault addres Inverter fault information Inverter fault Inverter fault information address 0x8000 0000: no fault 0x8000 0012:Motor parameter over current fault 0001:Acc overcurrent 0013:Input phase loss protection 0002:Dec overcurrent 0014:Earthing short circuit fault 0003:Over current at 0015:Encorder fault constant speed running 0004:acc overvoltage 0016:Input Power fault 0005:Dec overvoltage...
- Page 247 000D:Peripheral fault 001F:User defined fault 1 000E:Current detecting 0028:User defined fault 2 circuit fault 000F:RS232/485 0029:PID feedback loss Communication fault 0010:System interference 002A:User defined fault 1 0011:EP2PPROM 002B:User defined fault 2 error Note: The inverter fault information read from the fault address is consistent with the fault record code in Table 7- 1 in Chapter 7.
- Page 248 the following is to achieve CRC-16 C language source code, pay attention to the final result has been exchanged high and low byte, that is, the result is to send the CRC checksum . uint16 CrcValueByteCaA0(const uint16 *data, uint16 len) uint16 CRCValue = 0xFFFF;...
- Page 249 address Order Number of P0.02 Data P0.03 Data Checksum code data sections content content 0x01 0x03 0x04(2*2) 0x13 0x88 0x00 0x00 To be calculated Write command frame: Request frame is write data frame of P0.02 parameter of machine number 1: address Order code Register...
- Page 250 4: 4800BPS; 5: 9600BPS; 6: 19200BPS; 7: 38400BPS; 8: 57600BPS; 9: 115200BPS. This parameter is used to set the data transmission rate between host computer and inverter. Note that the host computer and the inverter set the baud rate must be the same,Otherwise, communication will not work.
- Page 251 the system processing time, the system delays the processing after the data is processed until the response delay time arrives. Send data. 【0.0s】 PC.04 Communication Range: 0.0s~60.0s timeout When this function code is set to 0.0 s, the communication timeout parameter is invalid. When this function code is set as valid value, if the interval time between one communication and the next communication exceeds the communication timeout, the system will report a communication error (E-15 will be set to invalid normally.) If the function...
Need help?
Do you have a question about the DGI900 and is the answer not in the manual?
Questions and answers