
Subscribe to Our Youtube Channel
Related Manuals for Rockler Dust Right 750 CFM


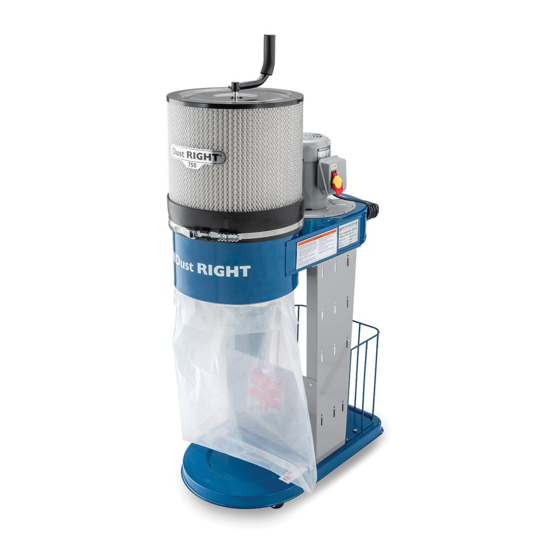
Summary of Contents for Rockler Dust Right 750 CFM
- Page 1 750 CFM Mobile Dust Collector Instructions Effective September 2019 Review full instructions prior to use for important safety information. Always check Rockler.com to confirm that you are using the most recent version of instructions for your product.
-
Page 2: General Safety Warnings
Instructions and safety warnings for your product (see the • Keep children and bystanders away from the tool Instructions link on the product page at Rockler.com). operating area; • Do NOT use power tools in explosive environments, or in >... -
Page 3: Important Safety Instructions
PRODUCT SPECIFIC SAFETY WARNINGS IMPORTANT SAFETY INSTRUCTIONS When using electrical appliances, basic precautions should always be followed, including the following: READ ALL INSTRUCTIONS BEFORE USING (THIS APPLIANCE) Failure to understand and follow all safety warnings and instructions could result in fire, electrical shock or serious injury. SAFE USE ELECTRICAL/GROUNDING >... -
Page 4: Maintenance
PRODUCT SPECIFIC SAFETY WARNINGS CONTINUED > Wear approved safety glasses, dust mask or respirator > The motor assembly of the Dust Right 750 CFM Mobile ® and hearing protection while using this machine Dust Collector is heavy. To avoid the risk of serious injury, you MUST obtain the help of another adult to lift the or emptying the dust bag. -
Page 5: Parts List
PARTS LIST Quantity Base Ball Casters Left Leg Panel Right Leg Panel Divider Panel #10-24 x 3/8" Flanged Button-Head Screw 5/16"-18 x 1/2" Flanged Hex-Head Cap Screw Wrench (not shown) Assembly 1. Turn the Base (1) upside down on a smooth surface and attach the Ball Casters (2) with #10-24 x 3/8"... - Page 6 Fig. 3 PARTS LIST Quantity #10-24 x 3/8" Flanged Button-Head Screw 5/16"-18 x 1/2" Flanged Hex-Head Cap Screw Wrench (not shown) Wire Hose Basket 10 Motor Assembly 11 Handle/Cord Wrap 12 1/4"-20 x 1" Hex Head Cap Screws 4. Attach the Wire Hose Basket (9) to the Left and Right Leg Panels (3 and 4) and Base (1) with nine #10-24 x 3/8"...
- Page 7 5. With the help of another adult, lift the Motor Assembly (10) 6. Position the Handle/Cord Wrap (11) on the curved area onto the Left and Right Leg Panels (3 and 4), carefully of the Motor Assembly (10), aligning the mounting holes. aligning the mounting holes.
- Page 8 7. Install the self-adhesive Foam Tape (13) in the channel PARTS LIST Quantity around the funnel area on the Motor Assembly (10) where the Canister Filter (14) will be installed. Trim away any 13 Foam Tape excess length with a utility knife. Fig. 6. 14 Canister Filter 8.
- Page 9 Nut and set screw may need to be loosened Fig. 7 You might need to loosen the nut and set screw on the Canister Handle (16) for the following step. 9. Fit the Canister Handle (16) onto the post at the top of the Canister Filter (14), taking care to align the set screw and nut with the flat on the post.
- Page 10 Fig. 9 Electrical Connections and Grounding > To reduce the risk of electric shock, do NOT use > If connected to a circuit protected by fuses, use time-delay outdoors or on wet surfaces. fuses, marked Type D, with this appliance. >...
- Page 11 Check Rockler.com for updates. If you have further questions, please contact our Technical Support Department at 1-800-260-9663 or support@rockler.com Fig. 9...
- Page 12 57841 - RL Distributed by Rockler Companies, Inc. 1-800-279-4441 Rev 09/19 4365 Willow Dr. Medina, MN 55340 www.rockler.com...
Need help?
Do you have a question about the Dust Right 750 CFM and is the answer not in the manual?
Questions and answers
What is the easiest way to remove and empty the dust bag
The dust bag on the Rockler Dust Right 750 CFM is held in place inside the steel housing with a snap ring. To remove and empty it, detach the snap ring, take out the bag, empty its contents, and then reinstall it by securing it back with the snap ring.
This answer is automatically generated