Table of Contents
Advertisement
Quick Links
Operation, Repair, Parts
GrindLazer
For removal of materials from flat horizontal concrete and asphalt surfaces. For use with
compatible universal quick attach systems from major skid steer manufacturers. For
professional use only.
Model 25P471 - GrindLazer HP RC820 H (Hydraulic-Low Flow)
1000 psi (69 bar, 6.9 MPa) Inlet Fluid Maximum Working Pressure
Model 25P472 - GrindLazer HP RC1640 H (Hydraulic-High Flow)
2000 psi (138 bar, 3.8 MPa) Inlet Fluid Maximum Working Pressure
Model 25P473 - GrindLazer HP RC1625 G (Gas - 25HP Kohler)
Important Safety Instructions
Read all warnings and instructions in this manual before using the
equipment. Be familiar with the controls and the proper usage of the
equipment. Save these instructions.
™
25P471
www.graco.com/techsupport
Related Manuals:
24 590 54
25P472
3A7398A
Kohler Owner's Manual
25P473
EN
Advertisement
Chapters
Table of Contents

Related Manuals for Graco GrindLazer HP RC820 H


Summary of Contents for Graco GrindLazer HP RC820 H
- Page 1 For professional use only. Model 25P471 - GrindLazer HP RC820 H (Hydraulic-Low Flow) 1000 psi (69 bar, 6.9 MPa) Inlet Fluid Maximum Working Pressure Model 25P472 - GrindLazer HP RC1640 H (Hydraulic-High Flow) Related Manuals: 2000 psi (138 bar, 3.8 MPa) Inlet Fluid Maximum Working Pressure...
-
Page 2: Table Of Contents
Contents Contents Warnings ................4 Component Identification . - Page 3 Graco Standard Warranty ........
-
Page 4: Warnings
Warnings Warnings The following warnings are for the setup, use, grounding, maintenance, and repair of this equipment. The exclamation point symbol alerts you to a general warning and the hazard symbols refer to procedure-specific risks. When these symbols appear in the body of this manual or on warning labels, refer back to these Warnings. Product-specific hazard symbols and warnings not covered in this section may appear throughout the body of this manual where applicable. - Page 5 Warnings WARNING SKIN INJECTION HAZARD High-pressure fluid from hose leaks, or ruptured components will pierce skin. This may look like just a cut, but it is a serious injury that can result in amputation. Get immediate surgical treatment. • Inspect hose before each use for cuts, bulges, kinks or any other damage. •...
-
Page 6: Component Identification
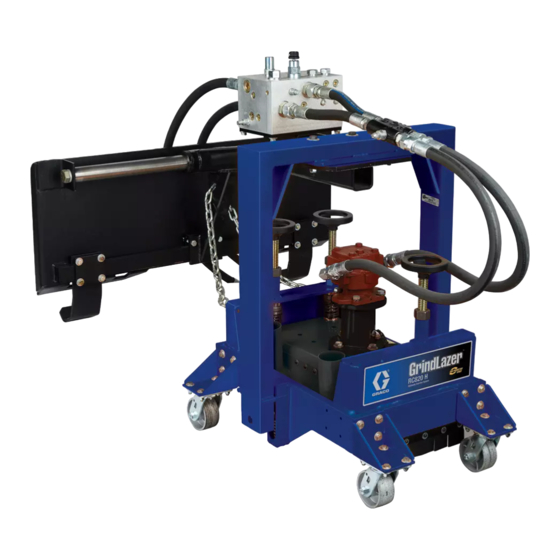
Component Identification Component Identification 25P471 (Hydraulic - Low Flow) Component Component Universal Quick Attach Mount Support Legs Hydraulic Supply Line (male quick-connect) Wheel Mount Location (side) Hydraulic Return Line (female quick-connect) U-bar Spring Hydraulic Pump Tachometer Cushion Valve Caster Wheels Vacuum Port Dust/Debris Skirt Universal Quick Attach Mount Plate... -
Page 7: Component Identification
Component Identification Component Identification 25P472 (Hydraulic - High Flow) ti37705a Component Component Cutter Height Control Knobs (3x) Hydraulic Return Line (male-quick connect) Universal Quick Attach Mount Support Legs Hydraulic Supply Line (female-quick connect) Wheel Mount Location (side) Hydraulic Pump Dust/Debris Skirt Cushion Valve U-bar Spring Vacuum Ports (2x) -
Page 8: Component Identification
Component Identification Component Identification 25P473 (Gas) ti37706a Component Component Battery Box Universal Quick Attach Mount Plate Wheel Mount Location (side) Gas Tank Throttle (Speed) Control Emission Canister Choke Control Engine U-bar Spring Vacuum Ports (2x) Debris Skirt Tachometer Belt Tension U-bar Caster Wheels Cutter Height Control Knobs (3x) -
Page 9: Setup
Setup Setup When the top edge of the skid steer plate adapter is seated in the top part of the Universal Quick Attach Mount Plate, curl the skid steer tilt function back until the Universal Quick Attach Mount Plate is flat against the CRUSH HAZARD skid steer plate adapter. -
Page 10: Cutter Head Installation
Setup Cutter Head Installation Set Width of Cut (Models 25P472 & 25P473) Models 25P472 & 25P473 allow the GrindLazer to be swiveled up to 30° either left or right to increase the cutting path width. Loosen the center swivel bolt at the end of the attachment arm and then loosen the outer two bolts CRUSH HAZARD using two 3/4”... -
Page 11: Dust Control
Setup Dust Control 2. Attach vacuum hose to the inlet port on the Cyclone Separator (optional) or vacuum. Vacuum Attachment 1. If using a vacuum, attach vacuum hose to the vacuum ports on the GrindLazer. 3A7398A... -
Page 12: Operation
Operation Operation 2. Open the fuel shutoff on the gas tank and then place the Throttle Control lever at the “fast” position. 3. Move the Choke Control lever to closed. 4. Turn Key Switch to start the engine. 5. After the engine starts, move Choke Control lever to open. -
Page 13: Set Cutter Speed
Operation Set Cutter Speed Recommended Speeds For best performance and cutter life, try to maintain the following speeds read at the Tachometer: Tachometer Speed Rotating cutters can severely injure feet. Keep feet Cutter Type clear of cutters. Model Carbide Cutters Wire Brush 1. -
Page 14: Disconnect Grindlazer From Skid Steer
Operation Disconnect GrindLazer from 3. Turn the Cutter Height Control Knobs counterclockwise about two turns to ensure the Skid Steer cutter head or heads do not contact the work surface. The following instructions are generic. Due to the differences in attachment mounting and removal methods among various brands of skid steers, refer to your skid steer owners manual for proper attachment removal methods. -
Page 15: Repair
Repair Repair 2. Slide cutter assembly onto shaft up to the backing plate. Avoid touching the cutter head(s) after use until they have completely cooled. 3. Slide felt washer onto the shaft into the space CRUSH HAZARD between the cutter edge and the bearing edge. To avoid serious injury or death, never work under the equipment unless it is securely supported by safety stands or blocks. -
Page 16: Drive Belt Replacement (Models 25P472 & 25P473)
Repair Drive Belt Replacement (Models 3. Remove the auxiliary belt cover over the engine pulley using a 7/16” socket or wrench. 25P472 & 25P473) Models 25P472 & 25P473 are equipped with a Poly ® Chain GT2 (Gates Co.) drive belt or a multi groove (banded) “V”... -
Page 17: Bearing Replacement (Models 25P472 & 25P473)
Repair 6. To loosen the tension on the belt, locate and loosen 11. Hydraulic Model (25P472): After the belt has been the two jam nuts on the adjusting screws for under properly tightened, reconnect the GrindLazer to the the motor mount plate using a 9/16” socket or skid steer and allow it to run for 15-20 seconds to wrench and then using a 3/16”... - Page 18 Repair 3. Hydraulic Model (25P472): With the hydraulic NOTE: At this point there is full access to the hoses attached, remove the hydraulic motor and set GrindLazer drive components to service them as it aside. needed. Gas Model (25P473): The Quick Attach Mount 5.
-
Page 19: Bearing Replacement (Model 25P471)
Repair 7. Use one of the set screws and thread it into the Bearing Replacement (Model middle hole to back out the bushing as shown 25P471) below. Tools required: • Two 3/4” socket or wrench • 9/16” socket or wrench 1. - Page 20 Repair 5. Remove the Quick Attach Mount boom from the 8. Remove the bearing assembly using the 3/4” socket U-bar using the 3/4” socket or wrench. or wrench. 6. Remove the Quick Attach Mount and hydraulic assemblies from the GrindLazer and set aside. 7.
-
Page 21: Maintenance
Maintenance Maintenance DAILY: • Check all fasteners and re-tighten. • Clean dust and debris from exterior of GrindLazer Avoid touching engine and cutter head after use until (do NOT use pressure washer or other high they have completely cooled. pressure cleaning equipment). •... -
Page 22: Recycling And Disposal
Recycling and Disposal Recycling and Disposal Rechargeable Battery Disposal End of Product Life Do not place batteries in the trash. Recycle batteries At the end of the product’s useful life, dismantle and according to local regulations. In the USA and Canada, recycle it in a responsible manner. -
Page 23: Troubleshooting
Troubleshooting Troubleshooting HYDRAULIC MODELS CRUSH HAZARD To avoid injury from unexpected start up, always dis- To avoid serious injury or death, never work under the connect the Hydraulic Supply/Return Lines before you equipment unless it is securely supported by safety service your machine. -
Page 24: Parts - 25P471 (Outer Frame)
Parts - 25P471 (Outer Frame) Parts - 25P471 (Outer Frame) Torque to 28-30 ft-lbs (37.9-40.7 N·m) Torque to 20-22 ft-lbs (27.1-29.8 N·m) Torque to 12-15 ft-lbs (16.3-20.3 N·m) Torque to 4-6 ft-lbs (5.4-8.1 N·m) Torque to 2-3 ft-lbs (2.7-4.1 N·m) Torque to 160 ±... -
Page 25: Parts List - 25P471 (Outer Frame)
Parts - 25P471 (Outer Frame) Parts List - 25P471 (Outer Frame) Ref. Part Description Qty. Ref. Part Description Qty. 100133 WASHER, lock, 3/8” 18B047 MOUNT, caster 18B188 TACHOMETER 18B176 CASTER 18B501 BOLT, hex, head, 3/8-16 x 1.25” 18B160 BUSHING, bronze 18B525 SET, screw, 5/16-18 x 1/2”... -
Page 26: Parts - 25P472 (Outer Frame)
Parts - 25P472 (Outer Frame) Parts - 25P472 (Outer Frame) Torque to 28-30 ft-lbs (37.9-40.7 N·m) Torque to 20-22 ft-lbs (27.1-29.8 N·m) Torque to 2-3 ft-lbs (2.7-4.1 N·m) 3A7398A... -
Page 27: Parts List - 25P472 (Outer Frame)
Parts - 25P472 (Outer Frame) Parts List - 25P472 (Outer Frame) Ref. Part Description Qty. Ref. Part Description Qty. 18B117 NUT, eye, 3/8-16 18B176 CASTER 100101 SCREW, hex cap, 3/8-16 x 1” 18B047 MOUNT, caster 16C393 LABEL, warning, ISO cut foot hazard ... -
Page 28: Parts - 25P472 (Inner Frame)
Parts - 25P472 (Inner Frame) Parts - 25P472 (Inner Frame) Torque to 28-30 ft-lbs (37.9-40.7 N·m) Torque to 12-15 ft-lbs (16.3-20.3 N·m) Torque to 7-8 ft-lbs (9.5-10.8 N·m) Torque to 4-6 ft-lbs (5.4-8.1 N·m) Torque to 2-3 ft-lbs (2.7-4.1 N·m) See manufacturing instructions Apply Sealant (L243) -
Page 29: Parts List - 25P472 (Inner Frame)
Parts - 25P472 (Inner Frame) Parts List - 25P472 (Inner Frame) Ref. Part Description Qty. Ref. Part Description Qty. 18B536 NUT, nylock, 9/16-12 18B501 BOLT, hex head, 3/8-16 x1.25” 17X925 PULLEY, drive 100133 WASHER, lock, 3/8” 18B174 SPACER, roller 100023 WASHER, flat, 3/8”... -
Page 30: Parts - 25P473 (Outer Frame)
Parts - 25P473 (Outer Frame) Parts - 25P473 (Outer Frame) Torque to 28-30 ft-lbs (37.9-40.7 N·m) Torque to 20-22 ft-lbs (27.1-29.8 N·m) 3A7398A... -
Page 31: Parts List - 25P473 (Outer Frame)
Parts - 25P473 (Outer Frame) Parts List - 25P473 (Outer Frame) Ref. Part Description Qty. Ref. Part Description Qty. 18A786 STRAP, Velcro, 2” x 24” 18B176 CASTER 801958 PROTECTOR, battery terminal, red 18B047 MOUNT, caster 801959 PROTECTOR, battery terminal black 18B501 BOLT, hex head, 3/8-16 x 1.25”... -
Page 32: Parts - 25P473 (Inner Frame)
Parts - 25P473 (Inner Frame) Parts - 25P473 (Inner Frame) Torque to 28-30 ft-lbs (37.9-40.7 N·m) Torque to 12-15 ft-lbs (16.3-20.3 N·m) Torque to 7-8 ft-lbs (9.5-10.8 N·m) Torque to 4-6 ft-lbs (5.4-8.1 N·m) Torque to 2-3 ft-lbs (2.7-4.1 N·m) 3A7398A... -
Page 33: Parts List - 25P473 (Inner Frame)
Parts - 25P473 (Inner Frame) Parts List - 25P473 (Inner Frame) Ref. Part Description Qty. Ref. Part Description Qty. 18B174 SPACER, roller 18B501 BOLT, hex head, 3/8-16 x 1.25” 18B115 BEARING 100133 WASHER, lock, 3/8” 18B163 SPACER, belt idler 100023 WASHER, flat, 3/8”... -
Page 34: Parts - 25P471 Motor & Drive
Parts - 25P471 Motor & Drive Parts - 25P471 Motor & Drive Torque to 12-15 ft-lbs (16.3-20.3 N·m) Torque to 7-8 ft-lbs (9.5-10.8 N·m) Torque to 90 ± 5 ft-lbs (122 ± 6.8 N·m) Torque to 140 ± 5 ft-lbs (190 ±... -
Page 35: Parts List - 25P471 Motor & Drive
Parts - 25P471 Motor & Drive Parts List - 25P471 Motor & Drive Ref. Part Description Qty. Ref. Part Description Qty. 18B186 LOVEJOY, 7/8” 17W238 BEARING, drive, housing, assy 18B050 LOVEJOY, 1 3/8” 18B108 SPACER, hardened 9/16” 18B187 LOVEJOY, spider 17X259 CONNECTOR, hub, drive 18B064... -
Page 36: Parts - 25P472 Motor & Drive
Parts - 25P472 Motor & Drive Parts - 25P472 Motor & Drive Torque to 28-30 ft-lbs (37.9-40.7 N·m) Torque to 12-15 ft-lbs (16.3-20.3 N·m) Torque to 90 ± 5 ft-lbs (122 ± 6.8 N·m) After 100 is in place (before tightening bolts on plate) turn screws 106 to tension belt. -
Page 37: Parts List - 25P472 Motor & Drive
Parts - 25P472 Motor & Drive Parts List - 25P472 Motor & Drive Ref. Part Description Qty. Ref. Part Description Qty. 18B031 PLATE, motor 18B501 BOLT, hex head, 3/8-16 x1.25” 18B140 FITTING, 90° 101911 WASHER, lock, 3/8” 18B141 REDUCER, straight 18B180 BUSHING, taper, lock, 35mm 17W218 WASHER, flat, 3/8”... -
Page 38: Parts - 25P473 Engine & Drive
Parts - 25P473 Engine & Drive Parts - 25P473 Engine & Drive Torque to 28-30 ft-lbs (37.9-40.7 N·m) Torque to 70 ± 5 ft-lbs (94.9-6.8 N·m) Parts List - 25P473 Engine & Drive Ref. Part Description Qty. Ref. Part Description Qty. -
Page 39: Parts - 25P471 / 25P472 Universal Quick Attach Mount U-Bar
Parts - 25P471 / 25P472 Universal Quick Attach Mount U-Bar Parts - 25P471 / 25P472 Universal Quick Attach Mount U-Bar Torque to 28-30 ft-lbs (37.9-40.7 N·m) Torque to 20-22 ft-lbs (27.1-29.8 N·m) Torque to 12-15 ft-lbs (16.3-20.3 N·m) Parts List - 25P471 / 25P472 Universal Quick Attach Mount U-Bar Ref. -
Page 40: Parts - 25P473 Universal Quick Attach Mount U-Bar
Parts - 25P473 Universal Quick Attach Mount U-Bar Parts - 25P473 Universal Quick Attach Mount U-Bar Torque to 28-30 ft-lbs (37.9-40.7 N·m) Torque to 20-22 ft-lbs (27.1-29.8 N·m) Torque to 12-15 ft-lbs (16.3-20.3 N·m) 3A7398A... -
Page 41: Parts List - 25P473 Universal Quick Attach Mount U-Bar
Parts - 25P473 Universal Quick Attach Mount U-Bar Parts List - 25P473 Universal Quick Attach Mount U-Bar Ref. Part Description Qty. Ref. Part Description Qty. 18B120 SWITCH, key 18B041 U-BAR 17W098 WASHER, flat, 1/2” 18B182 CAM ROLLER 17W057 SCREW, hex cap, 1/2-20 x 4” 18B157 SPRING, U-bar, assy 101926... -
Page 42: Parts - 25P471 / 25P472 / 25P473 Universal Quick Attach Mount Plate
Parts - 25P471 / 25P472 / 25P473 Universal Quick Attach Mount Plate Parts - 25P471 / 25P472 / 25P473 Universal Quick Attach Mount Plate Torque to 28-30 ft-lbs (37.9-40.7 N·m) Torque to 20-22 ft-lbs (27.1-29.8 N·m) Torque to 645 ± 5 ft-lbs (875.5-6.8 N·m) Parts List - 25P471 / 25P472 / 25P473 Universal Quick Attach Mount Plate Ref. -
Page 43: Parts - 25P471 / 25P472 Manifold
Parts - 25P471 / 25P472 Manifold Parts - 25P471 / 25P472 Manifold Parts List - 25P471 / 25P472 Manifold Ref. Part Description Qty. Ref. Part Description Qty. 18B147 PLUG, blanking 18B134 MANIFOLD, hydraulic 18B149 PLUG, blanking 18B139 FITTING, straight 16D646 LABEL, warning, ISO hot surface ... -
Page 44: Parts - 25P471 / 25P472 Hydraulic Hoses
Parts - 25P471 / 25P472 Hydraulic Hoses Parts - 25P471 / 25P472 Hydraulic Hoses Torque to 28-30 ft-lbs Torque to 28-30 ft-lbs (37.9-40.7 N·m) (37.9-40.7 N·m) Torque to 7-8 ft-lbs Torque to 7-8 ft-lbs (9.5-10.8 N·m) (9.5-10.8 N·m) Tighten down. Parts List - 25P471 / 25P472 Hydraulic Hoses Ref. -
Page 45: Parts - 25P473 Fuel Tank Assembly
Parts - 25P473 Fuel Tank Assembly Parts - 25P473 Fuel Tank Assembly Torque to 12-15 ft-lbs (16-3-20.3 N·m) Torque to 2-3 ft-lbs (2.7-4.1 N·m) Parts List - 25P473 Fuel Tank Assembly Ref. Part Description Qty. Ref. Part Description Qty. 18B172 RETAINER, fuel tank 18B485 SCREW, button head, #10-32 x 3/8”... -
Page 46: Technical Data
Technical Data Technical Data GrindLazer HP RC820 H (Model 25P471) Metric Inlet fluid working pressure 1000 psi 69 bar (6.9 MPa) Standard flow delivery 15-25 gpm 57-95 l/min Noise level Sound levels for this product are influenced by the type of skid steer, and the contribution of the sound from the Grin- dLazer cannot be adequately distinguished from the skid steer. -
Page 47: Graco Standard Warranty
With the exception of any special, extended, or limited warranty published by Graco, Graco will, for a period of twelve months from the date of sale, repair or replace any part of the equipment determined by Graco to be defective. -
Page 48: Graco Information
For patent information, see www.graco.com/patents. TO PLACE AN ORDER, contact your Graco distributor or call 1-800-690-2894 to identify the nearest distributor. All written and visual data contained in this document reflects the latest product information available at the time of publication.
Need help?
Do you have a question about the GrindLazer HP RC820 H and is the answer not in the manual?
Questions and answers