Advertisement
Quick Links
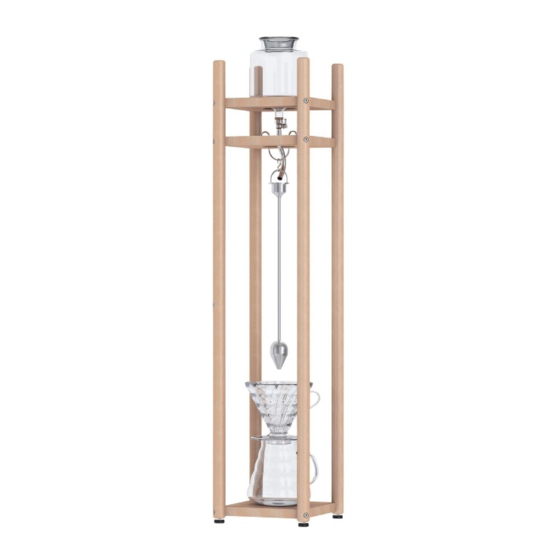
V60 Water Dripper "FURIKO"
V60 Water Dripper "FURIKO"
V60 ウォータードリッパー・FURIKO
V60 ウォータードリッパー・FURIKO
取扱説明書
お買いあげ誠にありがとうございます。 正しくご使用していただくため、
この取扱説明書を必ずお読みください。 また、 お読みになりましたら、
大切に保管してください。
Instruction Manual
Thank you for purchasing this HARIO product.
Please be sure to read this instruction manual thoroughly
in order to use this product correctly.
After reading it, store it in a safe place for future reference.
For use with boiling water
Do not expose to open flames
特許登録済
PAT. 6168637
Advertisement

Subscribe to Our Youtube Channel
Related Manuals for Hario FURIKO V60


Summary of Contents for Hario FURIKO V60
- Page 1 V60 Water Dripper “FURIKO” V60 Water Dripper “FURIKO” V60 ウォータードリッパー・FURIKO V60 ウォータードリッパー・FURIKO 取扱説明書 お買いあげ誠にありがとうございます。 正しくご使用していただくため、 この取扱説明書を必ずお読みください。 また、 お読みになりましたら、 大切に保管してください。 Instruction Manual Thank you for purchasing this HARIO product. Please be sure to read this instruction manual thoroughly in order to use this product correctly. After reading it, store it in a safe place for future reference. 特許登録済 For use with boiling water PAT. 6168637 Do not expose to open flames...
- Page 2 お取扱い上の注意 Precautions for Use 直火にかけられません。 ガラスは割れるものです。 洗浄やご使用時はていねいにお取扱いください。 お子様に使用させないでください。 また、 幼児のそばで使用したり、 幼児の手の届く所に置かないでください。 ●ご使用前には洗浄を して く だ さ い。 ●ヒビ、 欠け、 強いスリ傷の入ったものは、 思わぬときに破損することがありますので、 使用しないでください。 ●ガラス器の内面を、 金属スプーンなどで強くたたいたり、 強く こすったりしないでください。 破損の原因になります。 ●破損した際のお取扱いは、 ケガをしないよう十分ご注意ください。 ●廃棄する際は、 各自治体の指示に従い分別して ください。 ●フタをつかんで持ち運ぶことは絶対にしないでください。 ガラスが抜け落ちる場合があります。 ヒビ ・ カケ ●転倒の恐れがありますので、 不安定な場所やお子様やペッ トが通る場所、 風のある場所に置かないでください。 Crack, Chip ●また、...
- Page 3 内容物と材質のご案内 Parts list and material guide 3. ガラスフタ、 ガラスフタパッキン 耐熱ガラス 耐熱温度差120℃ 1. 上ボ−ル 2. XGS-80 ガラスサーバー シリコーンゴム (耐熱温度180℃) 耐熱ガラス 耐熱温度差120℃ 耐熱ガラス 耐熱温度差120℃ Glass cover, The sealant attached to the glass lid Top bowl XGS-80 glass server Heatproof glass Heatproof glass Heatproof glass (Heat resistance temperature diffrence : 120℃) (Heat resistance temperature diffrence : (Heat resistance temperature diffrence : Silicone rubber 120℃) 120℃) (Handles temperatures up to 180℃) 4. 水量調整コック 5. コック用ジョイント 6. U字フック ステンレス シリコーンゴム (耐熱温度180℃) ステンレス Water adjustment faucet Silicone joint for cock U-shaped hook stainless steel Silicone rubber stainless steel (Handles temperatures up to 180℃)...
- Page 4 スタンドの組み立て方法 How to assemble the stand 付属の六角棒レンチを使ってボルトを図のように12か所に装着し、 固く締めてください。 アジャスターを 図のように4か所に装着してください。 ボルトは13本入っており、 1本は予備となります。 Attach the twelve bolts as shown in the figure, and tighten them fully using the provided hexagonal wrench Attach four adjusters as shown in the figure. There are 13 bolts and 1 bottle becomes a spare. 上天板...
- Page 5 部品の取り付け方法 Attaching Parts 上ボールとコック とコックパイプの取り付け方法 Attaching the upper ball and faucet コック用ジョイントを上ボール足管に コック用ジョイントのフチを足管に 差し込みます。 向けて折り返します。 Insert the faucet joint into the neck Turn down the edges of the faucet joint of the top bowl. towards the neck. コックをコック用ジョイントの穴に差し込みます。 コックの先にチューブとコックパイプを 奥まできっちり差し込んでください。 しっかりとはめます。...
- Page 6 部品の取り付け方法 Attaching Parts U字フック とS字フック と振り子のスタ ン ドへの取り付け方法 Attaching the U-shaped hook, S-shaped hook and pendulum to the stand U字フックの両端を中天板の凹みにかけます。 U字フックにS字フックと振り子を かけます。 Hook the U-shaped hook onto both edges of Hook the S-shaped hook and pendulum the hole in the middle board as shown in the figure. onto the U-shaped hook.
- Page 7 使用方法 How to use 中細挽きのコーヒー粉72g : 水840ml 計量スプー ンすりきり6杯 840 ml of water 72g of medium fine ground coffee: 6 flat measuring spoons コーヒー粉 coffee powder × 6 WDC-6 MADE IN JAPAN ドリッパーにペーパー フィ ルターとコーヒー粉 72gをセッ トします。 付属の計量スプーン すりきり6杯がおよそ72gです。 コーヒー粉はゆすっ...
- Page 8 使用方法 How to use 上から見た図 Viewed from above 振り子の先端をコーヒー粉の端の上あたりまで持っ ていき、 そ こからそっと離します。 スタン ド脚のある方向から離す ようにし て ください。 このとき、 図のように そうすることで、 振れ幅の方向が徐々に変わり、 コーヒー粉に水が均一にかかるようになります。 Bring the pendulum to the edge of the coffee powder and release it. When releasing the pendulum, do so in the direction of the stand legs as shown in the figure.
- Page 9 使用方法 How to use コックのつまみを回して水を滴下させます。 30分程度で840mlを落とすために、 下記の速度を目安につまみの角度を調整し て ください。 目視で調整する場合 クッキングスケール等を使っ て調整する場合 840mlの水を上ボールに入れた状態で 840mlの水を上ボールに入れた状態で コック パイプの先から落ちる雫同士 30秒に18mlの速度 が繋がらないぎりぎりの速度 Turn the faucet to allow water to start dripping. Adjust the angle of the faucet as shown below to enable 840ml to drip in approximately 30 minutes. Adjusting Visually Adjusting on cooking scales With 840ml of water in the top ball, adjust...
- Page 10 使用方法 How to use 雫がポコポコと音をたてながら、 揺れる振り子の先から滴下されます。 振り子の振れ幅は10分程で徐々に落ち着き、 30分後にはほんのわずかに振れる程度になっ ていますが、 途中で振りなおす必要はありません。 振りなおし ても問題ありませんが、 その場合は最初の振り出しを含めて30分に2回を限度とすることをお勧めします。 振り直しが多すぎると粉の層の浅い外周部にも多くかかるため、 出来上がったコーヒーが薄く なります。 Water drips from the tip of the pendulum with a bubbling sound. The swaying distance of the pendulum gradually decreases after about 10 minutes and almost stops after around 30 minutes, but there is no need to set the pendulum swinging again.
- Page 11 Next, use a spoon to fully mix all of the coffee grounds to ensure they are equally moistened before swinging the pendulum. ペーパー フィルターはHARIOの 「V60ペーパー フィルター03」 をご使用ください。 Please use Hario V60 Paper Filter 03 paper filters.
- Page 12 部品のお取扱い ・ お問い合わせ パーツについて HARIOパーツ 検 索 ま たはフ リ ーダイ ヤル:0120-39-8208 製品についてのお問い合わせ先 〒103-0006 東京都中央区日本橋富沢町9-3 フリーダイヤル:0120-39-8208 http://www.hario.com HARIO CO., LTD. 9-3 Nihonbashi Tomizawa-Cho, Chuo-ku,Tokyo 103-0006 Japan http://www.hario.jp 831483 WDF-6説明書1809...
Need help?
Do you have a question about the FURIKO V60 and is the answer not in the manual?
Questions and answers