Advertisement
Quick Links
Welcome!
Congratulations! You've just taken one of your first steps into the world of 3D Laser
Engraving! This guide will take you through the steps of installing Opt Laser's
PLH3D 6W engraving laser head onto your X-Carve!
We've tried to make it as easy as possible to get you from unpacking your parts to
engraving.
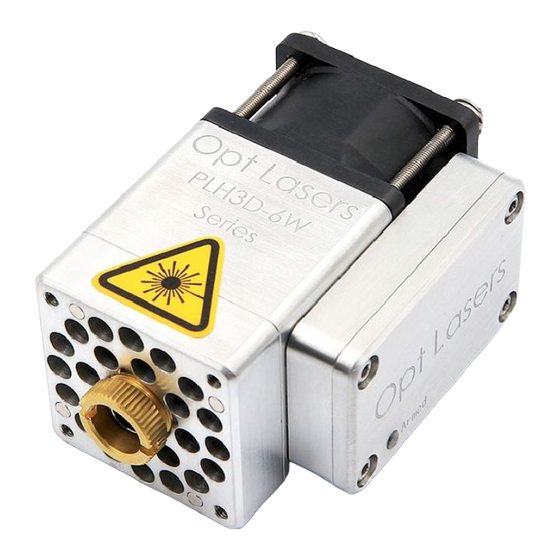
The PLH3D engraving laser head allows you to engrave or cut your designs in a wide
variety of materials such as wood, plastic, rubber, foam, cardboard, leather and many
more.
Bill of Materials
This is all you need to have in order to get your X-Carve upgraded with Opt Laser's
PLH3D 6W laser engraving head:
From the left:
1) 12V 3A power supply
2) PLH3D nozzle &
3) PLH3D engraving laser head
4) Additional 400-700 nm collimator
43mm spindle holder adapter with screws (optional)
Advertisement

Subscribe to Our Youtube Channel
Related Manuals for Opt Lasers PLH3D 6W


Summary of Contents for Opt Lasers PLH3D 6W
- Page 1 Congratulations! You’ve just taken one of your first steps into the world of 3D Laser Engraving! This guide will take you through the steps of installing Opt Laser’s PLH3D 6W engraving laser head onto your X-Carve! We’ve tried to make it as easy as possible to get you from unpacking your parts to engraving.
-
Page 2: Getting Started
Aside from the kit purchased at OptLasers.com you will need regular 3-core household wire with a plug for the power adapter and 2,4m (95") of 0,5 mm2 (20 AWG) 4-core wire to carry power and control signals from power supply and X-Controller to the laser head: Getting Started We recommend to swap X-Carve’s spindle and replace it with a laser for the laser... - Page 3 The mount's outer diameter is 68 mm (the same as DeWalt’s 611 or D26200 spindle) The square inside is 40,1mm x 40,1mm and positioned 5mm off-center to account for aluminum protective can on the laser head. This can protect the laser driver which is mounted directly on the laser head.
- Page 5 Wiring Feed the 4-core wire through the drag chain and connect it to the laser head using the terminal block (included): On the picture, the red and black wires are going to the power supply. Green and white wires are going to X-Controller. Recommended wiring: Laser Head 4-core wire...
- Page 6 Connect green and white wires from the 4-core wire to the X-Controller. Green wire goes to Spindle (PWM) and white wire goes to GND:...
- Page 7 PLH3D nozzle & 43mm spindle holder adapter It is recommended to use an additional nozzle while performing cuts with PLH3D laser head. The nozzle will direct the air stream much better in cases where the laser head is position more than 50 mm from material surface. Here’s how the nozzle looks like: Nozzle attaches directly to the laser head with 4 attached screws.
- Page 8 The nozzle can also be used as a mount if your X-Carve has the stock 43mm 24V spindle. If your X-Carve was delivered with DeWalt 611 or D26200 trim router, you’ll have to either use the mount described “Getting started” chapter of this guide or cut another one that fits the nozzle only, just like the one on picture below: Easel project for this mount can be found here: http://easel.inventables.com/projects/wfSareHaTE4gDrYl2azdKw...
- Page 10 Setup Congratulations! Your X-Carve is now upgraded with 3D engraving laser head. Before you can use it however, you will have to set-up your X-Carve first. In order for the laser head to work the Spindle (PWM) signal has to be enabled. There is few ways to do that but we will focus on the most user friendly one.
- Page 11 Set "Spindle control preference" to "Automatic" and click "Save spindle preference". Proceed to the end of the setup procedure. The spindle control is now enabled and X-Controller can control the laser head. Keep in mind that Easel software is not meant to work with laser heads and it will not work properly.
- Page 12 G-Code for this logo is available here: LINK to PLH3D_logo.g Here’s the result on scrap piece of MDF:...
- Page 13 Congratulations!
- Page 14 You're all set. Now you can use your X-Carve to laser-cut and laser-engrave your projects. Once you're done with the laser head and want to swap it with the spindle, remember to unplug the Spindle (PWM) connector from X-Controller to avoid shorts. Safety Note: Looking at the laser beam may irreversibly damage your sight.
Need help?
Do you have a question about the PLH3D 6W and is the answer not in the manual?
Questions and answers