Table of Contents
Advertisement
Advertisement
Table of Contents

Related Manuals for Royal Sovereign RBC-EP1600


Summary of Contents for Royal Sovereign RBC-EP1600
- Page 1 RBC-EP1600 Platinum 1 Pocket Currency Discriminator OPERATING MANUAL...
-
Page 2: Table Of Contents
Thank you for purchasing the Royal Sovereign Platinum 1 Pocket Currency Discriminator, RBC-EP1600. This manual will provide you with safety information, instructions for optimal use, and proper care and maintenance for your product. Please read this manual carefully before operating. -
Page 3: Safety Instructions
SAFETY INSTRUCTIONS Always be careful when using the machine. To reduce the risk of fire, electrical shock, or other injuries, keep these safety considerations in mind when installing, using, and maintaining your machine: WARNING Place the machine on a secure, stable surface. The machine can be seriously damaged if it falls. -
Page 4: Box Contents
“Daily Maintenance” section of this manual carefully. If the performance becomes deteriorated, please clean all the sensors first before calling your Royal Sovereign Customer Service. Safety Notes Your machine and the supplies are designed and tested to meet strict safety requirements. -
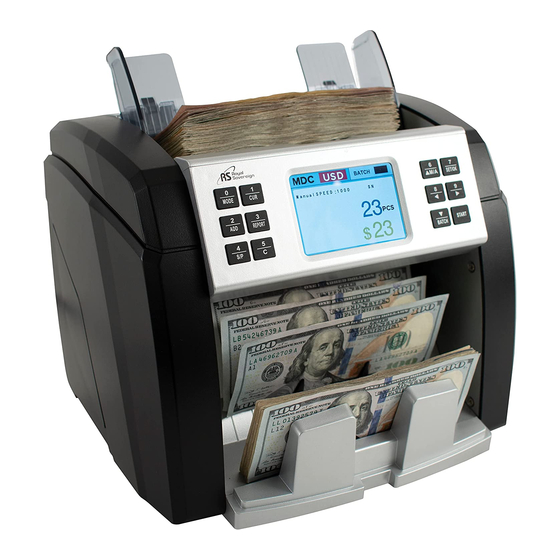
Page 5: Product View
PRODUCT VIEW Parts Note Guide for Counting Notes Expansion guide Hopper Thickness Adjustment Screw Gap control screw Control Panel Stacker Back Cover Power Plug Power Switch Printer Port USB Port External Display Port... -
Page 6: Control Panel
CONTROL PANEL Description Description Change the counting mode (Count Mode, Clear the screen Sort Mode, and Mixed Mode). Manual / Auto Counting Change the currency. Confirm and enter the selected mode. Add Mode Print Button. View the bill count Batch Mode report. - Page 7 Action This key can be used to select the bill counting mode. You can select MDC (Mixed), SDC (Sort), or CNT (Count). This key can be used to select which currency you will be counting. USD – United States Dollar CAD –...
- Page 8 Action By pressing the “CLEAR/BACK" key, you can clear the counted number and total value after counting. This key can be used to choose between Manual counting or Auto counting. OK: this key can be used to confirm the count mode, exit the corresponding interface, or print the counting result in MDC (Mix) mode.
-
Page 9: Product Operation
PRODUCT OPERATION PLACING BILLS INTO HOPPER It is very important to place the bills into the hopper correctly because recognition performance of the bills is highly affected by the arrangement of the bills. Please avoid counting bills in bad conditions such as wet, excessively dirty, folded, curled notes, or with foreign material like clips, bands, etc., as it may cause a malfunction of the machine. - Page 10 SORT MODE (By pressing the “MODE” key) The machine can catch the different denomination bill while counting. In this mode, the machine will read the first bill that goes through and sort based on that denomination. Therefore, if a mixed bill is stuck in the pile, the machine will display an error code informing the user of the different denomination.
- Page 11 CHECKING SERIAL NUMBERS The machine can record the serial numbers of the bills that are counted. The display will show the denomination and serial number of the bills in order of how they went through the machine. From the Report screen, press the “REPORT”...
- Page 12 SELECTING AUTOMATIC/MANUAL COUNTING The machine is preset to Automatic Mode. In Automatic mode, when the hopper sensor detects banknotes on the hopper, the machine will automatically start to count the bills. To change to manual mode, press the “M/A” key. In Manual mode, the machine will not count the bills automatically even though the bills are on the hopper.
- Page 13 THERMAL PRINTER (OPTIONAL) Available Printers: Compatible via RS232 Printer. RBC-EP1600 Operating Printer Count banknotes Normal receipt =============================== Press the "REPORT" key DENOMI AMOUNT =============================== Press the key to print the report. (The user can print again and again by pressing the key.)
-
Page 14: Error Messages & Troubleshooting
ERROR MESSAGES & TROUBLESHOOTING Error Code Error Cause Error Solution Suspect note flagged for Double notes (2 pieces stuck together) Chain note Broken note / half note Suspect note with wrong Remove the first bill image (CIS error) from the stacker. Press “START”... - Page 15 Metal Thread Detector error Clean the sensor. If error MG1 error continues, sensor may need to be changed. MG2 error Contact Royal Sovereign MG3 error if error persists. MG4 error Clean the sensor. If error continues, sensor may need to be changed.
- Page 16 IR transmission area 3 Clean the sensor. If error IR transmission area 4 continues, sensor may need to be changed. Contact Royal Sovereign if error persists. IR transmission area 5 IR transmission area 6 IR transmission area 7 IR transmission area 8...
- Page 17 IR reflect area 3 Clean the sensor. If error IR reflect area 4 continues, sensor may need to be changed. Contact Royal Sovereign if IR reflect area 5 error persists. IR reflect area 6 IR reflect area 7 IR reflect area 8...
-
Page 18: Specifications
SPECIFICATIONS Model RBC-EP1600 Dimensions (WxDxH) 10.08” W x 11.02” D x 10.82” H Weight 13.20 lbs. Hopper Capacity 600 pcs Stacker Capacity 200 pcs Display Type USA, CAD, EUR, GBP, RUB, MXN, Currencies ARS, BRL, KRW, CNY, JPY, HKD Counting Speed... -
Page 19: Daily Care
If necessary, the glass surfaces of the detectors may also be wiped with a soft cloth damped with alcohol. To get the best results out of your bill counter, Royal Sovereign recommends using Royal Sovereign Cleaning Cards (RBC-CLN) to remove dirt, dusts, oils, and other contaminates from your bill counter. -
Page 20: Warranty
ONE YEAR LIMITED WARRANTY Royal Sovereign International, Inc. warranties this product to be free from defects in material and workmanship for a period of one (1) year. This warranty is extended to the original purchaser only. This warranty only covers products that are properly installed, properly maintained, and properly operated in accordance with the instructions provided.
Need help?
Do you have a question about the RBC-EP1600 and is the answer not in the manual?
Questions and answers