
Related Manuals for Royal Sovereign RBC-ES250


Summary of Contents for Royal Sovereign RBC-ES250
- Page 1 Owner's Manual HIGH SPEED BILL COUNTER WITH VALUE COUNTING RBC-ES250 Please read and retain these instructions. Royal Sovereign International, Inc. For more information, please go to www.royalsovereign.com...
- Page 2 Thank you for purchasing the Royal Sovereign Bill Counter with Value Counting - RBC-ES250. This manual will provide you with safety information, instructions for optimal use, and proper care and maintenance for your product. Please read this manual carefully before operating.
-
Page 3: Safety Instructions
Do not take apart the machine. When service or repairs are needed, bring to a qualified service repair technician or contact Royal Sovereign Customer Service. When unplugging the power cord from the outlet, grip the plug to pull it out. -
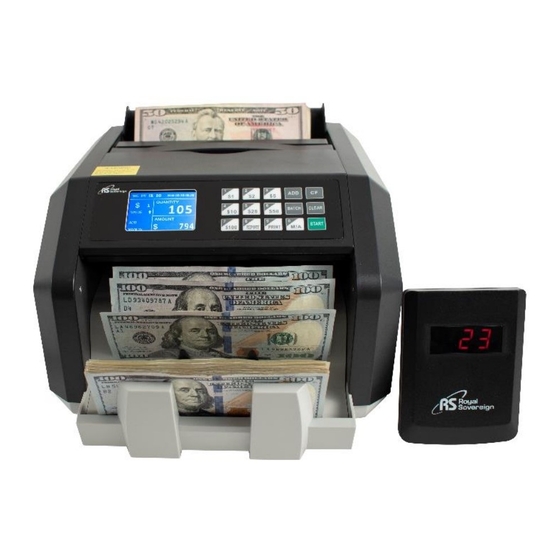
Page 4: Box Contents
BOX CONTENTS Bill Counter Power Cord External Display PRODUCT VIEW Hopper Carrying Handle Control Panel Bill Receiving Vanes External Stacker Display... - Page 5 QUICK START GUIDE Plug the power cable into the back of the unit and into the wall power outlet (B). On the back of the machine, flip the power switch to power on (A). The machine will go through an automatic self-diagnostics test to ensure accurate bill counting.
-
Page 6: Control Panel
CONTROL PANEL Counterfeit Detection (CF Key) – To use the detection methods, press the “CF” button. If the machine detects an error due to one of these methods, the machine will stop counting to allow for removal of the suspect bill and an error code will display. -
Page 7: Product Operation
PRODUCT OPERATION Attach the power cable to the back of the machine, plug into a three-prong outlet, and turn the switch on. • The unit will conduct an automatic self-diagnostics to ensure accurate counts. • After three seconds of the counting wheels spinning, the screen will display “0”. •... - Page 8 PRODUCT OPERATION (Continued) Date and Time Set: • • On the control panel, press and hold “ADD”. The cursor button will flash over the date/time setting. The display shows year-month-day-hour-minute. • Press the “1” button to move left. Press the “7” button to move right. •...
-
Page 9: Troubleshooting
TROUBLESHOOTING Error Code Reason Solutions To loosen the tension, please turn the bill Bills get damaged / thickness adjuster (located on the back of the Hopper Tension is too tight Machine runs slow machine) anti-clockwise. Repeat bill counting and adjust if the problem continues. To tighten the tension, please turn the bill Bills eject from the thickness adjuster (located on the back of the... -
Page 10: Error Code Display And Solutions
DD suspect note due to bill width continue counting. Remove first bill from the stacker, then Half Note error continue counting. Clean the sensor or contact Royal Sovereign E01/E02 Counting Sensor error to replace sensor if error code persists. Clean the sensor or contact Royal Sovereign Code disc sensor error to replace sensor if error code persists. -
Page 11: Maintenance Of The Machine
If necessary, the glass surfaces of the detectors may be wiped with a soft cloth damped with alcohol. To get the best results out of your bill counter, Royal Sovereign recommends using Royal Sovereign Cleaning Cards (RBC-CLN) to remove dirt, dust, oils, and other contaminates from bill counters. With the machine on, simply run the cleaning card through the machine like a bill. -
Page 12: One-Year Limited Warranty
ONE YEAR LIMITED WARRANTY Royal Sovereign International, Inc. warranties this product to be free from defects in material and workmanship for a period of one (1) year. This warranty is extended to the original purchaser only. This warranty only covers products that are properly installed, properly maintained, and properly operated in accordance with the instructions provided.
Need help?
Do you have a question about the RBC-ES250 and is the answer not in the manual?
Questions and answers
We are having trouble with how to change the batch quantity.
To change the batch quantity on the Royal Sovereign RBC-ES250, press the desired number on the keypad. For example, to set the batch quantity to 30, press “3” followed by “0”. The number 30 will appear on the control panel.
This answer is automatically generated