Advertisement
Quick Links
Quick Installation Guide
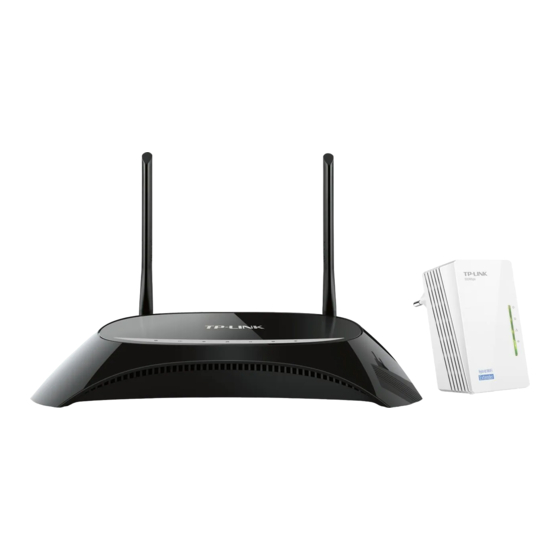
AV500 Hybrid Wi-Fi Starter Kit
H5R/H5E
MODEL NO.
LEDs and Buttons
Router
AP CLONE
RESET
/PAIR
/WPS
1
Configure the Router
Method 1 >> Con gure the Router via CD Setup Wizard
1
Insert the TP-LINK Resource CD into the
CD-ROM drive.
Method 2 >> Con gure the Router via Web-based Quick Setup Wizard
Make sure that your computer is set to "Obtain an IP address automatically".
Open your web browser, type domain name
1
http://tplinklogin.net in the address bar and
press Enter. Then use the default user name
and password (admin/admin) to log in.
1. If the login window does not pop up or the
login fails, please refer to Troubleshooting-2.
2. To
ensure
account
security,
you
are
recommended to change the default user name
and password on the "System Tools >
Password" page after your rst login.
Package Contents
Hybrid Wi-Fi Dual Band Router
Hybrid Wi-Fi Extender
Resource CD
Ethernet Cable × 2
(For Windows Only)
AV500 Hybrid Wi-Fi Starter Kit
MODEL NO. H5R/H5E
QIG
Power Adapter
Power LED (On/O /Blink)
USB LED (On/O )
Wireless LED (On/O )
WPS LED (On/O /Blink Slowly/Blink Quickly)
WAN LED (On/O /Blink)
LAN LED (On/O )
Powerline LED (On/O /Blink)
RESET/WPS Button
AP CLONE/PAIR Button
(For Windows Only)
Select H5R and then click Easy Setup Assistant.
2
(For Windows/Mac/Linux)
Click Quick Setup on the main menu and then click
2
Next.
The router will automatically detect the Internet
connection. If the Internet is available, the router will
direct you to Step 5; otherwise, you need to continue
with Step 3.
Hardware Connection
Router
Connect the WAN port of the router to the Internet with an Ethernet cable.
1
Connect a LAN port of the router to your computer with another Ethernet cable.
Connect the power socket of the router to a wall socket with the supplied power adapter.
3
Plug the extender into a nearby wall socket.
4
5
Turn on the ON/OFF switch to power on the router and wait for 1 minute.
1. The router and extender must be plugged into wall sockets under the same electric meter.
2. Con gure the router before performing AP clone.
Extender
3
Choose your language from the drop-down menu.
Click START and the Easy Setup Assistant will guide
you step by step to set up the router.
Select Auto-Detect to detect the Internet connection
3
type and click Next. (The Dynamic IP is the suitable
connection type for most cases, so we take it as an
example in the following.)
Extender
Computer
Power LED (On/O /Blink Slowly/Blink Quickly)
Powerline LED (On/O /Blink)
Ethernet LED (On/O )
Wireless LED (On/O /Blink)
Wi-Fi Button
AP CLONE/PAIR Button
Reset Button
4
Follow the instructions until you see the screen
below. Click FINISH to complete the setup.
If Dynamic IP is detected, the MAC Clone page
4
will appear. In most cases, there is no need to
clone the MAC address. You can select "No, ..."
and then click Next.
(To be continued ...)
Advertisement

Related Manuals for TP-Link H5R


Summary of Contents for TP-Link H5R
- Page 1 Configure the Router (For Windows Only) Method 1 >> Con gure the Router via CD Setup Wizard Select H5R and then click Easy Setup Assistant. Insert the TP-LINK Resource CD into the Choose your language from the drop-down menu. Follow the instructions until you see the screen CD-ROM drive.
- Page 2 USB port of the router can be used to share your file, media, storage space, and printer across your local network. You can set up additional features by referring to the Technical Support page on the TP-LINK website or the User Besides, by setting up an FTP server, you can access your files whenever you are connected to the Internet.
Need help?
Do you have a question about the H5R and is the answer not in the manual?
Questions and answers