Table of Contents
Advertisement
Available languages
Available languages
Quick Links
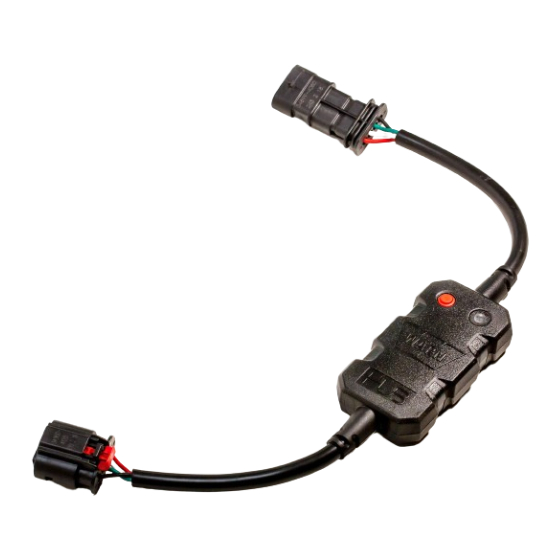
WARN® HUB Receiver
General Safety/ Tips/Trouble Shooting/
Customer Service Guide
Always Know Your Winch. Take time to fully read these
instructions, your quick start guide and the Basic Guide to
Winching Techniques (found online at www.warn.com), in
order to understand your product operations.
WARNING
• For winch applications only. Do not use with a hoist product.
CAUTION
MOVING PARTS ENTANGLEMENT HAZARD
Failure to observe these instructions could lead to
minor or moderate injury.
To avoid injury to hands or fi ngers:
• Never leave the Hub Receiver plugged in when installing,
freespooling, rigging, servicing or when the winch is not
being used.
* Always keep hands clear of winch rope, hook loop, hook
and fairlead opening during installation, operation, and
when spooling in or out.
WARNING
CHEMICAL AND FIRE HAZARD
Failure to observe these instructions could lead to
serious injury or death.
• Always remove jewelry and wear eye protection.
• Never route electrical cables across sharp edges.
• Never route electrical cables near parts that get hot.
• Never route electrical cables through or near moving parts.
• Always place the supplied terminal boots on wires and
terminals as directed by the installation instructions.
• Never lean over battery while making connections.
• Never route electrical cables over battery terminals.
• Never short battery terminals with metal objects.
• Always verify area is clear of fuel lines, fuel tank, brake
lines, electrical wires, etc., when drilling.
• Always consult operator' s manual for proper wiring details.
• Always insulate and protect all exposed wiring and
electrical terminals.
• Always connect red (+) power cable ONLY to the positive
(+) terminal of the battery.
• Always connect black ground (-) power cable ONLY to the
negative (-) terminal of the battery.
NOTICE
• For Truck/SUV Hub Receiver Only: Avoid vehicle battery
drain by unplugging the remote plug from winch and
secure up and out of the way, when not in use.
Page 1
103969A0
FCC Regulation
This device complies with Part 15 of the FCC Rule. Operation is
subject to the following two conditions:
(1) this device may not cause harmful interference, and
(2) this device must accept any interference received,
including interference that may cause undesired operation.
This equipment has been tested and found to comply with the limits
for a Class B digital device, pursuant to part 15 of the FCC Rules. These
limits are designed to provide reasonable protection against harmful
interference in a residential installation. This equipment generates,
uses and can radiate radio frequency energy, and if not installed
and used in accordance with the instructions, may cause harmful
interference to radio communications. However, there is no guarantee
that interference will not occur in a particular installation. If this
equipment does cause harmful interference to radio or television
reception, which can be determined by turning the equipment off
and on, the user is encouraged to try to correct the interference by
one or more of the following measures:
• Reorient or relocate the receiving antenna.
• Increase the separation between the equipment and receiver.
• Connect the equipment into an outlet on a circuit diff erent from
that to which the receiver is connected.
• Consult the dealer or an experienced radio/TV technician for help.
§ 15.21 Information to user.
The users manual or instruction manual for an intentional or
unintentional radiator shall caution the user that changes or
modifi cations not expressly approved by the party responsible
for compliance could void the user' s authority to operate the
Tips/Features
Pairing a second receiver
1. Open Settings on smart device.
2. Click 'My HUB Receivers'
3. Click 'Pair a HUB Receiver'
4. Complete pairing following Pair/Connect section in quick start.
Reset receiver
1. Hold button for 10 seconds until blue light on the HUB receiver rapidly flashes.
2. Release button.
3. Forget receiver. NOTE: Follow your smart device's manufacturers instructions to forget
bluetooth pairing.
4. Follow Pair/Connect instructions in Quick Start Guide to reconnect your smart device to
the HUB receiver.
equipment. In cases where the manual is provided only in a form
other than paper, such as on a computer disk or over the Internet, the
information required by this section may be included in the manual in
that alternative form, provided the user can reasonably be expected
to have the capability to access information in that form.
Industry Canada
This device complies with Industry Canada license-exempt RSS
standard(s). Operation is subject to the following two conditions:
(1) this device may not cause interference, and
(2) this device must accept any interference, including
interference that may cause undesired operation
of the device.
Under Industry Canada regulations, this radio transmitter may only
operate using an antenna of a type and maximum (or lesser) gain
approved for the transmitter by Industry Canada. To reduce potential
radio interference to other users, the antenna type and its gain should
be so chosen that the equivalent isotropically radiated power (e.i.r.p.)
is not more than that necessary for successful communication.
This radio transmitter (identify the device by certifi cation number, or
model number if Category II) has been approved by Industry Canada
to operate with the antenna types listed below with the maximum
permissible gain and required antenna impedance for each antenna
type indicated. Antenna types not included in this list, having a gain
greater than the maximum gain indicated for that type, are strictly
prohibited for use with this device.
Page 2
103969A0
Advertisement
Table of Contents

Related Manuals for Warn HUB


Summary of Contents for Warn HUB
- Page 1 Reset receiver • For Truck/SUV Hub Receiver Only: Avoid vehicle battery 1. Hold button for 10 seconds until blue light on the HUB receiver rapidly flashes. drain by unplugging the remote plug from winch and secure up and out of the way, when not in use.
-
Page 2: Trouble Shooting/Error Conditions
• Confi rm winch remote plug is connected (if applicable). your winch and its operations No connection between HUB • Verify HUB Receiver’s LED is green. Refer to Quick Start Guide. App and HUB Receiver Check zip ties and make sure they are tight. - Page 3 Cet équipement a été testé et avéré conforme aux limitations d'Industrie Canada. Son fonctionnement est soumis aux deux treuillage (accessible en ligne sur www.warn.com) afi n de relatives à un appareil numérique de classe B, conformément à la conditions suivantes : comprendre le fonctionnement de votre appareil.
-
Page 4: Entretien
(le cas échéant). désactivée. télécommande de treuil. Il n'y a pas de connexion • Vérifi er que le voyant LED du récepteur HUB est entre l'application HUB et Entretien allumé en vert. Se reporter au Guide de démarrage rapide. - Page 5 Restablecer el receptor eléctricos que queden expuestos. 1. Presione el botón durante 10 segundos, hasta que la luz azul del receptor HUB parpadee • Conecte siempre el cable de alimentación rojo (+) SOLO con el terminal positivo (+) de la batería.
-
Page 6: Mantenimiento
(si procede). Lea detenidamente las Instrucciones, la Guía de operación Aplicación de HUB y receptor • Verifi que que la luz LED del receptor HUB es verde. o la Guía básica de técnicas del cabrestante para HUB no conectados entre sí... - Page 7 Empfänger zurücksetzen • Immer das schwarze (-) Erdungskabel NUR an den HINWEIS 1. Halten Sie die Taste 10 Sekunden lang gedrückt, bis die blaue Leuchte am HUB-Empfänger in rascher negativen (-) Anschluss der Batterie anschließen. Abfolge blinkt. • Nur für Hub-Empfänger am Lkw/SUV: Vermeiden Sie 2.
-
Page 8: Fehlerbehebung/Fehlerzustände
• Stromversorgung des Fahrzeugs einschalten. • Schalten Sie die Stromversorgung des Fahrzeugs ein. Stromversorgung ist ausgeschaltet • Stecker des HUB-Empfängers in die Steckbuchse für die • Prüfen Sie, ob alle Kabelverbindungen (Schaltschütz, Windenfernsteuerung einstecken. Steuerung, Massekabel) fehlerfrei und sicher sind. - Page 9 4. Slutför parkoppling efter avsnittet Parkoppla/Anslut i snabbstart. Återställ mottagaren 1. Håll knappen intryckt i 10 sekunder tills blått ljus på HUB-mottagaren snabbt blinkar. 2. Släpp knappen. MEDDELANDE 3. Glöm mottagaren. OBSERVERA: Följ anvisningarna från tillverkaren av din smarta enhet för att glömma Bluetooth-parkoppling.
-
Page 10: Kontakta Oss
För ytterligare information eller frågor, kontakta: med solenoidkontrollenhet solenoidkontrollenheter. WARN INDUSTRIES, INC. 12900 S.E. Capps Road, Clackamas HUB-överhettning • Flytta HUB till en svalare plats på fordonet. OR USA 97015-8903, 1-503-722-1200, LED- Mottagaren är inte Kundtjänst: 1-800-543-9276 indikatorn är • Se avsnittet Parkoppla/Anslut i Snabbstartguiden. - Page 11 (+) della batteria. • Collegare sempre il cavo di terra nero (-) SOLO al terminale 1. Tenere premuto il tasto per 10 secondi finché la spia blu sul ricevitore HUB inizia a AVVISO negativo (-) della batteria.
-
Page 12: Manutenzione
Ogni 90 giorni L’app HUB e il ricevitore primo utilizzo utilizzo • Verifi care che il LED del ricevitore HUB sia verde. HUB non sono connessi tra Consultare la Guida di avvio rapido. Per comprendere il verricello e il suo funzionamento,... - Page 13 • Sempre conecte o cabo de alimentação preto (-) SOMENTE Reiniciando o receptor no terminal negativo (-) da bateria. 1. Segure por 10 segundos o botão até que a luz azul do receptor HUB pisque de forma AVISO intermitente. 2. Solte o botão.
- Page 14 • Verifi que se o plugue do controle remoto do guincho Manutenção está conectado (se for o caso). Não há conexão entre o • Verifi que se a luz de LED do Receptor HUB está verde. Antes da Após cada A cada 90 Verifi que Consulte o Guia de Inicialização Rápida.
- Page 15 • Sluit de zwarte aardingskabel (-) altijd ALLEEN aan op de Ontvanger resetten negatieve (-) klem van de accu. 1. Houd de knop 10 seconden ingedrukt totdat het blauwe lampje op de HUB-ontvanger snel knippert. OPMERKING 2. Laat de knop los.
-
Page 16: Neem Contact Op
(indien van toepassing). Neem de tijd om de bedieningsinstructies, Geen verbinding tussen • Controleer of de LED van de HUB-ontvanger groen is. gebruiksaanwijzing en de basishandleiding voor HUB-app en HUB-ontvanger Raadpleeg de Snelstartgids. liertechnieken te lezen, zodat u de lier en de bediening... - Page 17 4. Viimeistele laiteparin muodostaminen noudattamalla Pikaoppaan Pariliitä/Liitä-osiota. sisään- ja uloskelauksen aikana. Vastaanottimen nollaaminen 1. Pidä painiketta painettuna 10 sekunnin ajan, kunnes HUB-vastaanottimen sininen valo vilkkuu nopeasti. ILMOITUS 2. Vapauta painike. 3. Unohda vastaanotin. HUOM.: Noudata älylaitteesi valmistajan ohjeita Bluetooth- •...
- Page 18 Tarkista nippusiteet ja varmista, että ne ovat tiukat. yhteen suuntaan Vaihda tarvittaessa. • Vahvista, että johtoliitännät on kytketty oikein Johtoliitännät virheelliset ja tiukasti. Katso Vaihe 3 – HUB-vastaanottimen Tarkasta, että kaikki johtokomponentit ovat (vain Universal) johdotus. Katso Pikaopasta. oikein, ja varmista, että ne ovat kunnolla kiinni kytkentäpisteissä.
Need help?
Do you have a question about the HUB and is the answer not in the manual?
Questions and answers