
Related Manuals for norbar T-BOX XL


Summary of Contents for norbar T-BOX XL
- Page 1 OPERATOR’S MANUAL T-BOX XL™ FOR USE WITH T-BOX XL™ FITTED WITH (VERSION 2.1.0.X) SOFTWARE Part Number 34396 | Issue 2 | Original Instructions (English)
-
Page 3: Table Of Contents
CONTENTS Introduction Software Compatibility Features and Functions Quick Start Before Use Preparation Setup for Use Measure Preparation Transducer Tool Work ID Target Units Zero Display Mode Take Results (Calibrate) Data Logging Save Results View / Delete Results Mains / Battery Setup Target Tool Templates... - Page 4 Specification – USB Specification – Modes Track Peak Peak Extra Features Pulse Graph Specification – Targets Specification – Hand Torque Tool Classification Maintenance T-Box XL™ Calibration Transducer Calibration Battery Replacement Repair Cleaning Product Disposal Battery Disposal Trouble Shooting Glossary of Terms...
-
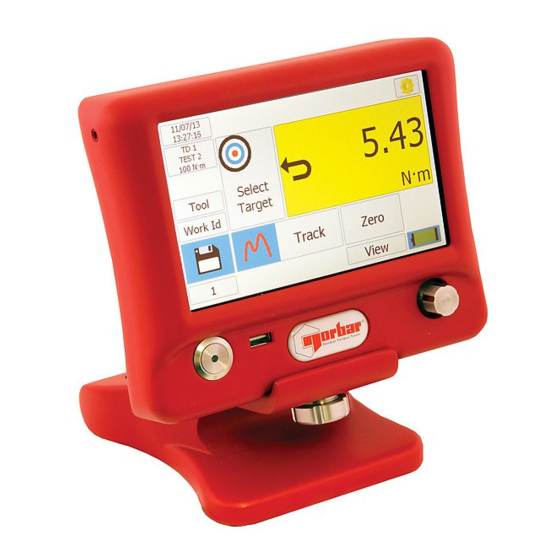
Page 5: Introduction
INTRODUCTION The T-Box XL™ is a hand held torque measuring instrument with a user friendly colour touch screen interface. Both hand and powered torque tools can be measured, calibrated or viewed in graph mode. The comprehensive instrument functions in 12 languages, all common torque units, pre-loaded Tool calibration templates and has a large measurement memory for storage of test results. -
Page 6: Features And Functions
Total 6,645KB (7% of memory) Templates for all Norbar tools (Torque Wrenches, PneuTorques & EvoTorques) to enable the operator to easily perform calibrations on their tools to the relevant ISO standard using the in-built calibration program. In addition templates exist for all torque tools covered in ISO 6789:2003 with other tools easily added. -
Page 7: Quick Start
QUICK START Follow flowchart to use the T-Box XL™. To just measure torque follow the RED bold path. For more comprehensive details refer to BEFORE USE, MEASURE, SETUP and SPECIFICATION sections. NOTE: If Target, Tool Templates, Tools or Non-Smart Transducers do not exist, add via Setup. -
Page 8: Before Use
MOISTURE BEFORE USE. For Bench Use: a. Fix stand to bench, use M10 bolts provided. Do not tighten above 10 N·m. b. Mount T-Box XL™ on stand, tighten fixing screw by hand. TIP: The T-Box XL™ will mount on a standard tri-pod (not supplied). - Page 9 2000, XP, Vista, 7 & 8. The T-Box XL™ can be powered from mains or battery. It is essential to charge the internal battery for 200 minutes (3 hours & 20 minutes) for full charge. To charge the internal battery, connect the Power supply adapter between the T-Box XL™...
-
Page 10: Setup For Use
Setup For Use Turn T-Box XL™ on. The Norbar logo appears. Wait for the green progress bar at the bottom of the logo screen. The measure screen will then be shown. Screen Area Action Further Information T-Box XL™ Software Version #, Date &... -
Page 11: Measure
MEASURE Preparation Turn T-Box XL™ on. The measure screen will be shown: Before taking measurements ensure the T-Box XL™ is prepared correctly. The following icons are used to navigate: Exit Meaning Scroll Exit (no change) Icon Transducer Press to show / select transducer details: For SMART transducer details are shown. -
Page 12: Tool
Tool Press ‘Tool’ to select the tool to be calibrated or used. ® ® A Tool can be a Torque wrench, PneuTorque , EvoTorque , Torque screwdriver, etc. Enter / select “Tool Serial #” (If not required select “No Tool”). TIP: If tools are bar coded, a USB bar code scanner (not supplied) can be used to enter the number. -
Page 13: Target
Press ‘Zero’ to zero display. TIP: If the displayed reading does not zero the transducer may be overstrained. Contact a Norbar approved distributor for further advice. NOTE: It is also possible to zero the display in other modes (e.g. CLICK mode), when the reading... -
Page 14: Mode
Select mode for the Tool being used. The currently selected mode is shown with a BLUE border. Take Results Operate tool and measure torque on T-Box XL™. Calibrate The measurement point is displayed on the left of the display for an ISO6789 Tool Template (eg: 20%, 60% &... - Page 15 If the Tool template has Setting Values (e.g. for air pressure settings when calibrating pneumatic tools) the following screen will be displayed before each set of torque readings are taken: Setting Values (optional) The Setting Value (in this example 2 P.S.I.) can either be accepted or changed to a different value.
-
Page 16: Data Logging
To view large amounts of data will take many seconds (Only the last 20,000 logged results can be viewed). To avoid this delay, transfer logging data directly from the T-Box XL™ to the USB stick by pressing the following setup button:... -
Page 17: Save Results
The last measurement will be removed from the top of the screen The Number of Tests counter will decrease by 1. The BIN symbol will disappear. COMPLETE At the end of CALIBRATION or when ‘# of Tests’ complete; T-Box XL™ displays:... -
Page 18: View / Delete Results
View / Delete Results To view results for use, calibrations & graphs: Select result then press: TICK to view [Shows: Tool, Mode, Transducer and results (with LO/OK/HI if target was used)]. RED CROSS to delete (via the password if set). The results are listed in DATE order, with the latest at the top. -
Page 19: Setup
SETUP T-Box XL™ SETUP covers: Targets, Tool Templates, My Tools, Non-Smart Transducers, USB, Language, Modes, Sleep, Password, Time & Date, Angle Display, Units and Serial Port. The TDMS software can also setup the Targets, Tool Templates & Transducers. Press: in measure to show:... -
Page 20: Target
Torque value at which the STOP output on Ancillaries connector changes to logic 1. Internal Snug NO-TICK = Snug torque triggered from Ancillaries. Torque Trigger TICK = Snug torque triggered when Torque value reaches ‘Snug torque’ value in T-Box XL™. Snug Torque Torque value to start measuring angle. Direction Direction Angle Target operates. -
Page 21: Tool Templates
Tool Templates Press to show: Templates exist for all Norbar tools (Torque Wrenches, PneuTorques & EvoTorques) in multiple torque units. Select Tool Template to Add, Edit or Delete. Tool Template Options Comment Model # Model number of Tool. Description Description of Tool. -
Page 22: Non-Smart Transducer Setup
Non-Smart Transducers Setup NOTE: This feature is not required for Norbar SMART transducers (with suffix: .LOG, .LOGA, .IND & .INDA). Press to show: Add / edit / delete as required. Transducer Options Comment Serial # Serial number of Transducer. Model # Model number of Transducer. -
Page 23: Instrument Setup
Instrument Setup Press to show: Language Press to show: Languages are: English / French / German / Italian Danish / Spanish / Dutch / Finnish Swedish / Norwegian / Portuguese / Russian Select language. -
Page 24: Modes Setup
Modes Setup Press to show: QUICKLY PRESS icon to enable / disable (RED X) the mode: Disable all modes that are NOT required. (Track mode cannot be disabled). PRESS AND HOLD icon to setup mode: Mode Options Comment (where applicable) TICK required filter frequency. -
Page 25: Sleep After
Enter time in minutes. The T-Box XL™ will go to sleep if there has been no activity for the time set in ‘Sleep After’. During sleep, none of the T-Box XL™ functions operate. If continual operation is essential disable the sleep function. -
Page 26: Date & Time
Date & Time Press to show: Select Date & Time. Angle Display Press to show: Angle Display Display (Options for angle Metric Torque Units Imperial Torque Units transducer) Torque Torque only. Torque only. Torque & Angle Torque & angle in ° (degrees). Torque &... -
Page 27: Serial Port
TICK. Set “Line Delay” = 0. To turn off set option to 0 (zero)). Log All Serial Output Save the Data that is output inside the T-Box XL™. UN-TICK TIP: Using the ‘Comma’ as the Separator will create results with ‘comma separated values’ (csv), ®... -
Page 28: Specification - General
±0.06% *Using a coverage factor of k=2, to give a confidence level of approximately 95%. Resolution: 5 active digits for all Norbar transducers. Display: 7” WVGA TFT colour display with touch screen. With update rate of three times per second (3Hz). -
Page 29: Specification - Transducer Interface
120% of transducer capacity. 120% of transducer capacity. For ‘NON-SMART’ transducers the transducer parameters can be stored in the T-Box XL™ for ease of use. NOTE: If any of the transducer’s parameters are changed, like a re-calibration of the mV/V value, the transducer’s stored parameters must be updated prior to use. -
Page 30: Specification - Ancillaries
SPECIFICATION - ANCILLARIES The Ancillaries connector contains inputs and outputs for connection to external equipment. Pin Connections Pin No Function Digital +5 V (maximum current 5 mA). External PRINT / RESET Input (Active High). Low Limit Torque Output. Pass Limit Torque Output. High Limit Torque Output. -
Page 31: Analogue Output
If the output is measured against PIN 13 (0 V) the signal will always be positive, with zero torque around 2.5 V. TIP: Some transducers (Norbar Annular type) will give a negative output change for a positive torque. This is because they are designed to measure reaction torque. -
Page 32: Specification - Serial Port
Data Output Example Code: DP=Decimal Point. CR=Carriage Return. SP=Space. T-Box XL™ with the serial port set to the factory defaults. Reading 1068.4 lbf·ft (clockwise). NOTE: The maximum number of characters per line = 24. Connector Type 9 way male ‘D’ type connector. -
Page 33: Specification - Usb
1.5 Mbps 1.5 Mbps NOTE: The T-Box XL™ is not designed to send data directly to a USB printer. Pass the data to a PC, then to a USB printer. When USB flash drive is used, files transferred are: Text File On Flash Drive... -
Page 34: Specification - Modes
SPECIFICATION - MODES Track Display follows signal. Peak Used for Click wrenches. Hold 1 peak for the ‘AUTO RESET HOLD TIME’, then reset. If ‘Manual Reset’ is selected torque will be reset when ‘Reset’ pressed or external ancillaries reset input active. TIP: When calibrating ISO6789 Type II Torque tools, the standard calls for the time from 80% to the final target torque value shall take 0.5 to 4 seconds. -
Page 35: Pulse
Pulse This mode is for PULSE TOOLS only. WARNING: DO NOT USE WITH IMPACT TOOLS. TIP: For best results do not change setup, keep Filter Frequency = 2500Hz and Active From = 4.8%. TIP: For best results work above 20% of transducer capacity. Pulse tools use air to operate a hydraulic mechanism that applies torque in a series of pulses. -
Page 36: Graph
Graph Graph Mode Step Action Option Single event: Automatic start / stop to capture 1 fast event. Graph starts when torque goes above the ‘Active From’ setting. Graph stops when torque goes below the ‘Active From’ setting. Select type Manual start / stop to capture 1 or more slower events. Multi event: Graph starts when record (REC) pressed. -
Page 37: Specification - Targets
SPECIFICATIONS – TARGETS The T-Box XL™ has targets for both Torque and Angle value. Each Target has an Upper Limit and a Lower Limit. Torque Signal Display Icons Display Colour Display Example Serial Port Ancillaries At zero None YELLOW Logic output Pin 3... -
Page 38: Specification - Hand Torque Tool Classification
SPECIFICATION - HAND TORQUE TOOL CLASSIFICATION The T-Box XL™ tool templates conform to ISO 6789:2003 classification for hand torque tools. A summary of the classifications are given below; for full details please refer to the ISO standard. Tool Type I: Indicating torque tools (The torque exerted is indicated on scale, dial or display). - Page 39 20 / 60 / 100 At set point 20 / 60 / 100 20 / 60 / 100 The T-Box XL™ automatically calculates the limits to ISO 6789:2003 by the following method: (Target value – Displayed reading) Deviation = x 100 Displayed reading If the 100% target value is set above 10 Nm, the deviation must be within ±...
-
Page 40: Maintenance
Re-calibration and repair should be carried out at Norbar or by a Norbar approved agent. Battery Replacement There are 2 batteries in this product. A custom battery pack for powering the T-Box XL™ (if the battery life is less than the specification it will require replacing) and a Coin cell to power the clock. -
Page 41: Trouble Shooting
The printer is too slow for the fast data output; need to slow down Serial printer losing data. T-Box XL™. In ‘Serial Port Setup’ change “Line Delay’ to a larger time. Line feed required. Serial output is being overwritten. -
Page 42: Glossary Of Terms
Work identification - the reference to the task, application or job. Work Id E.g.: a bolted flange, engine cylinder head, vehicle wheel nuts, etc. Zero Suppression Value of torque that has to be achieved for the T-Box XL™ not to display zero. - Page 43 Tel + 61 (0)8 8292 9777 Tel + 86 21 6145 0368 Email enquiry@norbar.com.au Email sales@norbar.com.cn NORBAR TORQUE TOOLS INC NORBAR TORQUE TOOLS INDIA PVT. LTD 36400 Biltmore Place, Willoughby, Plot No A-168, Khairne Industrial Area, Ohio, 44094 Thane Belapur Road, Mahape, Navi Mumbai –...
Need help?
Do you have a question about the T-BOX XL and is the answer not in the manual?
Questions and answers