Advertisement
Quick Links
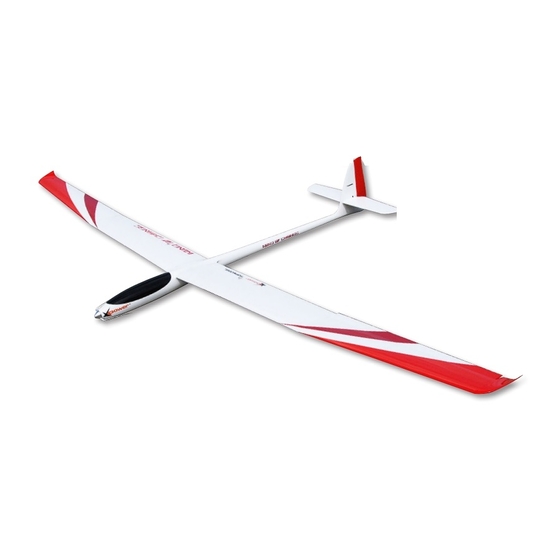
Planeur électrique de performance
Caractéristiques techniques / Technical data :
Envergure / wingspan : 4,00m
Longueur / length :
1,80m
Poids / TO weight :
4,5 / 4,7 kg
Surface / wing area :
79,9 dm
Profil / airfoil :
SD 7080 mod.
Equipements recommandés / Related items :
Moteur / motor :
XPower XC4220/14
Contrôleur / ESC : XPower XREG60
Accu de propulsion / Power pack :
Hélice / Propeller : XPower
Cône / Spinner :
Precision spinner
Radio / RC set :
Récepteur/receiver :
Régulateur de tension :
Ailerons
Volets
Profondeur/elevator :
Direction/rudder:
ATTENTION !
Ce modèle à construire n'est pas un jouet, il
ne convient pas aux enfants de moins de
14 ans.
Une mauvaise utilisation de ce matériel peut
provoquer des dommages matériels
ou corporels. Vous êtes pleinement
responsable
lorsque vous utilisez votre modèle.
Volez à une distance de sécurité des zones
habitées.
Soyez sûr que personne n'émet sur la même
fréquence que vous.
Order N°
High performance electric-glider
2
LiPo XPower Xtreme 14,8 V 5000 mAh
14 x 8" #099FB1408
Ø45 / Ø5 mm #020C1828
JETI DUPLEX R8
XPOWER SVR5-5/6V
2 servos TOPMODEL DS6010MG
2 servos TOPMODEL DS6010MG
1 servo TOPMODEL DS9010T
1 servo TOPMODEL S5514
CAUTION !
This model construction kit is not a toy and is
not suitable for children under the age of 14.
Incorrect use of this material could cause
material damage ou personal injury.
You are fully responsible for your actions
when you use this model.
Fly at a safe distance from occupied zones.
Be sure that no one else is using the same
frequency as you.
099006
Distribué par / Distributed by:
TOPMODEL
S.A.S.
Le jardin d'entreprises de SOLOGNE - F-41300 SELLES SAINT DENIS
www.topmodel.fr
ARF
Pour modélistes ayant
un bon niveau
ADV
For advanced
modellers
ARF
©TOPMODEL 2013
Advertisement

Related Manuals for Topmodel WIND OF CHANGE


Summary of Contents for Topmodel WIND OF CHANGE
- Page 1 Ø45 / Ø5 mm #020C1828 Radio / RC set : Récepteur/receiver : JETI DUPLEX R8 Régulateur de tension : XPOWER SVR5-5/6V Ailerons 2 servos TOPMODEL DS6010MG Volets 2 servos TOPMODEL DS6010MG Profondeur/elevator : 1 servo TOPMODEL DS9010T Direction/rudder: 1 servo TOPMODEL S5514...
- Page 2 Nous vous souhaitons un grand succès en assemblant et en faisant évoluer votre nouveau Wind of Change. Le succès de nos Krasivo et Krasivo 2 nous a conduit à concevoir et à vous proposer le Wind of Change, qui est une extrapolation en 4 mètres d'envergure.
- Page 3 With the Wind of Change, you can practice soaring on flat fields as well as for slope soaring. Flying is easy and if you fly with at ease a 2.5 or 3 meters glider with ailerons, you can fly the Wind of Change. Your first ideal 4-meter span ! Additional informations : Double dihedral on the wing make easy to stay in thermals.
- Page 4 Les filets sont particulièrement vulnérables à la surchauffe. Votre Wind of Change XPower est entoilé avec de l’Oracover® blanc N°10, rouge N°22 et rouge foncé N°20. RE-SHRINKING THE COVERING 1) Open you kit slowly and take care not to damage any parts of the kit.
- Page 5 MISC (B) Sachet de petites pièces ............1 (B) Small parts ................1 set (C) Autocollants couleur ............1 set (C) Color stikers ................1 set (D) Manuel de montage ..............1 (D) Instruction manual ..............1 Notice Ecotop - Page 5 - Wind of Change...
- Page 6 - 1 XPower FOLDING PROP 14x8 (# 099FB1408) - 1 XPower FOLDING PROP 14x8 (# 099FB1408) - 1 Cône alu turbo Ø 45/Ø5 mm (# 020C1828) - 1 Alu Precision Turbo Spinner Ø 45/Ø5 mm (# 020C1828) Notice Ecotop - Page 6 - Wind of Change...
- Page 7 2) A l'aide d'un fer à entoiler, ou de la pointe d'un fer à repasser, collez les bords de l'ouverture et rabattez l'entoilage dans l'ouverture. With a covering iron, cement the edges of the hole, and flip the covering inside the bay. Notice Ecotop - Page 7 - Wind of Change...
- Page 8 Be sure to install the servo arm screws onto the servos. perpendiculaires aux boîtiers des servos. N'oubliez pas la vis de maintien du palonnier. Notice Ecotop - Page 8 - Wind of Change...
- Page 9 This slot should not lead to the upper side. 11) Avec du papier de verre, dépolissez les surfaces de collage des guignols et des contre-plaques. Using sandpaper grit 80, scratch the glueing surfaces of the horns and counter plates.. Notice Ecotop - Page 9 - Wind of Change...
- Page 10 Placez du film adhésif double face sous le cache. Cut the servo covers from vacuum formed plastic plate. Install double sided adhesive under the covers. 17) Collez les caches servos. Install the servo covers. Notice Ecotop - Page 10 - Wind of Change...
- Page 11 Découpez soigneusement l'entoilage. On the top of the wing, locate under the covering the hole for the flap linkage. Carefuly cut the covering film. Notice Ecotop - Page 11 - Wind of Change...
- Page 12 Cette fois, il faut rallonger les fils de 40 cm. As you did for the aileron servos, extend the flap servos wires. Weld 40 cm extension wires. Notice Ecotop - Page 12 - Wind of Change...
- Page 13 Prepare the flap linkages as shown. In this case, a nut allows to set up the linkage at each side. Please, don't forget to slide the silicone tube onto each clevis. Adjust the linkage so that the flap is in neutral position with the servo centered. Notice Ecotop - Page 13 - Wind of Change...
- Page 14 (A7) Servo cover (rest of ABS plate) .........1 1) Faites passez le fil de servo d'aileron au travers du panneau interieur d'aile. Route the aileron servo wire through the wing inner panel. Notice Ecotop - Page 14 - Wind of Change...
- Page 15 Check if the ailerons and flaps servo wires exit from the root rib. 7) Collez les pions de calage en fibre dans la nervure d'emplanture avec de l'époxy. Glue the incidence dowels with epoxy in the root rib. Notice Ecotop - Page 15 - Wind of Change...
- Page 16 (B12) Guignol de direction en fibre ...........1 (B12) Rudder horn (fiberglass) ...........1 (B13) Vis à bois 2,2 x 8 mm ............2 (B13) 2,2 x 8 mm self taping screw ........... 2 Notice Ecotop - Page 16 - Wind of Change...
- Page 17 Draw and drill a 1,8 mm hole. The screw can be removed, to stab. Disassemble the half-stab and the joiner. disassemble the stabs from the fuselage. Notice Ecotop - Page 17 - Wind of Change...
- Page 18 "réglages". Trial fit the rudder, and adjust if needed. Check if the throws can reach the values suggested in the settings chapter. Notice Ecotop - Page 18 - Wind of Change...
- Page 19 : la collerette doit être sous les pattes de fixations. Install the the hardware that came with your servos. Please, note that the ring of the brass rivets should be under the fixing tabs of the servo. Notice Ecotop - Page 19 - Wind of Change...
- Page 20 Fixez les avec les vis fournies. Using a servo tester or your radio system, center the servos. Fit the servo arms perpendicular to to the servo case. Secure the arm with the provided screws. Notice Ecotop - Page 20 - Wind of Change...
- Page 21 Remove the servo arm. Connect the pushrod to the arm. Re- attach the arm and the screw. 12 ) Procédez de même pour relier la commande de direction au servo. Do the same for the rudder pushrod. Notice Ecotop - Page 21 - Wind of Change...
- Page 22 Atatch the prop on the engine. Be sure that the blades can fold along the fuse. 4) Glissez le contrôleur sous la platine radio et connectez le au moteur. Insert the ESC below the radio tray and connect the motor. Notice Ecotop - Page 22 - Wind of Change...
- Page 23 RECEPTEUR RECEIVER Le nombre de servos installés sur le Wind of Change peut entraîner une consommation trop élevée pour le sytème BEC intégré au contrôleur. Nous recommandons d'alimenter le récepteur et les servos par un régulateur de tension. Nous présentons ici le SVR5 XPower.
- Page 24 The LiPo battery pack is secured with two Velcro ties (delivered with the kit). You can also add adhesive velcro strips on the tray and to the battery pack, to prevent any movement of the battery pack. Notice Ecotop - Page 24 - Wind of Change...
- Page 25 également un impact important sur la compensation de profondeur liée. Il convient à chaque modéliste d’adapter ces réglages conseillés à ses propres habitudes et convenances. Notice Ecotop - Page 25 - Wind of Change...
- Page 26 16 mm down) if your Tx can do that. Note : Les débattements sont mesurés au plus large de chaque gouverne. Note : Throws are measured at the widest part of each surface. Notice Ecotop - Page 26 - Wind of Change...
- Page 27 La plage de vitesse de ce planeur est très étendue. Le grand bras de levier arrière rend le Wind of Change très stable en tangage et en lacet.
- Page 28 à la section Bons vols… DOC-NOTICE. Good flights… Internet construction guide in color ! : The manual is downloadable on our website on the product page, section DOCUMENTATION. NOTES Notice Ecotop - Page 28 - Wind of Change...
Need help?
Do you have a question about the WIND OF CHANGE and is the answer not in the manual?
Questions and answers