Table of Contents
Advertisement
Available languages
Available languages
Quick Links
Advertisement
Table of Contents

Related Manuals for Romedis Symphonie Aqua System VC


Summary of Contents for Romedis Symphonie Aqua System VC
- Page 1 Gebrauchsanleitung | Instructions for use...
- Page 3 GEBRAUCHSANLEITUNG INSTRUCTIONS FOR USE...
-
Page 5: Table Of Contents
GEBRAUCHSANLEITUNG Sicherheitshinweise und Vorsichtsmaßnahmen ......Wichtige Bauteile ............Beschriftung des Gerätes . -
Page 7: Gebrauchsanleitung Ger
GEBRAUCHSANLEITUNG Sehr geehrter Symphonie Aqua-Anwender, vielen Dank, dass Sie sich für das Symphonie Aqua System VC entschieden haben. Dieses innovative Abdrucksystem wurde für die Orthopädietechnik entwickelt und gefertigt. Umfangreiche Qualitätssicherung, Dokumentation, sowie engmaschige Tests zur Sicherstellung der fehlerfreien Fertigung unserer Artikel, sind grundlegend für Qualitätsprodukte der Firma Romedis GmbH. -
Page 9: Sicherheitshinweise Und Vorsichtsmaßnahmen
Stumpfes für das Symphonie Aqua den korrekten Einsatz des Symphonie System VC beträgt max. 58cm. Das Aqua Systems VC, dessen Inbetrieb- Symphonie Aqua System VC ist für das nahme, Wartung und Reinigung. maximale Körpergewicht von 170kg frei- gegeben. Der Benutzer ist verantwort- HINWEISE ·... -
Page 10: Wichtige Bauteile
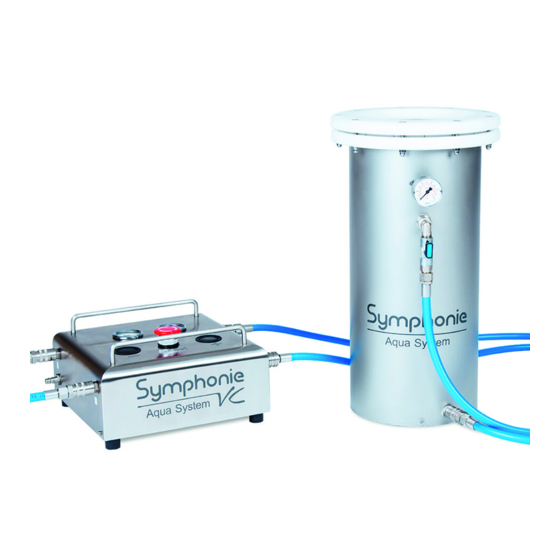
2. Wichtige Bauteile Das Symphonie Aqua System VC besteht aus: Verbindung für Schlauch (Nr. 1), Wasserzulauf Anschluss für Schlauch (Nr. 2), genereller Schlauch-Anschluss 3. Verbindung für Schlauch (Nr. 3), Wasserablauf Anschluss Symphonie Aqua (Nr. 4) 5. Anschluss für Druckluftschlauch max. 6 bar (87,02 psi ) 6. - Page 12 Höhenausgleichsscheiben Aufnahmeteller mit distalem 14.1 4 Größe S (3 cm) Entlastungskissen 14.2 2 Größe L (6 cm) 15.1 10 cm Durchmesser, Höhe 8 cm 14.3 Distale Endkappe ( 7cm) 15.2 12 cm Durchmesser, Höhe 8 cm 15.3 14 cm Durchmesser, Höhe 8 cm 15.4 16 cm Durchmesser, Höhe 8 cm 14.1 14.3...
-
Page 13: Beschriftung Des Gerätes
Symphonie Aqua VC Steuerungskasten 18.1 Druckmanometer/Druck im Zylinder 18.2 Unterdruckmanometer/ 18.1 18.2 Druck im Steuerungskasten Max. 1 bar (14,5038 psi ) 18.3 – Taste zur Druckverminderung 18.3 18.4 18.4 + Taste zur Druckerhöhung 18.5 Reset Taste, Pumpe ein 18.5 3. Beschriftung des Gerätes Venting - Entlüftung Nur zur Entlüftung nach Befüllung, laut Anleitung. -
Page 14: Vorbereitung
5. Vorbereitung Abb. 3 Bei Lieferung sind alle Komponenten des Systems fertig montiert und auf Dichtigkeit geprüft. Vor Inbetriebnahme Verbinden Sie Schlauch (3) für den des Systems verbinden Sie den VC Steu- Wasserablauf mit dem hauseigenen erungskasten mit den 4 Schläuchen. Wasserablauf (Abb. - Page 15 Entfernen Sie die Entlüftungsschraube Nach der Befüllung bitte das erhöhte (Abb. 6) und öffnen Sie anschließend Gewicht des Zylinders beachten (ca. 30 kg). den Sperrhahn (Abb 7). Nachdem der Behälter gefüllt ist: · Verschließen Sie die Entlüftungsöff- nung wieder (Abb. 9), Abb.
-
Page 16: Verwendung
6. Verwendung Bitte prüfen Sie vor jedem Gebrauch den einwandfreien Zustand der Silikon- membran (Abb. 12). Sicherheitshinweise: Nicht während des Gipsabdrucks entfernen!! Membran nach jeder Anwendung säu- bern. Reinigungshinweise beachten! Keine scharfen, säurehaltigen Reiniger verwenden! Abb. 12 Um einen korrekten Abdruck herzustel- Prüfen Sie den sicheren Stand des len, benötigen Sie: Patienten, sowie des Zylinders, ggf. - Page 17 · sowie die Athletik des Patienten messen Sie zunächst vom distalen Stumpf- (1=unsportlich – 4=sportlich) (Abb. 14) ende bis zur gewünschten Schafthöhe und errechnen die Differenz zur Gesamt- länge der Höhenausgleichsscheibe, begin- nen Sie immer mit der distalen Endkappe. (Abb. 16) Abb.
- Page 18 mittig in den Zylinder. (Abb. 19) Befüllen Sie nun das System bis zum distalen Abb. 19a Abb. 20 a Abb. 19b Entlastungskissen mit Wasser „+ Taste “. Um die Haftreibung der Membran zu vermeiden, fetten Sie die Membran oberhalb des distalen Entlastungskis- sen mit Gipsisoliercreme ein.
- Page 19 Der Patient kann nun stehend seinen des Gipsabdrucks. Je nach Art der ver- Stumpf mittig in die Öffnung des Zy- wendeten Gipsbinden warten Sie die linders einbringen, so dass er leichten übliche Aushärtezeit im völlig belasteten Kontakt mit dem distalen Belastungs- und statischen Zustand ab.
-
Page 20: Symphonie Vc-App
7. Symphonie VC-App Symphonie VC ist eine kostenlose Parameter, den empfohlenen Druck in Orthopädie-App der Romedis GmbH. der Symphonie VC - App berechnen: Sie dient dem/der Orthopädietechnik- · Das Gewicht des Patienten in Kilogramm Mechaniker/in zur Berechnung des · Den Umfang des Stumpfes am MPT... -
Page 21: Wartungs- Und Pflegehinweise
Für Personen- und Sachschäden, die oder Reparatur Kontakt mit dem Ver- durch eine unsachgemäße Verwendung trieb oder Hersteller auf. entstehen, schließt die Romedis GmbH jede Haftung aus. Wenn Sie Fragen zum Symphonie Das Gerät ist ausschließlich für die Aqua System VC haben, können Sie Orthopädietechnik, zur Herstellung... -
Page 23: Instructions For Use Eng
Thank you for choosing the Symphonie Aqua System VC. This innovative impression system was developed and produced for orthopaedic technology. The quality products from the Romedis GmbH undergo extensive quality assurance and documentation, as well as close-meshed tests in order to ensure flawless production. -
Page 25: Safety Instructions And Preventive Measures
Symphonie Symphonie Aqua System VC is 58cm. Aqua System VC. The approved, maximal bodyweight for the Symphonie Aqua System VC is NOTE 170kg. The user is responsible for the · Read the instructions for use carefully and completely. -
Page 26: Important Components
2. Important Components The Symphonie Aqua System VC consists of: hose connector (letter 1), water intake attachment for hose (letter 2), general hose mounting 3. hose connector (letter 3), water drain attachment Symphonie Aqua (letter 4) 5. attachment for compressed-air hose max. - Page 28 height adjusting discs cushion case 14.1 4 sized S (3 cm) 15.1 Ø 10 cm, height 8 cm 14.2 2 sized L (6 cm) 15.2 Ø 12 cm, height 8 cm 14.3 distal endcap ( 7cm) 15.3 Ø 14 cm, height 8 cm 15.4 Ø...
-
Page 29: Labelling On The Device
Symphonie Aqua VC control unit box 18.1 pressure manometer/ pressure in cylinder 18.1 18.2 18.2 negative pressure manometer/ pressure in cylinder Max. 1 bar (14,5038 psi ) 18.3 18.4 18.3 – button for decompression 18.4 + button for increase of pressure 18.5 18.5 reset button, pump on 3. -
Page 30: Preparation
5. Preparation (The water pressure must have a level of at least 2 bar or 29 psi.) When delivered, all system components are fully assembled and inspected for impermeability. Before operating the Fig. 3 system, connect the VC unit control box with the 4 hoses. - Page 31 Remove venting screw (Fig. 6) and After filling, be aware of the increased then open the stopcock (Fig. 7). weight of the cylinder (approximately 30 kg). After the container has been filled: · close the venting screw again (Fig. 9), Fig.
-
Page 32: Application
6. Application Please make sure that the silicone mem- braneis in sound condition before each use (Fig. 12). Safety instructions: Do not leave the pa- tient unattended during the plaster im- pression process!! Clean the membrane after every applica- tion. Observe the cleaning instructions! Fig. - Page 33 ranging from 1 (unathletic) to 4 (athletic) from the distal end of the stump to the (Fig. 14). desired socket height. Calculate the dif- ference in regard to the entire length of the height-compensating discs, always beginning with the distal end cap. (Fig.
- Page 34 cylinder (photo 19). Now fill the system – up to the stump end Fig. 19a Fig. 20 a Fig. 19b bearing cushion – with water „+ button “. To avoid membrane adhesion, lubricate the membrane above the distal bearing cushion with lubricating creme. During the application of the plaster Fig.
- Page 35 Sinking too deeply into the cushion place during the forming of the plaster would considerably impair the pressure impression. The plaster hardens while distribution on the stump. the limb is in a completely weight bearing and static state. Practical tip: For bulbous stumps, use cutting aid on cast as well so that cast During the setting time, the patient can can be easily removed.
-
Page 36: Symphonie Vc-App
7. Symphonie VC-App Symphonie VC is an orthopaedic app the VC app by means of the following from the Romedis GmbH which is free parameter: of charge. It assists the orthopaedic · the patient‘s weight in kilograms technician in calculating the recommen- ·... -
Page 37: Tips For Maintenance And Care
For injury to persons and damages attached to the cylinder when starting to materials occuring from improper operation. usage, the Romedis GmbH excludes any liability. Please contact the distributor or manu- The device is solely approved for or- facturer concerning repairs or damages. - Page 38 IMPRESSUM Georg-Wiesböck-Ring 5a 83115 Neubeuern Germany Tel + 49 (0) 80 35 - 96 78 78 96 Fax + 49 (0) 80 35 - 96 78 78 97 info@romedis.com www.romedis.com CEO: Andreas Radspieler Gerichtsstand Traunstein HRB 19576 St. - Nr.:...
- Page 40 Romedis GmbH Georg-Wiesböck-Ring 5a 83115 Neubeuern Tel. + 49 (0) 80 35 - 96 78 78 96 Fax + 49 (0) 80 35 - 96 78 78 97 info@romedis.com www.romedis.com...
Need help?
Do you have a question about the Symphonie Aqua System VC and is the answer not in the manual?
Questions and answers