REMEHA Celcia 20 Quick Start-Up
Hide thumbs
Also See for Celcia 20:
- Assembly and operating manual (87 pages) ,
- Assembly instructions & user manual (24 pages) ,
- Functions (24 pages)

Related Manuals for REMEHA Celcia 20


Summary of Contents for REMEHA Celcia 20
- Page 1 Snelle start Quick start up Démarrage rapide Schnellstartanleitung Remeha Celcia 20...
-
Page 2: Table Of Contents
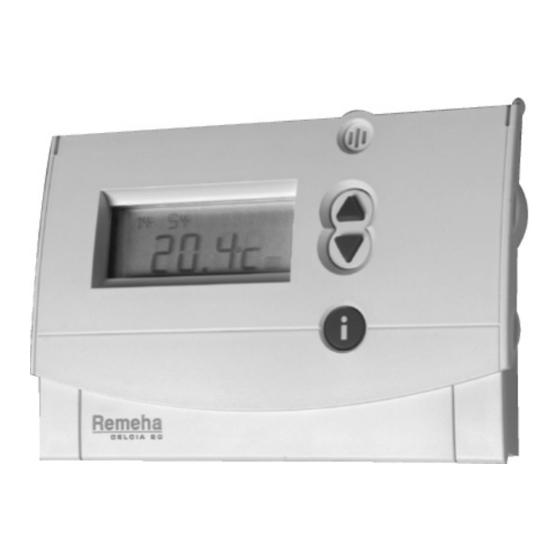
Clock program 1.2.1 Selecting the clock program 1.2.2 Programming Operating of a modulating boiler compared with that of an “on/off” boiler REMEHA CELCIA 20 À DÉMARRAGE RAPIDE Première mise en marche Programme de l’horloge 1.2.1 Réglage du programme de l’horloge 1.2.2 Programmation Comparaison entre une chaudière modulante et une chaudière «... - Page 3 SNELLE START REMEHA CELCIA 20 Met deze beknopte handleiding kunt u snel de eerste keer uw Remeha Celcia 20 in gebruik nemen en uw eigen klokprogramma invoeren. Display Plus/Min De knoppen die u nodig heeft bij het programmeren Draaiknop Escape De regelaar afb.
-
Page 4: Eerste Ingebruikname
1.2.1 Bepalen van het klokprogramma Om uw Celcia 20 overzichtelijk te programmeren is het van belang dat u als eerste de tabel voor het klokprogramma invult. Tip: gebruik in eerste instantie de blokken “MA-VR” en “ZA-ZO” en zet de uitzonderin- gen, als u die heeft, aan het eind van de reeks (zie tip op pagina 8). - Page 5 Schakel- MA-VR ZA-ZO MA WO DO Tijd- Temp punt stip 7:30 9:00 6:30 Vul nu uw eigen klokprogramma in: Schakel- MA-VR ZA-ZO MA WO DO Tijd- Temp punt stip...
-
Page 6: Programmeren
Remeha Celcia 20 1.2.2 Programmeren Als u het klokprogramma naar tevredenheid hebt ingevuld kunt u beginnen met het programmeren van de Celcia 20. Stap Actie Display P R O G P R O G P A R T Y P A R T Y Zet de draaiknop op “MENU”... - Page 7 P R O G P R O G P A R T Y P A R T Y E C O E C O afb. 07 115817LTALCEL007 P R O G P R O G P A R T Y P A R T Y E C O E C O...
- Page 8 Voer het nieuwe schakelpunt als “NIEUW PUNT” in volgens het schema op de vorige pagina U hebt nu uw Celcia 20 ingesteld. Zet na het instellen de draaiknop op om het programma in gebruik te nemen. Voor meer functies kunt u de uitgebreide handleiding...
-
Page 9: Werking Modulerende Ketel Ten Opzichte Van Een Aan/Uit Ketel
Werking modulerende ketel ten opzichte van een aan/uit ketel Tijd Aan / Uit ketel Modulerende ketel afb. 15 115817LTALCEL015 • In de grafiek is te zien hoe een modulerende ketel werkt. De ketel brand langer op een lager vermogen. Op deze manier blijven de temperaturen gelijkmatiger. Een niet-modulerende ketel(aan/uit) brand alleen op vol vermogen en schakelt daarna weer uit. -
Page 10: Quick Startup Remeha Celcia 20
Remeha Celcia 20 QUICK STARTUP REMEHA CELCIA 20 This document is designed to help you quickly put your Remeha Celcia 20 into operation for the first time and enter your own clock program. Display Plus/Min The buttons you will need for programming. -
Page 11: Initial Start Up
1.2.1 Selecting the clock program To program your Celcia 20 properly, it is important that you first complete the table for the clock program. Tip: to begin with, use the periods “MO-FR” and “SA-SU” and set the exceptions, if there are any, at the end of the series (see tip on page 15). - Page 12 Remeha Celcia 20 Switch MO-FR SA-SU MO TU WE TU Time Temp point 7:30 9:00 6:30 Now enter your own program: Switch MO-FR SA-SU MO TU WE TU Time Temp point...
-
Page 13: Programming
1.2.2 Programming Once you have completed the table to your satisfaction, you can then begin program- ming the Celcia 20. Step Action Display P R O G P R O G Turn the rotary knob to “MENU” P A R T Y... - Page 14 Remeha Celcia 20 P R O G P R O G P A R T Y P A R T Y E C O E C O fig. 07 115817LTGBCEL007 P R O G P R O G P A R T Y...
- Page 15 Enter the new switch point as “NEW POINT” according to the instructions on the previous page You have now set your new Celcia 20. After setting the device, turn the rotary knob to to activate the program. For more functions, please consult the full manual.
-
Page 16: Operating Of A Modulating Boiler Compared With That Of An "On/Off" Boiler
Remeha Celcia 20 Operating of a modulating boiler compared with that of an “on/off” boiler Time On/off boiler Modulating boiler fig. 15 115817LTGBCEL015 • The graph shows how a modulating boiler works. The boiler burns for longer on a lower heat output. This enables temperatures to remain more uniform. -
Page 17: Remeha Celcia 20 À Démarrage Rapide
REMEHA CELCIA 20 À DÉMARRAGE RAPIDE Cette fiche vous permet d’utiliser rapidement votre Remeha Celcia 20 et d’entrer vos propres réglages du programme de l’horloge. Affichage Plus / moins Boutons nécessaires pour la programmation Bouton rotatif Escape Le régulateur fig. 01 115817LTFRCEL001... -
Page 18: Première Mise En Marche
1.2.1 Réglage du programme de l’horloge Pour programmer votre Celcia 20 de manière précise, il est important que vous remplissiez d’abord le tableau du programme de l’horloge. Conseil : utilisez en priorité les plages «LU-VE» et «SA-DI» et définissez les exceptions, s’il y en a, à... - Page 19 Point de LU-VE SA-DI MA ME Temp commu- ment tation 7:30 9:00 6:30 Introduisez à présent votre propre programme d’horloge. Point de LU-VE SA-DI MA ME Temp commu- ment tation...
-
Page 20: Programmation
Remeha Celcia 20 1.2.2 Programmation Une fois que vous avez entré le programme de l’horloge comme vous le souhaitez, vous pouvez démarrer la programmation du Celcia 20. Stap Actie Display P R O G P R O G Mettez le bouton rotatif sur «MENU»... - Page 21 P R O G P R O G P A R T Y P A R T Y E C O E C O fig. 07 115817LTFRCEL007 P R O G P R O G P A R T Y P A R T Y E C O E C O...
- Page 22 Mettez le nouveau point de commutation sur «CREER POINT» en suivant le schéma de la page précédente Le réglage de votre Celcia 20 est terminé. Après le réglage, positionnez le bouton rotatif pour activer le programme. Pour d’autres fonctions, veuillez consulter le manuel...
-
Page 23: Comparaison Entre Une Chaudière Modulante Et Une Chaudière " Marche/Arrêt
Comparaison entre une chaudière modulante et une chaudière « marche/arrêt » Heure Chaudière marche / arrêt Chaudière modulante fig. 15 115817LTFRCEL015 • Le graphique montre le fonctionnement d'une chaudière modulante. La chaudière fonctionne plus longtemps à une puissance moins élevée. Cela permet de garder une température régulière. -
Page 24: Schnellstartanleitung Remeha Celcia 20
Remeha Celcia 20 SCHNELLSTARTANLEITUNG REMEHA CELCIA 20 Mit dieser Anleitung können Sie den Remeha Celcia 20 schnell für die erste Inbetrieb- nahme einrichten und Ihr eigenes Zeitschaltprogramm speichern. Display Pfeiltasten Diese Tasten benötigen Sie bei der Programmierung. Drehknopf Escape Der Regler... -
Page 25: Erste Inbetriebnahme
Tipp; ECO TEMP = Energiesparmodus 1.2.1 Definieren des Zeitschaltprogramms Für eine übersichtliche Programmierung des Celcia 20 empfiehlt es sich, zuerst die Tabelle für das Zeitschaltprogramm auszufüllen. Tipp: Verwenden Sie im ersten Schritt die Zeiträume „MO - FR“ und „SA - SO“, und führen Sie eventuelle Ausnahmen im Anschluss an die regelmäßigen Intervalle auf (s. - Page 26 Remeha Celcia 20 Beispiel: Sie möchten, dass die Temperatur von montags bis freitags um 7:30 Uhr 19 ºC (TEMP-2) beträgt. Um 9:00 Uhr verlassen Sie das Haus, somit soll ab dann der Ener- giesparmodus ECO-TEMP gelten. Donnerstags aber soll die Temperatur schon um 6:30 Uhr 19 ºC (TEMP-2) betragen.
-
Page 27: Programmierung
1.2.2 Programmierung Wenn Sie Ihr Zeitschaltprogramm wie gewünscht aufgestellt haben, können Sie den Celcia 20 jetzt entsprechend programmieren. Schritt Massnahme Displayanzeige P R O G P R O G Stellen Sie den Drehknopf auf „MENÜ“. P A R T Y... - Page 28 Remeha Celcia 20 P R O G P R O G P A R T Y P A R T Y E C O E C O Bild 07 115817LTDECEL007 P R O G P R O G P A R T Y...
- Page 29 7. Wenn im Display „NEUER PUNKT“ angezeigt wird, legen Sie den neuen Zeitschalt- punkt fest, wie auf der vorherigen Seite beschrieben. Der Celcia 20 ist damit programmiert. Stellen Sie den Drehknopf nach der Programmie- rung auf , um das Programm zu aktivieren. Informationen zu weiteren Funktionen...
- Page 30 Remeha Celcia 20 Arbeitsweise eines modulierenden Kessels gegenüber einem Einstufiger Kessel Heure Chaudière marche / arrêt Chaudière modulante Bild 15 115817LTDECEL015 • Aus der Grafik geht die Arbeitsweise eines modulierenden Kessels hervor. Der Kessel brennt länger und mit geringerer Leistung. Auf diese Weise bleiben die Temperaturen auf einem gleichmäßigen Niveau.
- Page 32 Remeha B.V. Postbus 32 7300 AA APELDOORN © Copyright Tel: +31 55 5496969 Niets uit deze uitgave mag worden verveelvoudigd en/of openbaar gemaakt Fax: +31 55 5496496 worden op welke wijze dan ook, zonder onze schriftelijke toestemming. Internet: nl.remeha.com Wijzigingen voorbehouden.
Need help?
Do you have a question about the Celcia 20 and is the answer not in the manual?
Questions and answers