Table of Contents
Advertisement
Quick Links
Advertisement
Table of Contents

Related Manuals for Datalogic Rhino II A6


Summary of Contents for Datalogic Rhino II A6
- Page 1 Rhino™ II A6 with Android™ Rugged Vehicle Mount Computer User’s Manual...
- Page 2 Datalogic publications, please let us know via the "Contact Datalogic" page Disclaimer Datalogic has taken reasonable measures to provide information in this manual that is complete and accurate, however, Datalogic reserves the right to change any specification at any time without prior notice. Datalogic and the Datalogic logo are registered trademarks of Datalogic S.p.A.
-
Page 3: Table Of Contents
Table of Contents Introduction ............... 1 Conventions ..................1 Product Presentation ..............2 Available Models ................3 Out of the Box ................4 General View .................5 Front View ................5 Back View ................6 Bottom View .................7 Accessories ...................8 Getting Started ..............9 Power Connection ................9 Fasten the Cables .............. - Page 4 Mode 1 (default) ..............19 Mode 0 .................19 Mode 3 .................20 Power off countdown ............20 Configuration ..............20 Front Panel Keys ................22 Configuration ..............22 Screen Blanking ................25 Configuration ..............25 Automatic Brightness Control ..........26 Temperature Sensor ..............28 Upgrading the Rhino II Android Firmware .......29 Local Upgrade ..............29 Applications ..............
- Page 5 Technical Features ............45 Technical Data ................45 Troubleshooting the Rhino II ........49 Problems While Operating the Rhino II ........49 Problems with Wireless Connectivity ........50 Maintenance ..............53 Cleaning the Device ..............53 Ergonomic Recommendations ..........53 Safety and Regulatory Information......
- Page 6 NOTES Rhino™ II...
-
Page 7: Introduction
Introduction Conventions This manual uses the following conventions: "Mobile computer", "Vehicle Mount Computer", "VMC" and "Rhino II" refer to Rhino II vehicle mount computer. The label artworks may be only a draft. Refer to the product labels for more precise information. User’s Manual... -
Page 8: Product Presentation
Adding a handheld bar code scanner such as Datalogic’s PowerScan™ allows for quick data entry and location confirmations. The Rhino vehicle computer is equipped with an internal isolated... -
Page 9: Available Models
Screen sizes: 10" and 12" • Freezer Model (WEC7 10" only) For further details about the Rhino II models refer to the web site: http://www.datalogic.com. The currently available models are: • 943200009 10" Rhino II Android 7.1 12-48 VDC •... -
Page 10: Out Of The Box
Introduction Out of the Box The Rhino II package contains: • Rhino II vehicle mount computer. • Power cable (2.9m ≈ 9.5'). • Bag: 4 mounting screws and washers for use with RAM mounts. • Bag: rubber cable slot seals and cable ties. •... -
Page 11: General View
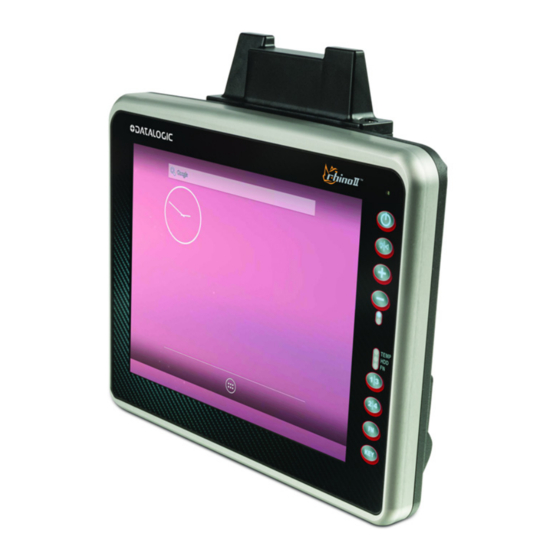
Introduction General View Front View Manual Screen Blank Mode Brightness/Volume Control 4 Programmable Keys Home Function Capacitive Touch Display 3 mm non-reflecting armored glass User’s Manual... -
Page 12: Back View
Introduction Back View VESA 75 Mounts Rhino™ II... -
Page 13: Bottom View
Introduction Bottom View Ethernet RJ45 10/100/1000 Mbps Fuse Not usable 1 x USB 2.0 (top) Power on Android 1 x USB 3.0 (bottom) Connection Models Serial Ports Speaker Jack COM1 – 5V pin 9 COM2 – 12V pin 9 User’s Manual... -
Page 14: Accessories
94ACC0165 DC Power Cable, 2.9M 94ACC0041 External 72-80 VDC Voltage Converter Use only a Datalogic approved power supply and cables. Use of an alternative power supply will invalidate any approval given to this device and may be dangerous. CAUTION Rhino™ II... -
Page 15: Getting Started
Getting Started Power Connection The internal power supply 12-48VDC is electrically isolated. The wires are already connected to the provided cable. The wires of the 3-pole input connector must be connected to DC Plus, DC minus and ignition. The ground wire (yellow - green) inside the cable must be connected to the ground contact. -
Page 16: Fasten The Cables
Getting Started Fasten the Cables There are three different types of gaskets. Choose the right one according to the size of the cable. Type 1: e.g. USB cable Type 2: e.g. power cable Type 3: no cable Type 1 and Type 2: cut the cable at its thinnest point (see the left picture below). - Page 17 Getting Started The cable cover is mounted in 3 steps: 1. Place the cable cover at an angle and slide it into the groove provided. 2. Push the cable cover downwards (ensure it doesn't slip out of the groove). 3. Fix with the screws provided. User’s Manual...
-
Page 18: Power On
Getting Started Power On Connect a power source to the Rhino II and press and hold the power button for a few seconds to start the device. To shutdown the device, press and hold the power button for a few seconds. -
Page 19: Desktop Window
Getting Started Desktop Window As soon as the mobile computer is on, the Android 7.1 desktop appears on the screen. Wait a few seconds before starting any activity, so that the mobile computer completes its startup procedure. All Apps Button Home Button Recent Apps Button Back Button... -
Page 20: All Apps Window
Getting Started All Apps Window Rhino™ II... -
Page 21: Adjusting The Screen Brightness
Getting Started Adjusting the Screen Brightness To adjust the screen brightness: • Ensure the Automatic Brightness Control is disabled. • Press the + button to increase the brightness. • Press the - button to decrease the brightness. Adjusting the Volume To adjust the volume, press the FN button first •... -
Page 22: Using The Accessories
Getting Started Using the Accessories Using an External Keyboard You can use many standard USB compatible keyboards. Datalogic recommends the use of a sealed/ruggedized key-board: • Sealed/rugged keyboards are available from Datalogic including: full sized QWERTY, ABCD, or mini QWERTY USB keyboards •... - Page 23 Getting Started data does not display in the application, consult the user manual for the scanner. Connecting a Serial Scanner COM1 provides 5VDC on pin 9, COM2 provides 12 VDC. Verify which voltage the scanner requires and connect to the appropriate COM port.
-
Page 24: Resetting The Terminal
Getting Started Resetting the Terminal 1. Open Settings application. 2. Tap Backup & reset. 3. Tap Factory data reset. 4. Tap RESET TABLET. LED Indicators Status Description Blue Solid FN toggled on Solid High Temperature Warning Yellow Solid HD Access Rhino™... -
Page 25: Rhino Ii Configuration
The following features can be configured by the user. To modify the default settings, create a file named UtilConfig.cfg with the new settings and copy it in "/data/datalogic" folder using adb tool. Then restart the device. When the device is reset the default configuration is restored. -
Page 26: Mode 3
Rhino II Configuration button. To shut down the VMC, disconnect IGN or press the PWR button. In Mode 0 you must use either IGN or PWR to control the VMC. You cannot use both of them. If the VMC is powered up via IGN, but powered down via PWR, it will immediately begin to power up again. - Page 27 Rhino II Configuration Key - Section name Parameter – Info Seconds after IGN disconnects before the VMC shuts IgnOffDelayTimeSec down. 30 = default. Minimum time in 10ms units for which power key DelayPowerKey must be pressed before going active. 0 = default. User’s Manual...
-
Page 28: Front Panel Keys
Rhino II Configuration Front Panel Keys The keys FN, 1/3, and KEY, on the right side of the device, are programmable. The programming is set by command lines in the "\Utilities\UtilConfig.cfg" file. are programmable as two keys each, giving a total of four available keys. - Page 29 Example: Frontkey_S1=#EXT=VK_TAB,VK_RETURN would cause the S1 key to transmit TAB followed by RETURN. Frontkey_S1=/Android/Data/Datalogic/Sample will launch the Sample program when the button 1 is pressed. The PWR button should not be reprogrammed, but this option is available if required. Set PWR to blank to let it execute Startup/Shutdown.
- Page 30 Rhino II Configuration Key - Section name Parameter – Info Control the state of the keys when function mode is OFF. 0 = default. Bit 1 (1): PWR Bit 2 (2): BL Bit 3 (4): + HWKeyLockFNOff Bit 4 (8): - Bit 5 (16): S1 Bit 6 (32): S2 Bit 7 (64): FN...
-
Page 31: Screen Blanking
COM port should be wired as input to the relay. The output from the sensor or relay should be wired to pin 1 (DCD) or pin 6 (DSR) of the selected COM port. The screen blanking cable from Datalogic (p/n 94ACC0157) is wired to pin 9 (pink) and pin 6 (grey). -
Page 32: Automatic Brightness Control
Rhino II Configuration Automatic Brightness Control The light sensor allows to automatically adjust the backlight brightness. The sensitivity of the sensor, the delay before it reacts and the brightness levels are configurable by the parameters listed below. You cannot use + and - keys to adjust brightness if automatic brightness control is enabled. - Page 33 Rhino II Configuration Key - Section name Parameter – Info Minimum light level to switch from dark to bright. 200 BrightCtrlSensorBright = default. Range 0..255 Brightness level when the backlight is switched to BrightCtrlBLDark dark. 12 = default. Range 0..255 Brightness level when the backlight is switched to BrightCtrlBLBright bright.
-
Page 34: Temperature Sensor
Rhino II Configuration Temperature Sensor Rhino II has a temperature sensor that can be enabled to switch off the VMC when the temperature exceeds the configured range. Use the parameters listed below. Key - Section name Parameter – Info [Hardware] Read cycle in seconds for temperature (T) logging when the configured range is exceeded. -
Page 35: Upgrading The Rhino Ii Android Firmware
Appendix 3 – Adb Tool Usage on page 43). In both cases, you need to download the upgrade OTA package from the Datalogic website. Local Upgrade 1. Make the OTA package accessible to the Rhino II. You have two options: a. - Page 36 Rhino II Configuration Remove the top cover to access the SD card reader slot. NOTE During the update, if the UPS Battery Board is installed, ensure that the battery level is at least 20%. NOTE Rhino™ II...
-
Page 37: Applications
Only administrators can access the password protected settings to either modify lockdown configurations or exit the lockdown. A Datalogic Standard version of SureLock is preloaded on the Rhino II. You have the option to upgrade to the Advanced version by contacting 42Gears: http://www.42gears.com/contact.html. -
Page 38: Surefox
SureFox will then block all other websites and allow the users to browse the allowed websites in locked down kiosk mode. A Datalogic Standard version of SureFox is preloaded on the Rhino II. You have the option to upgrade to the Advanced version by contacting 42Gears: http://www.42gears.com/contact.html. -
Page 39: Communications
Communications Setting Up Ethernet Communications Ethernet communications usually require special configuration. The Rhino II default settings are configured to use DHCP to automatically get an IP address from a DHCP server. To use a Static configuration: 1. Open the Ethernet application. 2. -
Page 40: Check Ethernet Communications
Communications Check Ethernet Communications 1. Open the Ethernet application. 2. Tap Check Ethernet. Connection information will be displayed on the top right corner of the screen. Setting Up 802.11 Radio Communications The Rhino II has an internal 802.11 a/b/g/n 2x2 MIMO radio module. 1. -
Page 41: Setting Up Bluetooth Radio Communications
Communications Setting Up Bluetooth Radio Communications The Rhino II has an on board Bluetooth module compatible with Bluetooth 4.0 specification. Turn Bluetooth on: 1. Open Settings. 2. Tap Bluetooth. 3. Turn on the Bluetooth toggle. Before you can connect to a Bluetooth accessory, you must pair it: 1. -
Page 42: Wireless And Radio Frequencies Warnings
WARNING Most modern electronic equipment is shielded from RF signals. However, certain electronic equipment may not be shielded against the RF signals generated by Rhino II. Datalogic recommends persons with pacemakers or other medical devices follow same... - Page 43 Communications In case of doubt concerning the use of wireless devices with an implanted medical device, contact your doctor. Turn this device OFF in health care facilities when any WARNING regulations posted in these areas instruct you to do so. Hospitals or health care facilities may use equipment that could be sensitive to external RF energy.
- Page 44 Communications Do not store or carry flammable liquids, explosive gases or materials with the device or its parts or accessories. Areas with a potentially explosive atmosphere are WARNING often, but not always, clearly marked or shown. Sparks in such areas could cause an explosion or fire, resulting in injury or even death.
-
Page 45: Appendix 1 - Utilconfig.cfg File Format
Appendix 1 - UtilConfig.cfg File Format Keywords (Properties) The basic element contained in the CFG file is the keyword or property. Each keyword has a name and a value, delimited by an equals sign (=). The name appears to the left of the equals sign. The key cannot contain the characters equal sign (=) or the semi colon (;), as these are reserved characters. -
Page 46: Comments
Appendix 1 - UtilConfig.cfg File Format Comments Semicolons (;) at the beginning of the line indicate a comment. Comment lines are ignored. ; comment text Section and property names are not case sensitive. NOTE Rhino™ II... -
Page 47: Appendix 2 - Virtual Keycodes Reference
Appendix 2 - Virtual Keycodes Reference VK_RETURN VK_F1 VK_ESCAPE VK_F2 VK_BACK VK_F3 VK_DELETE VK_F4 VK_TAB VK_F5 VK_SPACE VK_F6 VK_F7 VK_INSERT VK_F8 VK_CAPITAL VK_F9 VK_LCONTROL VK_F10 VK_RCONTROL VK_F11 VK_LSHIFT VK_F12 VK_RSHIFT VK_LMENU VK_UP VK_HOMEPAGE VK_DOWN VK_POWER VK_LEFT VK_VOLUME_UP VK_RIGHT VK_VOLUME_DOWN VK_HOME VK_END VK_PRIOR VK_NEXT... - Page 48 Appendix 2 - Virtual Keycodes Reference NOTES Rhino™ II...
-
Page 49: Appendix 3 - Adb Tool Usage
Appendix 3 – Adb Tool Usage Android Debug Bridge (adb) is a versatile command-line tool that lets you communicate with the device. The adb command facilitates a variety of device actions, such as installing and debugging applications, and it provides access to a Unix shell that you can use to run a variety of commands on a device. - Page 50 Appendix 3 – Adb Tool Usage 7. Type: adb devices The Rhino IP address is displayed. 8. From now on, you can use adb commands from your PC as described in Android documentation for app developers https://developer.android.com/docs. For more information, refer to the Android adb tool documentation: https://developer.android.com/studio/command-line/adb.
-
Page 51: Technical Features
Technical Features Technical Data Physical Characteristics Construction Coated aluminum, no fan design 10 inch: 27.8 x 22.3 x 6.4 cm / 10.9 x 8.8 x 2.5 in Dimensions 12 inch: 32.4 x 25.1 x 7.1 cm / 12.7 x 9.9 x 2.8 in 3.4 Kg / 7.5 lb (10 inch Freezer Models) Weight 3.6 Kg / 7.9 lb (10 inch Standard Models) - Page 52 Technical Features Environmental Humidity 10 to 90% at 40 ºC / 104 ºF; non-condensing Operating: -20 to 55 ºC / -4 to 131 ºF (without heater, Capacitive models); Temperature -30 to 55 ºC / -22 to 131 ºF (with heater, minimal condensation using freezer-rated model - 10”...
- Page 53 Technical Features Interfaces 1 x Ethernet 10/100/1000 Mbps; RJ45; USB: 2 x USB 2.0 Type A (bottom) Interfaces 1 x USB 2.0 Type A (top) Serial: 2 x RS-232 (bottom); COM1: 5 V on pin 9; COM2: 5/12 V on pin 9 Interface Slots 1x Mini-PCIe, half or full size slot (full size used for Wi-Fi) System...
- Page 54 Technical Features NOTES Rhino™ II...
-
Page 55: Troubleshooting The Rhino Ii
Troubleshooting the Rhino II If you send the Rhino II in for service, it is your responsibility to save the computer data and configuration. Datalogic is responsible only for ensuring that the hardware matches the original configuration when repairing or replacing the computer. -
Page 56: Problems With Wireless Connectivity
Rhino II and then turn it back on. The Rhino II appears to be locked • If the Rhino II will not reboot, contact up and you cannot enter data. Datalogic or your local Datalogic service representative for help. Problems with Wireless Connectivity Problem... - Page 57 802.11 radio. Try rebooting the Rhino II. • If you have tried these possible solutions and nothing happens, you may have a defective radio card. For help, contact Datalogic or your local Datalogic service representative. User’s Manual...
- Page 58 Troubleshooting the Rhino II NOTES Rhino™ II...
-
Page 59: Maintenance
Maintenance Cleaning the Device Periodically clean the Rhino II device using a soft cloth slightly dampened with only water or Isopropyl Alcohol (70%). Do not use any other cleaning agents (e.g. different alcohol, abrasive or corrosive products, solvents) or abrasive pads to clean the device. If the plastic areas are very dirty use only a cloth dampened with water. - Page 60 Maintenance • Reduce or eliminate direct pressure • Provide adjustable workstations • Provide adequate clearance • Provide a suitable working environment • Improve work procedures. Rhino™ II...
-
Page 61: Safety And Regulatory Information
Rhino II, disposal must be performed in compliance with the laws in force in your jurisdiction. • Do not submerge the Rhino II in liquid products. • For further information or support, refer to this manual and to the Datalogic web site: www.datalogic.com. User’s Manual... -
Page 62: Power Supply
UL Listed/CSA Certified Power Unit LPS/SELV power source which supplies power directly to the unit via the attached power connector. Any changes or modifications to equipment, not expressly approved by Datalogic could void the user's authority to operate the equipment. Rhino™ II... -
Page 63: Marking And European Economic Area (Eea)
II is in compliance with Directive 2014/53/EU. The full text of the EU declaration of conformity is available at the following internet address: www.datalogic.com. Statement of Compliance Datalogic S.r.l. tímto prohlašuje, že tento Rhino II je ve shodě se Česky základními požadavky a dalšími příslušnými ustanoveními [Czech] směrnice 2014/53/EU - 2011/65/EU. - Page 64 Ελληνική ΣΥΜΜΟΡΦΩΝΕΤΑΙ ΠΡΟΣ ΤΙΣ ΟΥΣΙΩΔΕΙΣ ΑΠΑΙΤΗΣΕΙΣ ΚΑΙ ΤΙΣ ΛΟΙΠΕΣ ΣΧΕΤΙΚΕΣ ΔΙΑΤΑΞΕΙΣ ΤΗΣ ΟΔΗΓΙΑΣ 2014/53/EU - 2011/65/EU. [Greek] Par la présente Datalogic S.r.l. déclare que l' a ppareil Rhino II est Français conforme aux exigences essentielles et aux autres dispositions [French] pertinentes de la directive 2014/53/EU - 2011/65/EU.
-
Page 65: Information For The User
Datalogic S.r.l. declara que este Rhino II está conforme com os Português requisitos essenciais e outras disposições da Directiva [Portuguese 2014/53/EU - 2011/65/EU. Datalogic S.r.l. izjavlja, da je ta Rhino II v skladu z bistvenimi Slovensko zahtevami in ostalimi relevantnimi določili direktive 2014/53/EU [Slovenian] - 2011/65/EU. -
Page 66: Fcc Id/Ic Warning
Safety and Regulatory Information FCC ID/IC Warning FCC Label Compliance Statement: This device complies with Part 15 of the FCC Rules. Operation is subject to the following two conditions: (1) this device may not cause harmful interference, and (2) this device must accept any interference received, including interference that may cause undesired operation. -
Page 67: Exposure To Radio Frequency Radiation
Safety and Regulatory Information Exposure to Radio Frequency Radiation This equipment complies with FCC radiation exposure limits set forth for an uncontrolled environment. This equipment should be installed and operated with minimum distance 20cm between the radiator & your body. This equipment complies with IC radiation exposure limits set forth for an uncontrolled environment. -
Page 68: Radio Technologies And Frequency Bands
Safety and Regulatory Information Radio Technologies and Frequency Bands Rhino II incorporates the following radio technologies and supports the corresponding Frequencies and Radio-Frequency transmitted power, as specified below: Max Transmission RF Module Frequency Bands Power BT/SRD 2400 - 2479 MHz 10mW WLAN 2412 - 2472 MHz... -
Page 69: Weee Compliance
For more detailed information about disposal, contact the supplier that provided you with the product in question or consult the dedicated section at the website http://www.datalogic.com. Informazione per gli utenti L’apparecchiatura che riporta il simbolo del bidone barrato deve essere smaltita, alla fine della sua vita utile, separatamente dai rifiuti urbani. - Page 70 Am Ende des Gerätelebenszyklus darf das Produkt nicht über den städtischen Hausmüll entsorgt werden. Eine entsprechende Mülltrennung ist erforderlich. Weitere Informationen zu dieser Richtlinie erhalten sie von ihrem Lieferanten über den sie das Produkt erworben haben, oder besuchen sie unsere Hompage unter http://www.datalogic.com. Rhino™ II...
-
Page 71: Support Through The Website
Support Through the Website Datalogic provides several services as well as technical support through its website. Log on to www.datalogic.com. For quick access, from the home page click on the search icon and type in the name of the product you’re looking for. This allows you access to download Data Sheets, Manuals, Software &... - Page 72 Support Through the Website NOTES Rhino™ II...
-
Page 73: Glossary
Glossary Access Point A device that provides transparent access between Ethernet wired networks and IEEE 802.11 interoperable radio-equipped mobile units. Hand-held mobile computers, PDAs or other devices equipped with radio cards, communicate with wired networks using Access Points (AP). The mobile unit (mobile computer) may roam among the APs in the same subnet while maintaining a continuous, seamless connection to the wired network. - Page 74 Glossary Binary digit. One bit is the basic unit of binary information. Generally, eight consecutive bits compose one byte of data. The pattern of 0 and 1 values within the byte determines its meaning. Bluetooth® A standard radio technology using a proprietary protocol. The onboard Bluetooth®...
- Page 75 Glossary is typically stored in the flash ROM of a hardware device. While ROM is "read-only memory," flash ROM can be erased and rewritten because it is actually a type of flash memory. Flash Memory Non-volatile memory for storing application and configuration files. Host A computer that serves other mobile computers in a network, providing services such as network control, database access, special...
- Page 76 Glossary Scanner An electronic device used to scan barcode symbols and produce a digitized pattern that corresponds to the bars and spaces of the symbol. Its three main components are: • Light source (laser or photoelectric cell) - illuminates a barcode. •...
- Page 77 Glossary internet. This gives users the mobility to move around within a local coverage area and still be connected to the network. WPAN A Wireless Personal Area Network is a personal area network - a network for interconnecting devices centered around an individual person's workspace - in which the connections are wireless.
- Page 78 ©2019 Datalogic S.p.A. and/or its affiliates. All rights reserved. Datalogic and the Datalogic logo are registered trademarks of Datalogic S.p.A. in many countries, including the U.S. and the E.U. Datalogic S.r.l. Via S. Vitalino, 13 Calderara di Reno 40012 Italy Tel.
Need help?
Do you have a question about the Rhino II A6 and is the answer not in the manual?
Questions and answers