Table of Contents

Related Manuals for Magellan 156787


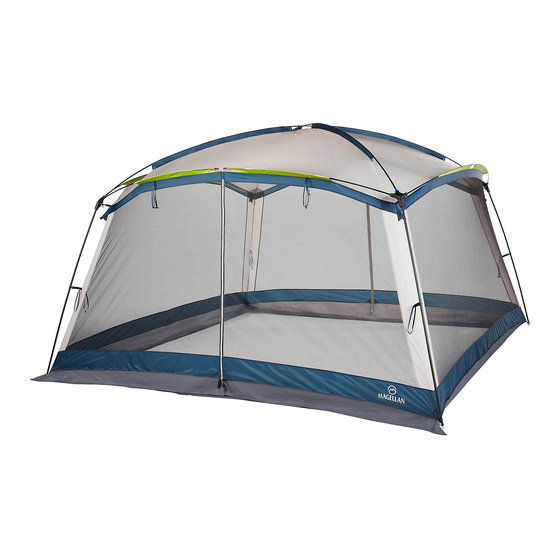
Summary of Contents for Magellan 156787
- Page 1 Instruction Manual 12X12 LIGHTED SCREEN HOUSE 156787 Please keep this instruction manual for future reference Customer Service: (888) 922-2336 7:00 am to 12:00 am CST (daily) Live Chat at: www.academy.com Email: customerservice@academy.com (Made in China)
-
Page 2: Table Of Contents
Table of Contents Warnings………………………………………………………………..…2 Tools and Parts…………………………………………………………...3 Assembly Instructions………………………………………………….4-6 Care and Maintenance……………………………………………...……7 Warranty Information………………………………………....8 Note: Before beginning assembly of product, make sure all parts are present. Compare parts with package content list and hardware contents. If any part is missing or damaged do not attempt to assemble the unit. -
Page 3: Warnings
Warnings IMPORTANT SAFETY AND TIP INFORMATION TO MAXIMIZE THE ENJOYMENT OF YOUR PRODUCT PLEASE ASSEMBLE AND USE YOUR PRODUCT AS SAFELY AS POSSIBLE. THE PURPOSE OF THE SAFETY ALERT SYMBOL IS TO CALL YOUR ATTENTION TO POSSIBLE HAZARDS RELATING TO THE USE AND ASSEMBLY OF YOUR PRODUCT. THE PURPOSE OF THE TIP SYMBOL IS TO CALL YOUR ATTENTION TO SUGGESTIONS THAT WILL ASSIST YOU IN THE ASSEMBLY/DISASSEMBLY PROCESS AND ENHANCE YOUR... -
Page 4: Tools And Parts
Parts List Part Image Tent Body Fiberglass Pole & Steel Pole set Carry bag Pole Bag Stake bag Guy rope Steel stake Lamp Remote control Page 3 of 8... -
Page 5: Assembly Instructions
Assembly Instructions Step 1: 1. Verify package contents listed on Page 3 by emptying contents of bag(s) and confirming all parts are undamaged. Tip: Do this at home prior to your first use of the product. 2. Select a smooth, level site and spread out the tent body. - Page 6 Assembly Instructions Step 3: Step 4: 1.Insert 4pc steel leg poles into the 1. Stake the tent by inserting the stakes hub with no color(B), then insert the through the pin-rings on base of the tent. pin at bottom of inner tent into the Make sure the base of the tent fully spread bottom end of leg poles(C).
- Page 7 LED Tent Light Instructions for use: 1. Remove battery cover. 2. Insert 4 x AA batteries and return battery cover. 3. Switch on the main switch to use the remote control or push button on/off. 4. Press the remote control or on/off button to go through the 3 phase lighting sequence. 5.
-
Page 8: Care And Maintenance
Care and Maintenance IMPORTANT NOTES BEFORE YOU BEGIN: • Assemble your tent before camping to become familiar with the assembly. • Setup is possible for one person, however two people are recommended. • Select a clean, level area for the campsite free of debris and sharp objects, and away from a natural watercourse. -
Page 9: Warranty Information
Warranty Information This product has been manufactured under the highest standards of quality and workmanship. We warrant to the original consumer purchaser that all aspects of this product will be free of defects in material and workmanship for one year from the date of purchase.
Need help?
Do you have a question about the 156787 and is the answer not in the manual?
Questions and answers