
Related Manuals for Wine Enthusiast 236 02 80 02


Summary of Contents for Wine Enthusiast 236 02 80 02
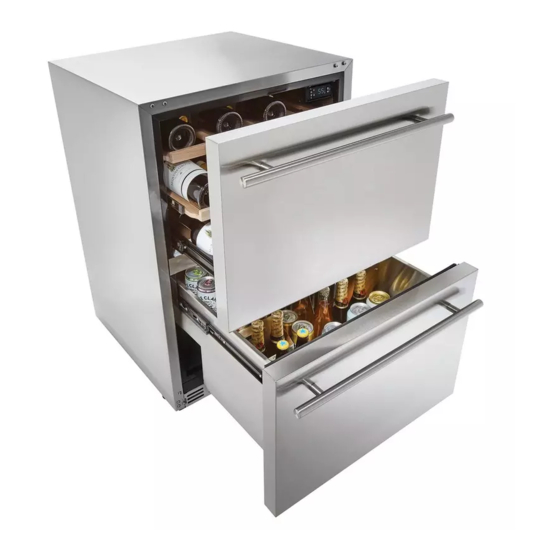
- Page 1 Indoor/Outdoor Wine & Beverage Cellar User Manual Model: 236 02 80 02 PLEASE READ THIS MANUAL CAREFULLY BEFORE INSTALLING AND OPERATING...
-
Page 2: Important Safeguards
IMPORTANT SAFEGUARDS When using this appliance, always exercise basic safety precautions, including the following: 1. Read all of the instructions before using this appliance. 2. This appliance is not intended for use by persons (including children) with reduced physical, sensory or mental capabilities, or lack of experience and knowledge, unless they have been given supervision or instruction concerning use of the appliance by a person responsible for their safety. - Page 3 Risk of child entrapment. Before you throw away your old wine cellar, take off the doors. Leave the shelves in place so that children may not easily climb inside. Thank you for using our Wine Enthusiast product. This easy-to-use manual Model number will guide you in getting the best use of your wine cellar.
-
Page 5: Electrical Requirement
Electrical Requirement • Make sure there is a suitable power Outlet (115 volts, 15 amps outlet) with proper grounding to power the wine cellar. • Avoid the use of three plug adapters or cutting off the third grounding in order to accommodate a two plug outlet. -
Page 6: Wine Cellar Features And Use
Wine Cellar Features and Use Your Wine Cellar Includes the following • Instruction manual • 2 drawer handles • 3 rolling pull-out shelves • Beverage compartment divider • 2 Anti-tip brackets Initial Setup • Before connecting the wine cellar to the power source, let it stand upright for approximately 24 hours. -
Page 7: Installing The Handle
Shelving Your cabinet was designed to store a maximum number of bottles securely. We recommend that you observe the tips below to optimize loading: • Remove tape from shelves once unit is stable and ready for bottle storage. • Make sure that the bottles are not all grouped together either at the top or bottom of the cabinet. - Page 8 Installation as a Built-In Cellar These cut out dimensions show the recommended space required for your wine cellar to perform as designed. Position the unit to allow free air flow through the front grill...
- Page 9 -Tip Bracket Installation Anti If freestanding and/or to reduce the risk of tipping the unit by abnormal usage or improper loading, it is recommended to secure by properly installing the anti-tip device included. Step 1 • An anti-tip bracket can be installed on either one or both sides •...
- Page 10 Step 2 • Lift the unit to access the underside of the rear • Use a screwdriver to remove the two small silver screws adjacent to the leveling legs (picture 3) to avoid interference between the screws and the bracket on install in Step 3 •...
-
Page 11: Operating Your Wine Cellar
Operating Your Wine Cellar The wine cellar includes an operating panel on the front of the unit. This operating panel includes several buttons, silk screen instructions, and indicator lights as detailed below: 11 10 1. Temperature increase and defrost start/stop button 2. -
Page 12: Interior Light
Setting the Temperature Control NOTE: The temperature readout shows the actual cellar temperature, it will temporarily show the set temperature while making adjustments, then reverts back to the actual temperature after 5 seconds. Make sure power cord is connected to a properly grounded outlet. Turn power ON using the power button 3. -
Page 13: Proper Wine Cellar Care And Cleaning
Temperature Settings for Serving Wine Although optimal storage temperature is generally regarded to be 53-57°F, different varietals of wine require different service temperature settings. The recommended temperature ranges for serving different varietals of wine are listed below. Your wine cellar will indicate when you have set the Upper/Lower zones to the below temperature ranges. -
Page 14: Power Interruptions
General: • Prepare a cleaning solution of 3-4 tablespoons of baking soda mixed with warm water. Use sponge or soft cloth, dampened with the cleaning solution, to wipe down your wine cellar. • Rinse with clean warm water and dry with a soft cloth. •... -
Page 15: Vacation And Moving Care
Vacation and Moving Care • For long vacations or absences, unplug the wine cellar and clean the wine cellar and door gaskets according to "General cleaning" section. Leave doors open, so air can circulate inside. • Always move the wine cellar vertically. Do not move with the unit lying down, as possible damage to the sealed system could occur. - Page 16 Wine cellar runs too frequently: • This may be normal to maintain constant temperature during high temperature and humid days. • Doors may have been opened frequently or for an extended period of time. • Clean condenser coils. • Check gasket for proper seal. •...
-
Page 17: Technical Data
Technical Data Two Drawer Wine and Beverage Cellar Model 236 02 80 02 Installation Free-Standing or Built-In Power 115V~60Hz Total Volume 5.12 CF Current 1.3 Amps Refrigerant R600a – 0.99 oz. Protection Class Climate Class Ambient Temperature 50°F to 109°F Temperature Control Range 54°... -
Page 18: Limited Warranty
All costs for labor and materials thereto shall be covered during the Limited Warranty Period. If Wine Enthusiast deems the wine cellar is not repairable, Wine Enthusiast will use the value of your original order toward a replacement; provided, however, that the purchaser will be responsible for all shipping and handling costs with respect to the replacement after the initial ninety (90) days after the date of receipt of original purchase. - Page 19 Limited Warranty. Exclusion of Certain Damages: Wine Enthusiast’s liability is limited to replacement or repair of the defective wine cellar. Wine Enthusiast shall not be liable for any damages, whether incidental, consequential or otherwise, because of any defective wine cellar.
Need help?
Do you have a question about the 236 02 80 02 and is the answer not in the manual?
Questions and answers